Showing posts with label World Map. Show all posts

Tuesday, June 6, 2017

SIP Challenge #102 Masculine Card Challenge

Hello and Happy Tuesday!   How's your week going so far?  We've had lots of rain over the weekend but at least it has cooled it off just a bit.  On Saturday, my hubby and I went to Knoxville to watch my sweet granddaughter Taylor play softball!  She is only 7 and is really doing so well.  It fun to watch how much she's progressed just over the last couple of years.  

Well since today is Tuesday, it's time for another SIP Challenge!   Today is all about Masculine Cards!  With Father's Day coming up, this should be a popular challenge! 

First of all if you know me at all, you know that I LOVE masculine cards.  I can't seem to think masculine without the tried and true, now retired sets by Stampin' Up! .... Traveler and World Map.  They are definitely two of my all time favorite stamps sets and I will never let them go! lol


I was able to purchase the coordinating dies for Traveler from Dies by Dave a while back.  I am so glad I did.  I have fussy cut this train so many times and it sure is wonderful to have the die!   For this fun card I started with an 11" x 4 1/4" piece of SU Basic Black cardstock scored at 5 1/2" for a top folding card.  I added a piece of 4" x 5 1/4" corrugated cardstock from my stash with fast fuse.  I slanted it a bit to the left side.  My top layer is a 3 3/4" x 5" piece of #80 Neenah Classic Crest Solar White cardstock.  I stamped the world map stamp with Sahara Sand SU Ink.  I used some SU Crumb Cake Ink to ink the edges.  I stamped the train with FSJ Black Licorice Ink and the suitcase with SU Soft Suede Ink.  I used the dies from Dies by Dave to cut the images out and popped them up with 3M Foam Tape.  I stamped the "Im here for you" sentiment from the SU You've Got This stamp set with FSJ Black Licorice Ink.  I added some FSJ Natural Twine and then added this layer scued to the right with Fast Fuse.  I used the edge of my scissors to add a bit of curl to my twine to finish this one off.  Simple card but super cute I think!

Thanks so much for stopping by!  Blessings, Tina

Tuesday, December 8, 2015

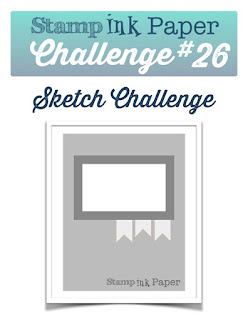
SIP #26 Sketch Challenge - Traveler

Hello and Happy Tuesday!  It's time for another SIP challenge and this week we have a fun sketch for you!  I really LOVE sketch challenges!  I usually get a feel for the stamp set I want to use the first time I look at the sketch.  Do you do that???  


This week's sketch gave me a nautical feel so I went to my "go to" stamp set, Traveler!  


I just adore this set!  My two most used stamps in it are the ship and the train but since I was feeling a little nautical, the ship it was!  lol

On this one I started with an A2  card base of Night of Navy.  My rectangle mat was Real Red that measured 3 1/2" x 2 1/2".  I stamped the World Map stamp set on Whisper White Cardstock and cut that 3 1/4" x 2 1/4" and adhered to the red layer.  My banners were cut with my banner punch out of last year's Nautical DSP.. I may be hoarding it....lol  The ship was stamped in Night of Navy onto Whisper White and fussy cut and attached with dimensionals onto the left side of the rectangle.  My "thanks" die cut was a thank you gift that I received with my first order from Taylored Expressions.  It's the first time that I've used it and I LOVE it!  I will definitely use it again!

Built for Free Using: My Stampin Blog


Thanks so much for stopping by!  Blessings!  Tina

Tuesday, August 25, 2015

SIP Challenge #11 Tic-Tac-Toe Masculine card

Hello everyone!  I am pretty pumped about this week's Stamp, Ink, Paper Challenge!  First of all I love Tic-Tac-Toe Challenges because you get so many styles, themes and looks from one Challenge. Secondly, I have been semi-addicted to the combination of the Stampin' Up! World Map and Traveler set and when I see the opportunity to make a masculine card.. well that's where I end up going!  lol
Here's the cool Tic-Tac-Toe Board to choose your 3 in a row from!

I went right down the middle row for my card with Masculine-Die Cut-Button combination!


I started out with a base of Baked Brown Sugar and layered in  Lost Lagoon and then a Watercolor Paper layer that I stamped the World Map Stamp on with Black Stazon and then watercolored.  I added some crumb cake and baked brown sugar ink to distress the map.  The train image from Traveler was stamped onto Very Vanilla cardstock with Early Espresso Ink.  It was die cut with the MFT Zig Zag Circles as well as the Baked Brown Sugar Circle.  The burlap ribbon on the left side was cut and unraveled on the sides  and had a piece of blue twine run over it with a gold button tied to the bottom where the sentiment flag was placed with a lost lagoon backing.

Now I have a question for you.  Does the layout of this card look familiar at all?  Well I used the sketch from week #9 for my design inspiration!  Yep, make sure you check out the challenges every week!  We've had some awesome sketches, color combos and inspiration photos!

Here are the Stampin' Up! Supplies that I used:
Built for Free Using: My Stampin Blog


Non-Stampin' Up! Products Used:  MFT Zig Zag Circle Dies, Blue Twine from my Stash

Thanks so much for stopping by!

Blessings!

Thursday, June 11, 2015

OSAT Blog Hop - Happy Father's Day or Masculine Card


Hello and Happy Thursday!  We've almost made it to Friday and that is always a good thing!  Since it's the 2nd Thursday of the month it's time for another One Stamp At a Time Blog Hop.  This month, it's all about Father's Day or Masculine Cards. If you have already been hopping then you should have landed from Kim Smith's Blog.  Kim is new to our Blog Hop but has some amazing work so I hope you left her some love on her page to make her feel welcome!

If you've followed me at all, you are probably not one bit surprised that I pulled out the Traveler stamp set for my masculine card.  It really is my "go to" masculine card set!


  I started with a 11" x 4 1/4" card base in Chocolate Chip.  I scored the front with my MFT stitched rectangles set.  I then cut a layer of Pool Party with a smaller stiched rectangle and dry embossed it in a woodgrain embossing folder.  I cut a piece of watercolor paper and stamped the world map onto it with Stazon Timber Brown Ink.  Once dry, I used my Aqua Markers to watercolor the map in with my Pool Party, Crumb Cake, and Old Olive Ink Pads.  Once I finished my watercoloring, I used a heat tool to dry it and then cut a stitched circle out of the Map.  I then heat embossed the sentiment from the Friendly Wishes Stamp Set with Gold embossing powder on the Map.  I glued my circle onto the lower half of the woodgrain background layer.   I stamped the train on Whisper White cardstock, fussy cut it, and adhered with dimensionals.  In the upper right corner I put a layer of burlap ribbon and a small piece of Chocolate Chip Chevron Ribbon from my huge stash.  I stapled the ribbon to the upper right of the card.  I then threaded a basic gold button with linen thread and adhered it the ribbon with glue dots.


For my second project I made a mini treat bag gift card holder.  I used a large sheet of watercolor paper and stamped the world map on it twice side by side with Stazon Timber Brown ink.  I then watercolored using my aqua painters with the same inks that I used on the map on my card.  I dried the paper off with my heat tool and then cut out the mini treat bag with my die and glued it together.  I glued a piece of burlap ribbon around the bag and stapled on a couple of pieces of Chocolate Chip Chevron ribbon and strand of linen thread to the left side of the burlap.  I heat embossed another of the sentiments from the Friendly Wishes Stamp set in gold.  I cut that out with a small stitched circle die and cut a larger stitched circle in Pool Party.  I glued the sentiment onto the blue circle and then adhered it to the burlap ribbon with glue dots.  I added a few gold Pink Posh sequins because it needed a little something :)  Oh and one of my favorite parts of this little bag is that I used My Paper Pumpkin blue tissue paper for the inside of it!   

I hope you've enjoyed our Blog Hop.  Next up is the super talented Martie Pollard's blog.  You'll love what she has for you, just click the Next button:
http://martie-pollard.squarespace.com/welcome/2015/6/9/osat-fathers-day-blog-hop


Here is a list of all of the Bloggers on the Hop:


Darla Roberts

Megan Thompson

Elizabeth Jeanne Thatcher

Wynne Grob

Debra Vance

Marisa Gunn

Holly Stene

AJ Bodine

Andrea Pancrazio

Maggie Mata

Kim Smith

Tina Riddle - That's Me :)

Martie Pollard

Diane Squires

Lori Mueller

James Weber

Ginger Pelfrey


Here are the Stampin' Up! Products Used:

Built for Free Using: My Stampin Blog


Non-Stampin' Up Products:

Pretty Pink Posh Gold Sequins
MFT Stitched Circles
Lil' Inker Stitched Rectangles


Blessings,
Tina

Monday, June 8, 2015

The Paper Players Challenge PP248 Masculine Card

Hello and Happy Monday!  I survived the day and at some point I had my doubts I would!  Why oh why are weekends not longer!

I made a card tonight for The Paper Players Challenge Blog.  To check out the challenge and link up your own card, click Here.

This was a masculine card challenge and to me that meant one thing....pull out the Traveler Stamp Set!  lol


Leave it to me to not use just one or two stamp sets.  I have a little bit of everything going on here!  I have an A2 card base of Baked Brown Sugar, a 5 3/8 x 4 1/8" layer of Pool Party, and then a 5 1/4" x 4" layer of watercolor paper.  I stamped the World Map stamp onto the Watercolor Paper with Brown Stazon Ink and then used my Aqua Painters to watercolor and distress the map.  I stamped the ship from the Traveler stamp set onto a piece of Pool Party with Memento Tuxedo Black, I then stamped the swish under it to look like Ocean Waves in Lost Lagoon.  I stamped the ship again on Whisper White and fussy cut the body of the ship and smoke stacks out and glued to the top of the ship that was stamped on Pool Party.  I cut the ship out with my MFT stitched circle dies and cut a larger circle out of Baked Brown Sugar to layer under it. I glued the blue circle to the Baked Brown Sugar circle and adhered them to my Map layer with dimensionals.  I stamped a cloud in Soft Sky from the Sprinkles of Life set and punched it out with the Tree Builder Punch and adhered it off the circle and cut the edge off at the end of the map layer.  I heat embossed the sentiment in gold on Whisper White from the You've Got This stamp set and cut a banner end on the left side.  I backed it with a layer of Baked Brown Sugar and used my Bone Folder to put a wave in it.  I adhered it to my card with dimensionals.  I stamped a suitcase from the Traveler set in Memento Tuxedo Black onto Whisper White and then fussy cut it and adhered it to the right side of the sentiment banner with dimensionals.  Whew! That was fun but I had a LOT of stamp sets out!  Oh well, that's how I roll!  lol

Here are the Stampin' Up Products I've Used:

Built for Free Using: My Stampin Blog

Non-Stampin Up Products: MFT Stitched Circles

Blessings,  Tina


Wednesday, May 6, 2015

ICS May Blog Hop Celebrate Dad


Well I have some super exciting news!  I was asked by an extremely talented group of Stampin' Up! Demonstrators to join their Inspire Create Share Monthly Blog Hop!  I am certainly honored and hope that you'll enjoy my card that is all about Celebrating Dad!

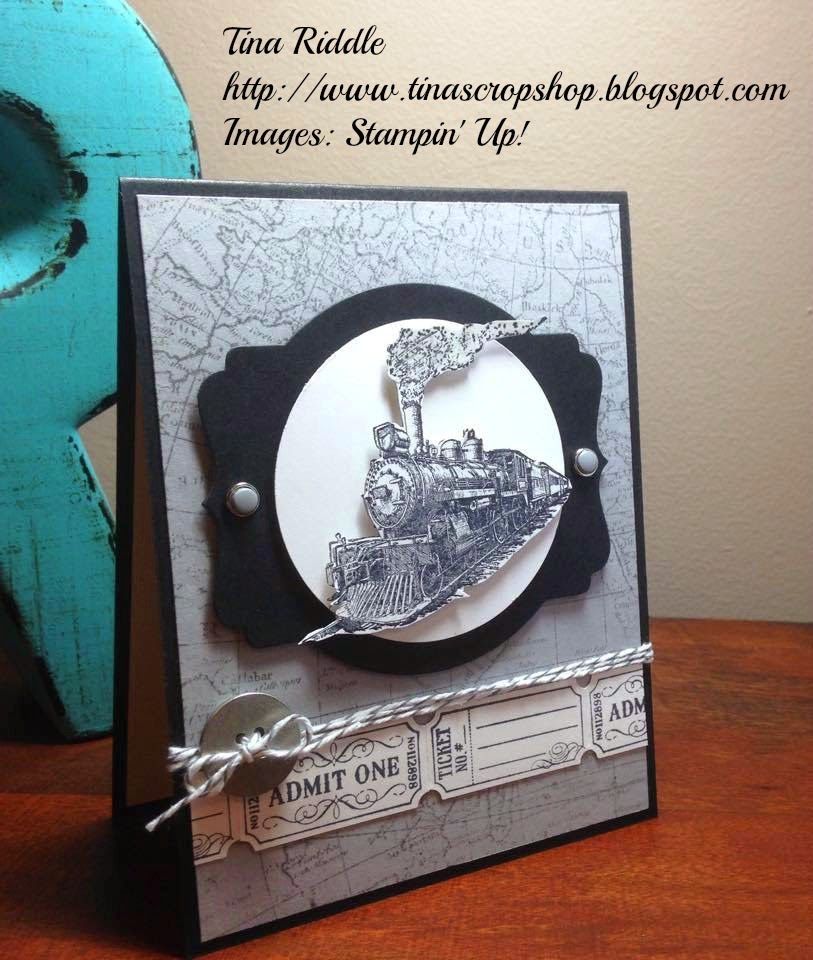
One of my favorite go-to stamp sets is "Traveler".  I just LOVE this stamp set. It is so perfect for masculine cards!  My Father's Day card is for my sweet Husband since I lost my Dad quite a few years ago.  Jeff is a wonderful husband and a great Dad to his two adult children as well as a great Step-Dad to my three adult children.  Together we have 5 granddaughters and to them he is a great Papaw!   The "Traveler" stamp that was perfect for Jeff's Father's Day card was the train stamp.  We both absolutely love trains.  About two years ago, we went through the Smoky Mountains on a train ride that was really so much fun  and we saw some of the most beautiful scenery.  For our next train ride, we plan to take a trip out West that will be a few days on a train.

Here's my card for Jeff and I hope you like the way it turned out as much as I did!


I started with a 4 1/4" x 11" card base, scored at 5 1/2" in Basic Black.  My first layer was  4" x 5 1/4" piece of Smokey Slate.  I stamped the World Map Stamp onto it with Basic Gray Ink and adhered it to the black base. I used my 2 1/2" Circle Punch to punch out a piece of Whisper White card stock and stamped the Train Image from the Traveler Set in the Circle with Memento Tuxedo Black Ink.  I glued that to a piece of Basic Black that I had cut with one of the Deco Label Framelit dies.  I then stamped the Train again on another piece of Whisper White card stock and fussy cut it and popped up over the image on the circle using Stampin' Dimensionals.  I used my Paper Piercer to punch a hole in each side of the Deco Label Framelit and Used a Candy Dot Brad with Smokey Slate Dots in each of the holes.  I used Stampin' Dimensionals to put the Deco Label Die onto my World Map layer.  I then stamped two of the ticket images twice from the That's The Ticket stamp set with Memento Tuxedo Black Ink onto Whisper White Cardstock.  I punched the tickets out with the Ticket Duo Builder Punch.  I cut a thin 4" strip of whisper white and started glueing on the tickets for my ticket border.  I adhered that to the front of my card with Tombo multi-purpose adhesive.  (Both the Ticket Duo Builder Punch and the That's The Ticket stamp set are on the retirement list so if you don't have them, you might want to try to grab them before they are gone!)  Next I ran a piece of Basic Gray twine around the front 3 times, just over the tickets, and tied them in a knot.  I used one of the Silver Basic Metal Buttons and ran the twine through the button and tied it in the front to finish off the my card front.


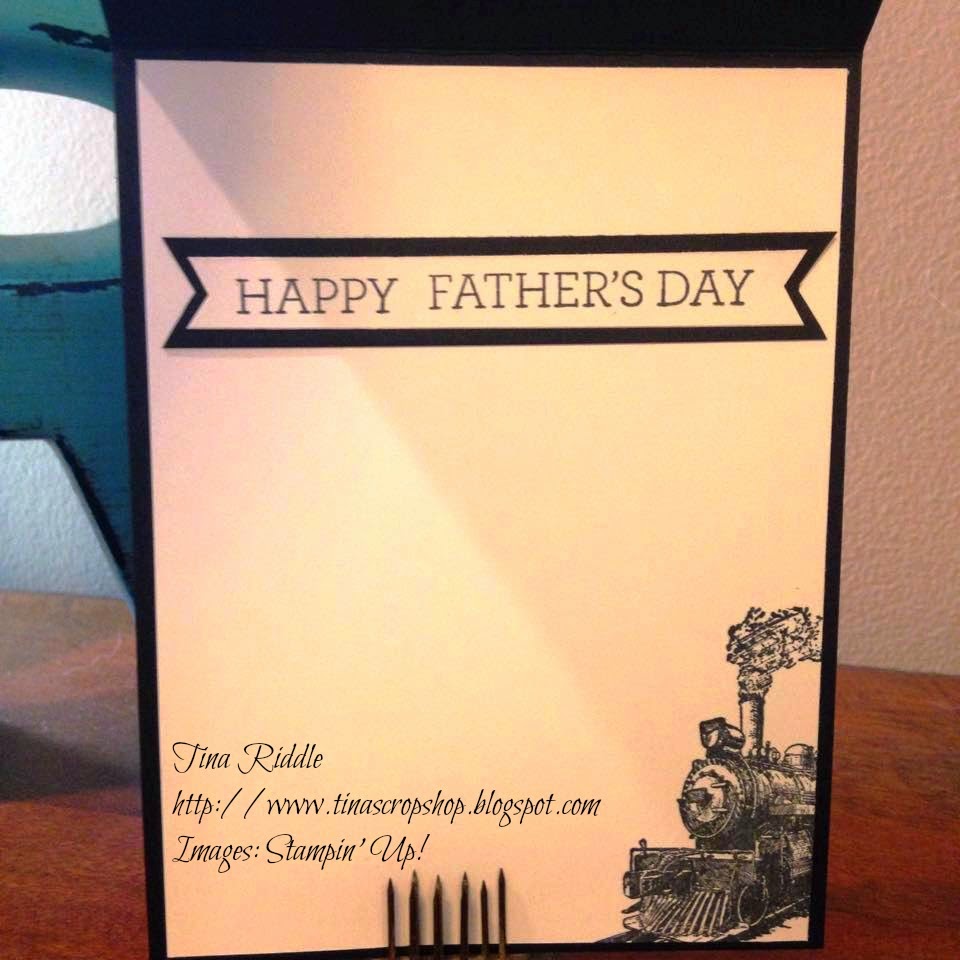
For the inside of my card I stamped the train just inside the right lower corner of a piece of 4" x 5 1/4" Whisper White card stock.  I then stamped the Happy Father's Day Sentiment from the Crazy About You Stamp Set onto a strip of Whisper White card stock.  I used my Hexagon Punch to cut a banner end on each side.  I backed it with a large piece of Basic Black cut the same way.

Please click the next button and continue on to see what the very talented Sharon Armstrong has in store for you!

Here are the Stampin' Up! products I've used on my card:

Built for Free Using: My Stampin Blog


Blessings,  Tina