Showing posts with label That's the Ticket. Show all posts

Tuesday, March 15, 2016

SIP #39 Sketch Challenge with Travler

Hello and Happy Tuesday!  I hope you are having a wonderful week!  Since it is Tuesday, it's time for another Stamp, Ink, Paper Challenge!  This week we have a fun sketch for you!


I know this is a complete shocker for anyone that knows me but this week I'm back with the Traveler set!  I know, I know, I'm obsessed with this stamp set!  Almost every sketch I look at speaks Traveler to me.  I try to fight it but I keep getting sucked into this world of trains, and ships.. oh my!  Lol  This week I paired it with the ledger stamp from The Open Sea as well as the retired stamp set.. That's the Ticket!  Here's my take on this sketch this week!


This one started with an 11" x 4 1/4" piece of Basic Black cardstock that was scored at 5 1/2".  I added a piece of 4 x 5 1/4" Basic gray cardstock that I ran through my big shot with an awesome  Darice Diamond Plate Embossing Folder.  I adhered the embossed layer with Multipurpose glue and stamped my tickets onto Very Vanilla Cardstock with Memento Tuxedo Black Ink and punched out the coordinating Ticket Duo Punch.  I glued three end to end onto the gray layer and tore the third one prior to glueing.  I stamped the ledger from The Open Sea stamp set in Memento Tuxedo Black onto a piece of 2 1/2" x  3 1/2" Smoky Slate cardstock.  After stamping, I sponged Smoky Slate ink on the edges and then crumpled it up into a ball.  Yep.. I crumpled it up!  lol  Then I opened it back up and tore away at some of the edges to distress it and then adhered it with foam tape over on the ticket strip.  I stamped the train from the Traveler set onto Very Vanilla cardstock with Memento Tuxedo black and used my Dies By Dave die to cut out the image.  I absolutely LOVE that Dave makes these dies for my favorite stamp set!  I adhered my train with more foam tape and then glued a few charcoal sequins from Pretty Pink Posh onto my card.   I decided not to use a sentiment on the outside and have stamped the "Sending Wishes Your Way" stamp from Butterfly Basics set on the inside.

Following are the Stampin' Up! Items Used:

Traveler Stamp Set
The Open Sea Stamp Set
That's the Ticket (Retired)
Ticket Duo Punch (Retired)
Memento Tuxedo Black Ink
Smoky Slate Ink
Basic Black Cardstock
Basic Gray Carstock
Smoky Slate Cardstock
Very Vanilla Cardstock
Stampin' Sponges

Non-Stampin' Up! Products:

Darice Diamond Plate Embossing Folder
Dies by Dave dies for Traveler Set
Charcoal Mini Sequins from Pretty Pink Posh
3-M Foam Tape

Thanks so much for stopping by!  Blessings, Tina

Wednesday, May 6, 2015

ICS May Blog Hop Celebrate Dad


Well I have some super exciting news!  I was asked by an extremely talented group of Stampin' Up! Demonstrators to join their Inspire Create Share Monthly Blog Hop!  I am certainly honored and hope that you'll enjoy my card that is all about Celebrating Dad!

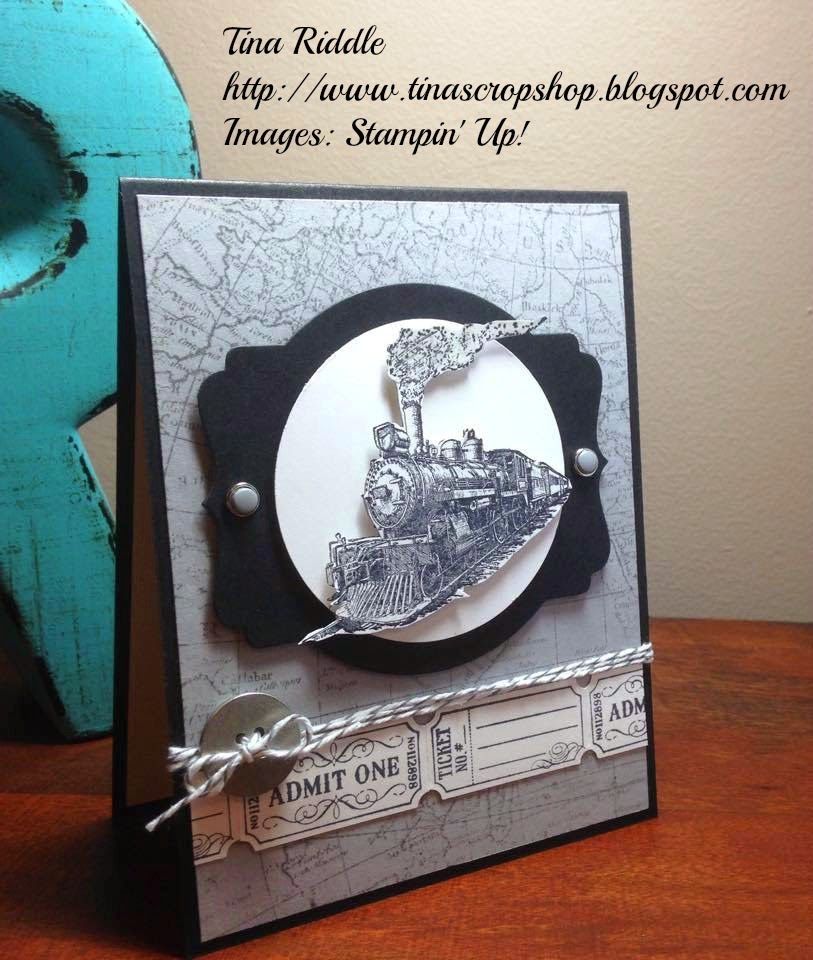
One of my favorite go-to stamp sets is "Traveler".  I just LOVE this stamp set. It is so perfect for masculine cards!  My Father's Day card is for my sweet Husband since I lost my Dad quite a few years ago.  Jeff is a wonderful husband and a great Dad to his two adult children as well as a great Step-Dad to my three adult children.  Together we have 5 granddaughters and to them he is a great Papaw!   The "Traveler" stamp that was perfect for Jeff's Father's Day card was the train stamp.  We both absolutely love trains.  About two years ago, we went through the Smoky Mountains on a train ride that was really so much fun  and we saw some of the most beautiful scenery.  For our next train ride, we plan to take a trip out West that will be a few days on a train.

Here's my card for Jeff and I hope you like the way it turned out as much as I did!


I started with a 4 1/4" x 11" card base, scored at 5 1/2" in Basic Black.  My first layer was  4" x 5 1/4" piece of Smokey Slate.  I stamped the World Map Stamp onto it with Basic Gray Ink and adhered it to the black base. I used my 2 1/2" Circle Punch to punch out a piece of Whisper White card stock and stamped the Train Image from the Traveler Set in the Circle with Memento Tuxedo Black Ink.  I glued that to a piece of Basic Black that I had cut with one of the Deco Label Framelit dies.  I then stamped the Train again on another piece of Whisper White card stock and fussy cut it and popped up over the image on the circle using Stampin' Dimensionals.  I used my Paper Piercer to punch a hole in each side of the Deco Label Framelit and Used a Candy Dot Brad with Smokey Slate Dots in each of the holes.  I used Stampin' Dimensionals to put the Deco Label Die onto my World Map layer.  I then stamped two of the ticket images twice from the That's The Ticket stamp set with Memento Tuxedo Black Ink onto Whisper White Cardstock.  I punched the tickets out with the Ticket Duo Builder Punch.  I cut a thin 4" strip of whisper white and started glueing on the tickets for my ticket border.  I adhered that to the front of my card with Tombo multi-purpose adhesive.  (Both the Ticket Duo Builder Punch and the That's The Ticket stamp set are on the retirement list so if you don't have them, you might want to try to grab them before they are gone!)  Next I ran a piece of Basic Gray twine around the front 3 times, just over the tickets, and tied them in a knot.  I used one of the Silver Basic Metal Buttons and ran the twine through the button and tied it in the front to finish off the my card front.


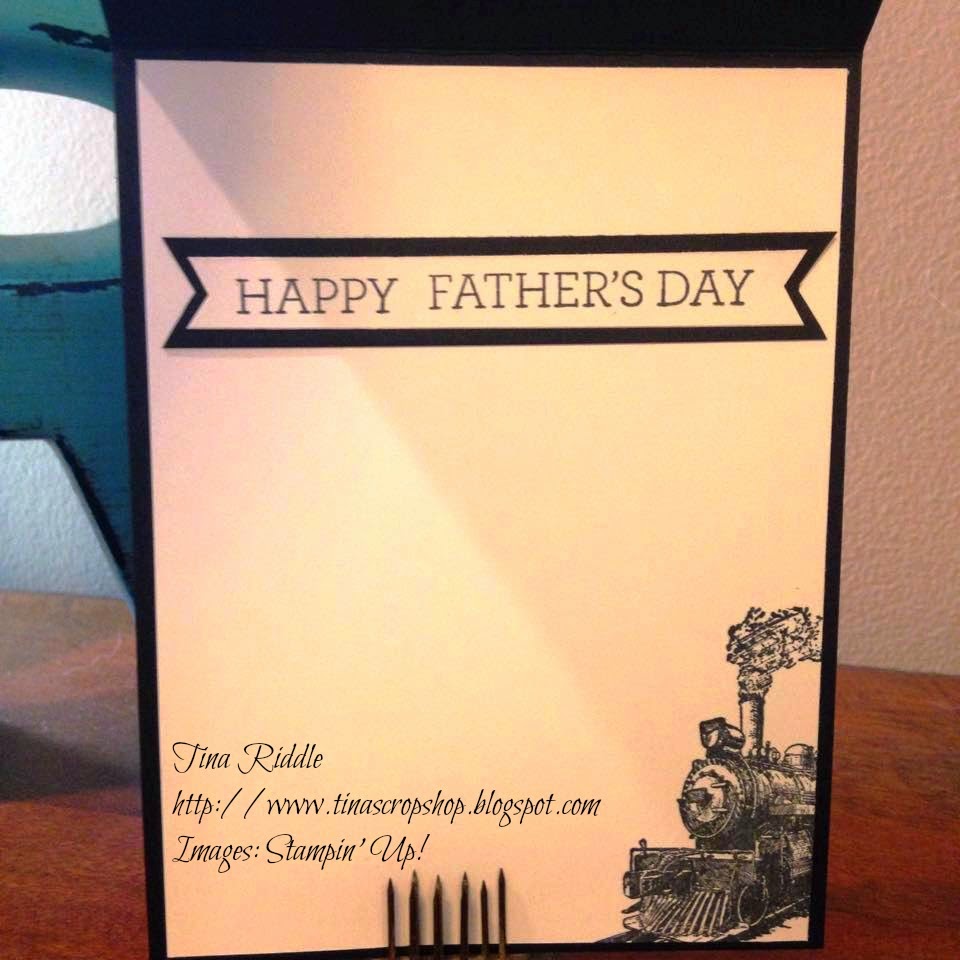
For the inside of my card I stamped the train just inside the right lower corner of a piece of 4" x 5 1/4" Whisper White card stock.  I then stamped the Happy Father's Day Sentiment from the Crazy About You Stamp Set onto a strip of Whisper White card stock.  I used my Hexagon Punch to cut a banner end on each side.  I backed it with a large piece of Basic Black cut the same way.

Please click the next button and continue on to see what the very talented Sharon Armstrong has in store for you!

Here are the Stampin' Up! products I've used on my card:

Built for Free Using: My Stampin Blog


Blessings,  Tina