Showing posts with label ICS Blog Hop. Show all posts

Wednesday, August 3, 2016

ICS Blog Hop - Fabulous Framelits!


Hello and Welcome to Inspire, Create, & Share's Fabulous Framelits Blog Hop!  If you have already been hopping you should have landed here from Deb Naylor's fabulous blog and I'd like to thank you for continuing on the hop!  Stampin' Up! has so many fabulous stamp sets with matching framelits that I have to admit this was a tough decision!  I mean really how do you choose with so many great sets!  Well my decision was really down to which set I hadn't had time to play around with!  lol  So Weather Together and the coordinating Umbrella Weather Framelits Dies was the winner!


I started with an 5 1/2 x 8 1/2" piece of Dapper Denim Cardstock that was scored at 4 1/4".  My next layer was a 5 1/4" x 4" piece of Whisper White Cardstock.  My top layer was a 5" x 3 3/4" piece of Soft Sky Cardstock that was sponged along the edges as well as some random circular motions with Dapper Denim Ink.  I added three clouds cut from the framelits in Basic Gray and then sponged along the edges with Dapper Denim.  The small one was attached with Snail adhesive and the large clouds were attached with Dimensionals.  I also cut out some of the rain drops from the framelits in soft sky and attached them with a Fine Tip Glue Pen.  I also layered some of the glue onto the top of the rain drops to give them some dimension.  I stamped my umbrella handle with Dapper Denim onto Basic Gray cardstock and cut them out with the Framelits as well.  The bottom umbrella was stamped onto Whisper White cardstock with Rich Razzleberry Ink and the top umbrella was simply cut with a piece of Playful Palette DSP.  I stamped the "we'll weather this together" sentiment from the Weather Together stamp set with Dapper Denim Ink onto a 1/2" strip of Whisper White Cardstock.  I used my Paper Snips to cut a banner end on the right side of the sentiment and tucked the left side under one of the umbrellas.  Lastly I used my Fine Tip Glue Pen to add a few sequins.  This was such a simple yet fun card to make.  If you don't have this set yet, why don't you?  It's fabulous!  

Next up is the awesome Joni Metras, just click the next button and you'll be there!


Since this fit the challenge I added my card to the SUO Challenge Blog!
Thanks so much for stopping by!  Below is a product listing for your convenience.  Blessings!  Tina


Product List

Wednesday, July 6, 2016

ICS Blog Hop Introducing 2016-2018 In Colors!


Hello and Welcome to the July Inspire, Create, & Share Blog Hop!  I hope you are ready for some fabulous color inspiration!  If you arrived from the awesome blog of Nichole Smith, thank you for continuing on!  If you started this hop at my blog, please make sure you check out all of this month's projects to inspire you!  This month's theme is the 2016-2018 Stampin' Up! In Colors and they are absolutely Fabulous!!!  In case you've been out of commission and somehow missed them, here are the colors ... 


I seriously LOVE everyone of these colors.. I don't know how to choose a favorite!  So for my card, I used them all!


I started with an 11" x 4-1/4" piece of Dapper Denim Cardstock, scored at 5-1/2" and then added a 4-1/8" x 5-5/8" piece of Sweet Sugarplum for a thin border.  Next was the fun part.  I cut 1/2" strips of all of the new In colors and using a piece of 4" x 5-1/4" piece of scrap cardstock for my base, I added the strips diagonally.  I cut my stray ends off as I went to keep things a little neater.  Once I had all of the strips adhered, I embossed it with my Polka Dot Textured Embossing Folder and attached to my Sweet Sugarplum layer.  I attached some loops of Silver Metallic Thread with Stampin' Dimensionals and then added a Silver Foil Doily.  I heat embossed the sentiment from Grateful Bunch onto a 2" circle of Sweet Sugarplum with Silver Embossing Powder.  I used Tear Tape to attach the Circle to the front of the Silver Doily.  I then glued 5 silver sequins onto the front and added a folded strip of Silver Sequin Trim to the left side with glue dots.  I think it turned out super cute!


For the inside of my card, I used a piece of Flirty Flamingo cardstock that measured 3-1/4" x 4-1/2".  I attached some strips to the lower right corner and stamped the sentiment in Dapper Denim.

I hope you've enjoyed my card and are ready to head over to the fabulous blog of Terri Takashige!  Just click the next button and you'll be there!


Here is a list of all of the Stampin' Up! Products used today:

Grateful Bunch Stamp Set
Dapper Denim Cardstock
Sweet Sugarplum Cardstock
Peekaboo Peach Cardstock
Emerald Envy Cardstock
Flirty Flamingo Cardstock
Metallic Foil Doilies
Silver Metallic Thread
Silver Sequin Trim
Versamark Ink
Silver Embossing Powder
Dimensionals
Dapper Denim Ink


Wednesday, June 1, 2016

ICS Blog Hop Guy's Night Out


Hello and welcome to Inspire, Create, & Share's June Blog Hop!  This month's theme is all about the Guys!  If you have landed here by way of Terri Takashige's awesome blog, then thank you for continuing on!  If you started with my blog, make sure you click the next button at the bottom of my post so you can continue on for some more guy card inspiration!

If you have followed my blog at all, you should know that I make a lot of Nautical themed cards so guy card's aren't hard for me at all.  Well today I went nautical with my first card and nuts with my second! lol


I was so happy that the awesome stamp set From Land to Sea was being carried over to the new catalog! Today's card uses a sponged background of a shore, sea, and sunset along with the stamped lighthouse from the awesome stamp set.  You may also notice a little bit of marsh stamped on the left side.  That is from the Wetlands Stamp Set.  Instead of using the window framelit I made a picture window by using the new Nesting Square Framelits.  I am really going to love those new framelits!  I also put a small 1/4" strip of the white between the black cardstock on the bottom of the card and the black from the Neutrals Collection DSP stack on the top of the card.  I used a piece of window sheet inside the window frame so that it really does look like a window.  It's a little difficult to tell in the picture that the window sheet is there.  The sentiment is from the Thoughtful Banners Stamp Set and coordinating Duet Banner Punch.  In case the scene looks familiar, I made a card on an earlier post that was the same sponged and stamped scene.  Lately I have been doing a lot of duplicate scenes when sponging but using them on different cards or in a different way.  If you want to see my original card using this scene click here.

For my second card.. yep, you'll see I really did go nuts and quite messy! 


I started with a 5 1/2" x 8 1/2" Sahara Sand Cardbase that was scored at 4 1/4".  I punched out some acorns in Sahara Sand Cardstock with my Acorn Builder Punch and then sponged them with Sahara Sand Ink around the edges.  I adhered them with Tombow Multipurpose glue to the front of my cardbase.  I used some Gold Thread to run around my card front three times and knotted it in the middle front.  In the middle I added a Gold Foil Doily and then a 2" circle of Sahara Sand that was also sponged around the edges.  I stamped my Nuts About You Acorn image with Versamark onto Very Vanilla Cardstock and then heat embossed with Gold Embossing Powder.  I then made some loops with my gold thread onto the front of the circle and kept in place with dimensionals.  I punched out my embossed acorn and placed in the center over the thread and dimensionals.  I thinned out some Tombow Multipurpose Glue with some water and used my aqua painter to splatter some of the thinned out glue onto my card and then sprinkled some Gold Glitter over the glue.  I used a dry brush to brush off the excess.  As you can see quite a bit of it stuck. :)  I added a strand of Gold Sequin Trim in the upper left corner to finish this one off.  So this was a little nutty and a little mess but still super cute I think! 


Next up on the hop is my friend, Megan Thompson, just click the next button to continue on to her blog!


Thanks so much for stopping by!  Blessings, Tina

Wednesday, May 4, 2016

ICS Blog Hop - Girl's Night Out!


Hello and welcome to May's Inspire, Create, & Share Blog Hop!  If you've already been hopping then you should have landed here from Terri Takashige's fabulous blog! and already know that this month's theme is Girl's Night Out!  

Girl's Night Out may mean something different to me than it does to you.  My version of a night out with my friends is to head over to Starbucks for some coffee, maybe a little shopping and of course always a nice dinner.  When I think of my friends, it reminds me that people are so much more important than things.  I have some wonderful friends and wouldn't trade them for the world! One of my favorite sets and is unfortunately soon retiring, is "Feel Goods" and I just love the sentiment "the best things in life aren't things"!


I started off with an 11" x 4 1/4" piece of Basic Black cardstock that was scored at 5 1/2".  I added a piece of the Neutrals Collection Designer Series Paper Stack in Black with white polka dots.   I stamped my sentiment in Memento Tuxedo Black Ink onto Whisper White Cardstock.  I cut the sentiment out with one of my Circle Framelits and adhered it to my card front with Fast Fuse.  I also cut out a Window Sheet with the same size Circle Framelit.  I made a frame out of two circle framelits by using a size larger Circle Framelit, and a size smaller framelit (skipping the size I used to cut out my sentiment and window sheet) so that it was a thick enough frame to add some strips of foam tape.  The edge of the window sheet was attached to the back of my circle frame with the foam tape   The sequins in my shaker card were from the Brights collection with a few random white sequins that I had hanging around my craft room.  After laying the sequins onto the sentiment, I attached the shaker frame with the foam tape already on it, onto the area surrounding the sentiment.   The Melon Mambo flowers were cut out using the Botanical Builder framelits. I added the small black center and then added a coat of Clear Wink of Stella onto the Petals.  For my white flowers, the larger layers were punched with the Pansy Punch, two smaller layers were from the Blossom Bunch Punch, and then a black layer that was back from the Botanical Buiders framelits again.  I put a Basic Pearl in the center of each flower.  I also used the Botanical Builder Framelits for my leaves that I cut out of Wild Wasabi Cardstock.  I used dimensionals to adhere my flowers and used multipurpose glue to adhere the leaves.  I added some Black and Melon Mambo baker's twine in two loops around the top of the card and then tied it in a bow on the right hand side to add some balance.  

Next up on the hop is my friend, and double-up line, Darla Roberts!  Just click the next button and you'll be at her blog!


Here are the Stampin' Up! products I used today:

Feel Good Stamp Set
Circle Framelits
Botanical Builder Framelits
Blossom Bunch Punch
Pansy Punch
Basic Black Cardstock
Melon Mambo Cardstock
Whisper White Cardstock
Brights Sequins
Neutrals Collection DSP Paper Stack
Black and Melon Mambo Baker's Twine
Basic pearl jewels
Mini Glue Dots
Tombow Multipurpose Glue
Fast Fuse
Stampin' Dimensionals

Thanks so much for stopping by!  Blessings, Tina


Wednesday, June 3, 2015

ICS Blog Hop Introducing the 2015-2017 In Colors

Hello and welcome to Inspire, Create, and Share's Blog Hop Introducing the 2015-2017 In Colors!  In case you haven't heard these brand new In Colors are Cucumber Crush, Watermelon Wonder, Delightful Dijon, Mint Macaron, and Tip Top Taupe.  If you've been hopping along, you should have arrived from the super talented Deb Naylor's Blog.


I am LOVING these new colors!  I keep changing my mind on which is my favorite but right now it appears to be a tie between Watermelon Wonder and Cucumber Crush.  They are both such fresh, fun colors so I those them to focus on for my project this month.


I started with a standard A2 card base of Cucumber Crush.  I added a strip of some of the New Cherry On Top DSP Paper onto left side of my card.  I then cut a 3 x 3 1/2" mat of Cucumber Crush cardstock and layered on more of the Cherry of Top DSP and then a smaller layer of Cucumber Crush.   It has such fun bright colors and matched the Watermelon Wonder and Cumcumber Crush DSP perfectly!  I stamped the ice cream cone base from the new Sprinkles of Life Stamp Set with Tip Top Taupe onto Whisper White cardstock.  I fussy cut it out and glued onto the layered rectangle.  I stamped the ice cream top tone on tone onto Tip Top Taupe as well as the Watermelon Wonder cardstock.  I then punched those out the new Tree Builder Punch.  I adhered the layers of the ice cream tops over the cone.  I then cut out three random width little strips of more of the Cherry On Top DSP and cut banner ends with the new Triple Banner Punch.  I glued those under the right side of the rectangle and then adhered it all with dimentionals onto my card.  I stamped my sentiment with Watermelon Wonder Ink onto Whisper White cardstock and cut out each line seperately at backed it with Cucumber Crush cardstock.  I glued those in a random manner to the far left side of my card. I added a few Pearls and called it done.  I really love how it turned out!

Thanks for stopping by and make sure you click the next button to continue on!

http://thestampdiva.blogspot.com/2015/06/ics-blog-hop-introducing-2015-2017-in.html

Following are the Stampin' Up! Products used:

Built for Free Using: My Stampin Blog


Blessings,
Tina

Wednesday, May 6, 2015

ICS May Blog Hop Celebrate Dad


Well I have some super exciting news!  I was asked by an extremely talented group of Stampin' Up! Demonstrators to join their Inspire Create Share Monthly Blog Hop!  I am certainly honored and hope that you'll enjoy my card that is all about Celebrating Dad!

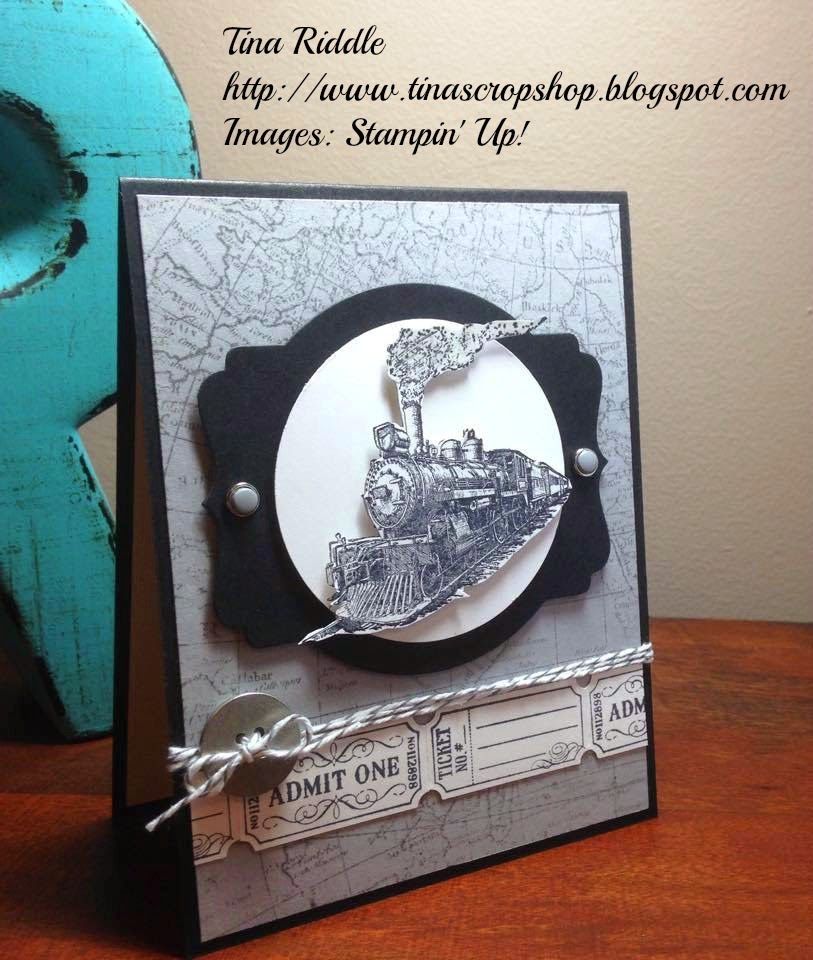
One of my favorite go-to stamp sets is "Traveler".  I just LOVE this stamp set. It is so perfect for masculine cards!  My Father's Day card is for my sweet Husband since I lost my Dad quite a few years ago.  Jeff is a wonderful husband and a great Dad to his two adult children as well as a great Step-Dad to my three adult children.  Together we have 5 granddaughters and to them he is a great Papaw!   The "Traveler" stamp that was perfect for Jeff's Father's Day card was the train stamp.  We both absolutely love trains.  About two years ago, we went through the Smoky Mountains on a train ride that was really so much fun  and we saw some of the most beautiful scenery.  For our next train ride, we plan to take a trip out West that will be a few days on a train.

Here's my card for Jeff and I hope you like the way it turned out as much as I did!


I started with a 4 1/4" x 11" card base, scored at 5 1/2" in Basic Black.  My first layer was  4" x 5 1/4" piece of Smokey Slate.  I stamped the World Map Stamp onto it with Basic Gray Ink and adhered it to the black base. I used my 2 1/2" Circle Punch to punch out a piece of Whisper White card stock and stamped the Train Image from the Traveler Set in the Circle with Memento Tuxedo Black Ink.  I glued that to a piece of Basic Black that I had cut with one of the Deco Label Framelit dies.  I then stamped the Train again on another piece of Whisper White card stock and fussy cut it and popped up over the image on the circle using Stampin' Dimensionals.  I used my Paper Piercer to punch a hole in each side of the Deco Label Framelit and Used a Candy Dot Brad with Smokey Slate Dots in each of the holes.  I used Stampin' Dimensionals to put the Deco Label Die onto my World Map layer.  I then stamped two of the ticket images twice from the That's The Ticket stamp set with Memento Tuxedo Black Ink onto Whisper White Cardstock.  I punched the tickets out with the Ticket Duo Builder Punch.  I cut a thin 4" strip of whisper white and started glueing on the tickets for my ticket border.  I adhered that to the front of my card with Tombo multi-purpose adhesive.  (Both the Ticket Duo Builder Punch and the That's The Ticket stamp set are on the retirement list so if you don't have them, you might want to try to grab them before they are gone!)  Next I ran a piece of Basic Gray twine around the front 3 times, just over the tickets, and tied them in a knot.  I used one of the Silver Basic Metal Buttons and ran the twine through the button and tied it in the front to finish off the my card front.


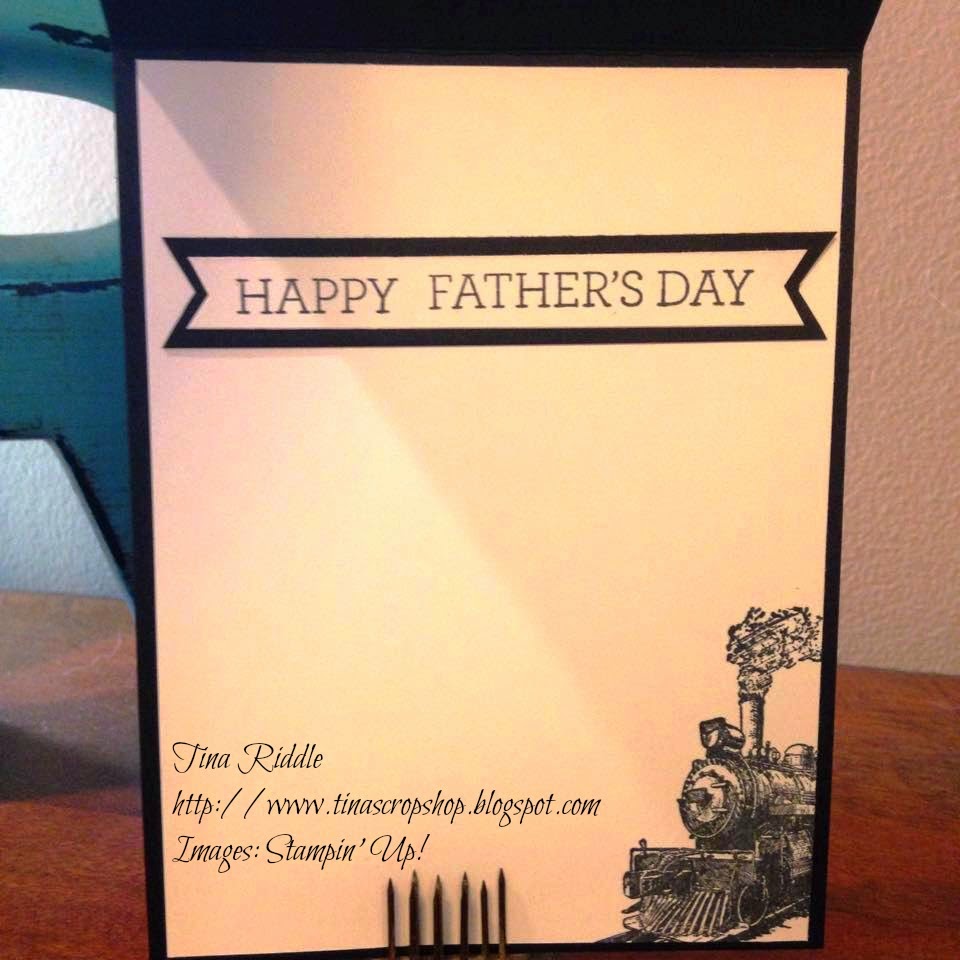
For the inside of my card I stamped the train just inside the right lower corner of a piece of 4" x 5 1/4" Whisper White card stock.  I then stamped the Happy Father's Day Sentiment from the Crazy About You Stamp Set onto a strip of Whisper White card stock.  I used my Hexagon Punch to cut a banner end on each side.  I backed it with a large piece of Basic Black cut the same way.

Please click the next button and continue on to see what the very talented Sharon Armstrong has in store for you!

Here are the Stampin' Up! products I've used on my card:

Built for Free Using: My Stampin Blog


Blessings,  Tina