Showing posts with label Valentine's Day Card. Show all posts

Tuesday, January 22, 2019

SIP #183 Theme Challenge - All My Love

Hello and Happy Tuesday!  My Monday was so loooooong!  I thought it would never end!  I was not exactly full of inspiration after a 12 hour day.  Alas, I had a design team project due so I had to make something for this week's Stamp, Ink, Paper Challenge!


For my card I used a couple of different sets.  The background stitched rectangle is the Marbled Turnabout from Concord & 9th.  The heart die cut is from Hero Arts January 2018 My Monthly Hero Kit.  I love those kits because if you need a card really quick there is usually one I can pull out to put something together.


The card base was Stampin' Up! Flirty Flamingo.  The marbled layer was stamped with Flirty Flamingo, Blushing Bride, Powder Pink, and Primrose Petals (retired).  I also added a layer of versamark to the Primrose Petals turnabout so that I could clear emboss it.  It looks really cool in person.  The white stitched rectangle is Whisper White Cardstock.  The heart from the Hero Arts January 2018 kit was cut in Flirty Flamingo.  The sentiment was stamped on Flirty Flamingo with Primrose Petals and then clear embossed.  I added three PPP Clear Sparkling Confetti and added a few splatters with a Primrose Petals Marker to finish it off.  Although I threw this one together really quickly I do like how it turned out.  

Thanks so much for stopping by!  Blessings, Tina

Thursday, February 8, 2018

OSAT Blog Hop - Don't Go Breaking My Heart


Hello and Welcome to the February OSAT Blog Hop.  If you've already been hopping then you know we are riding along with a Love theme this month a.k.a. Don't Go Breaking My Heart!  Honestly.. February really is the month of love, right?  Not only is the 14th Valentine's Day but February 18th is my Anniversary!  Jeff and I will be celebrating our 10th Anniversary this year and it seems like it has really just flown by!  I think the saying goes "Time flies when you're having fun".. well we certainly have been having a lot of fun.  It is certainly nice to have a wonderful life partner!

Well back to the Hop at hand....I really wanted to use something out of the Annual Catalog for my card and after doing a quick inventory of my stamps, it seemed a hands down decision to use the Lift Me Up Stamp Set and the Up and Away Thinlits Dies!


I went simple with my color scheme.. Real Red, Pacific Point, Soft Sky, and Whsiper White.


Here's the front of the box with the card.. I wanted to add a tag but with the tag on the front, it hides the "Love You" oval so I added the tag to the other side.


I felt like the color combination and the addition of the striped ribbon to the box made it feel a bit more masculine.  

Thanks so much for stopping by!  Please make sure to stop by all of blogs for lots of inspiration.  If you are interested in any of the products used, I'll have links below the Blog Roll!  

Blessings, Tina


Product List

Thursday, January 25, 2018

January A Paper Pumpkin Thing Blog Hop


Hello and Welcome to the January A Paper Pumpkin Thing Blog Hop!   I always look forward to this blog hop and all of the fabulous inspiration for each month's Paper Pumpkin kit!  I think this month may have been one of the hardest for me since I loved it so much exactly as designed!    


There were so many aodrable stamps in this month's kit so I decided to do some tone-on-tone stamping with Flirty Flamingo Ink on Flirty Flamingo Cardstock using many of the image stamps.  Those envelops are so adorable!!  I backed my 4" x 5 1/4" tone-on-tone layer with a 4 1/8" x 5 3/8" mat of Basic Black cardstock. Those layers were adhered to a top folding card base of Thick Whisper White Cardstock.   I used a piece of one of the card/giftcard holders to cut out a scallop square... that black with the small gold hearts was just so pretty.  I added one of the adhesive backed banners to the scallop square.  I stamped the "Be Mine" sentiment from the stamp set in Rich Razzleberry and then clear embossed it. I added some enamel dots onto the vellum heart so that I could adhere it  by putting a glue dot under the enamel dots. Once I had the heart adhered, I added two more enamel dots to the card front.   I added a small bow with the fabulous ribbon included in the kit to the upper left side of the scallop square to finish off the front of this one.  


I decided to use the front flap to hold my card in a horizontal position so that I could decorate the upper portion of the outside.  I adhered my vellum banner to the top and added the Flirty Flamingo banner over it.  I heat embossed the sentiment "You Make My Heart Happy" from the stamp set in gold onto a small piece of Whisper White Cardstock.  I then used my Lots of Labels Framelits Dies to cut out a small label and adhered it over the banners.  I added three of the Flirty Flamingo enamel dots to the upper portion as well.  


For the inside of my gift card holder I used one of the little scallop cards in the kit and stamped the sentiment "Be Mine" in Basic Black Archival Ink.  I added a Flirty Flamingo die cut heart from the Sunshine Wishes Thinlits Dies to the card with a small amount of Tombow glue making sure to center the Be Mine in the middle of the heart.  This left enough room to write a note on the bottom of the card.  I love that the treat/giftcard holder has notches for the beautiful ribbon to the tied.. so cute!

Thanks so much for stopping by!  Next up is the fabulously talented Rick Adkins.. just click the next button and you'll be there!


Blog Roll...

Tina Riddle << That's Me! >>
Product List

Tuesday, January 23, 2018

SIP Challenge #134 with Gina K Designs Geo Thanks by Claire Brennan


Hello and Happy Tuesday!  It's time for another Stamp, Ink, Paper Challenge and this one is a cool color challenge!  Check these colors out... how fun!!!


I just received my order from Gina K Designs and was super excited to use this Geo Thanks set with the challenge!  Claire Brennan is an amazing designer!  I think I have almost every set she has designed!  Check this one out.. fabulous, right??!!


I was originally drawn to the feather in this awesome set but with this week's color challenge I felt like the hearts would be perfect!  


I was originally going for a Clean and Simple Design but my splatters really got in the way of the "Clean" part!  Oh well.. I still love it.  I used a card base of 110# Neenah Classic Crest Solar White Cardstock measuring 11" x 4 1/4" and scored at 5 1/2" for a top folding card.  My stamped panel is Bristol Smooth Cardstock and I stamped the small outlined heart three times in Versafine Black Onyx Ink and then clear embossed them.  I used an Aqua Painter and SU Berry Burst, SU Calypso Coral and Tim Holtz Picked Raspberry Distress Ink for the watercoloring.  The splatters are Berry Burst and Calypso Coral and I also used my Aqua Painter to create those.  The sentiment was stamped in Versafine Black Onyx and clear embossed.  I added a few SU Glitter Enamel Dots and a heart sequin from a recent Hero Arts kit.  

Thanks so much for stopping by!  Blessings, Tina

Tuesday, February 7, 2017

SIP Challenge #85 Love! - Altenew To the Moon Stamp Set

Hello and Happy Tuesday!  Well by now you should have survived Monday so we've got that going for us!  lol  Since it Tuesday, it's time for another Stamp, Ink, Paper Challenge and this week is all about Love!


http://www.stampinkpaper.com


I was super excited to get my hands on this adorable Altenew Stamp Set "To the Moon".  The layering moon is just gorgeous!  I also used the Altenew Warm Gray Mini Cube set to stamp it.  I just adore having my Misti for layering stamps like this!  Here's my card!
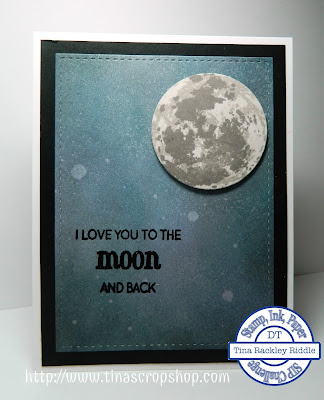

It was really hard to capture all of the distress ink layering in the background in this picture.  I started with a piece of Neenah Classic Crest Solar White cardstock in 110# weight.  I started with my round mini distress ink blending tool by blending Tim Holtz Distress inks in Broken China, Peacock Feathers, Seedless Preserves and lastly Black Soot around the edges and then lightly over the middle.  I spritzed with some water and then dabbed with a paper towel to make some light splotches.  I used my Mama Elephant Basic Creative Cuts Dies to cut my stitched panel.  Next I used Altenew Jet Black ink to stamp my sentiment.  I used my Misti to line it up and to make sure I got a good impression.  After stamping a few times I decided it needed a little more emphasis so I added a layer of versamark embossing ink and some Wow Black Embossing Powder and used my heat tool to emboss it.  Next I used another small piece of the same white cardstock in my misti to stamp my gorgeous moon.  I used the lightest of the warm gray ink cube set.. Morning Frost to stamp the solid image of the moon.  The 2nd layer was stamped with the next darkest color.. Evening Gray.  The final detailed image of the moon was stamped in the 3rd darkest color..Moon Rock.  I just love how it turned out.  I was lucky enough to find one of my SU layering circle dies cut the moon out perfectly.  I used Foam tape to adhere it to my stitched rectangle layer.  I attached that layer to a 4" x 5 1/4" piece of Basic Black cardstock and then mounted that on a Neenah Classic Crest Solar White 110# card base that measured 11" x 4 1/4" and was scored at 5 1/2" for a top folding card.  

Here's a list of all of the Products Used:

Altenew To the Moon Stamp Set
Altenew Warm Gray Mini Cube Ink Set
Altenew Jet Black Ink
Versamark Embossing Ink
Wow Black Embossing Powder
Tim Holtz Distress Round Ink Blending Tool
Tim Holtz Broken China Distress Ink
Tim Holtz Peacock Feather Distress Ink
Tim Holtz Seedless Preserves Distress Ink
Tim Holtz Black Soot Distress Ink
Mini Water Spritzer
Neenah Classic Crest Solar White Cardstock 110#
Stampin' Up! Basic Black Cardstock
Mama Elephant Basic Creative Cuts Dies
Stampin' Up! Layering Circle Framelits

Thanks so much for stopping by!  Blessings, Tina

Tuesday, January 24, 2017

SIP #83 Sketch Challenge with Love To Go!

Hello and Happy Tuesday!  I hope you are enjoying your week.  We've had some unusually warm weather here in Middle Tennessee but unfortunately I believe that has come to an end!  It's going to be back into the low 30's overnight.  I was so enjoying not having to wear a coat!  I'm beginning to think that I was meant to live in Florida because as I'm getting older I am not liking cold weather at all!  

Well of course since it is Tuesday, I'm back over at Stamp, Ink, Paper designing for a new sketch challenge!  I really LOVE this sketch!  It's one of my favorite sketches that I've used the past few months!  


Since it is right at the end of January, I thought I better get started on Valentines Cards.  This one is one of my favorites and will be my card to my better half because we are all about coffee!  Our first date, 10 years ago, was at Starbucks!   Here's my card with an adorable Unity Stamp Co. stamp set called Love to Go!


I really had fun making this card.  I may have gotten a little sequin happy but bling always seeems to be a good idea to me!  lol

Not only do I love the outside with this awesome sketch but I love the inside too since I decided to use the same circle and same type of  banner!


Isn't it just adorable??  Below is a list of all of the products I used!  Thanks so much for stopping by!  Have a wonderful week!  Blessings, Tina

  • Unity Stamp Co. "Love to Go" Stamp Set" (outside of card)
  • Unity Stamp Co. "no remedy for Love" (inside on the white circle)
  • Stampin' Up! "Good Greetings (retired)" (inside on the red banner)
  • Stampin' Up! Real Red Cardstock
  • Stampin' Up! Basic Black Cardstock
  • Stampin' Up! Happy Hearts Embossing Folder (outside black panel)
  • Stampn' Up! Stacked with Love DSP stack (retired) 
  • Memento Tuxedo Black Ink
  • Versamark Embossing Ink
  • Wow Black Embossing Powder
  • Stampin' Up! Mini Sweetheart Punch (retired)
  • Pretty Pink Posh Onyx and Charcoal sequins
  • Stampin' Up! Stitched Circle Thinlit Dies
  • Lil' Inker Stitched Rectangle Dies


Thursday, February 11, 2016

OSAT Blog Hop - Love is in the Air!


Hello and Welcome to the February One Stamp At A Time Blog Hop!  If you have already been hopping you should have landed here from the amazing blog of Maria Willis!  If you missed it, you will definitely want to make sure you check it out!  Maria has become one of my favorite card designers!  She has such a fresh and unique style that I really LOVE!  By now you probably already know that this Hop is all about Love!  I took this opportunity to make my sweet Hubby a Valentine's Card and a little treat box.   We've been trying to not eat as many sweets (we both have a sweet tooth!) so this is just the perfect size for a few chocolates and everyone needs a little chocolate for Valentine's Day! 

Here's my card and project!

And a close up of the card!

I can tell you that this card is much simpler than what I typically make.  I can't remember the last time I made a card that didn't have at least 3 full layers. lol  All that being said, I really like the way this turned out.  My cardbase was a 11" x 4 1/4" piece of Crumb Cake Cardstock scored at 5 1/2".  With my Sweetheart punch, I punched out Crumb Cake hearts and arranged them onto the base and adhered them with snail.  I then punched out more Crumb Cake hearts that I sponged with Crumb Cake Ink around the edges and adhered to the first layer of hearts to give them more dimension.  I added a Tea Lace Doily with snail and punched a 2 1/4" circle of Real Red Glimmer Paper and adhered to the middle of the doily.  I trimmed the Doily and circle at the left edge of the card.  I ran three loops of twine around the card front and tied it in the center of the circle.  The sentiment from the Groovy Love stamp set was stamped in Real Red Ink onto thick Whisper White Cardstock and then punched out with the Sweetheart Punch.  I sponged some Real Red Ink around the edges after punching and adhered over the circle and twine with Stampin' Dimensionals.     


For the inside of my card I stamped one of the larger hearts from the Groovy Love stamp set with Crumb Cake Ink that had first been stamped off to give it a more subtle look.  I added the Love You and My Valentine sentiments from the Bloomin' Love stamp set in Real Red.  To tie the inside to the outside I added a Red Glimmer Paper small sweetheart punch with a glue dot.  

Here's a better look at the Curvy Keepsake Treat Box..

I used Crumb Cake Cardstock to cut out my Curvy Keepsake Box.  I added a little bit of the Tea Lace Doily on both sides of the top.  The heart as well as the From My Heart sentiment were stamped on Thick Whisper White cardstock in Real Red ink.  The tag was cut from Thick Whisper White Cardstock as well.  The Love sentiment was also stamped in Real Red and the tag was attached to the treat box with twine.  I thought it turned out super cute.  

Next up is my sweet friend Megan Thompson's blog! Just click the next button and you'll be there!


Here's a full listing of our Bloggers in case you've lost your way!
  1. Eva Bussom 
  2. Pam Tetreault 
  3. Kelly Acheson 
  4. Martie Pollard 
  5. Wynne Grob 
  6. Elizabeth Jeanne 
  7. Renee Ondrajka  
  8. Alisa Tilsner 
  9. Maria Willis 
  10. Tina Riddle - You are here!!! 
  11. Megan Thompson 
  12. Melissa Davies 
  13. Sara Levin 
  14. AJ Bodine 
  15. Dena Rekow 
  16. Justin 
  17. Andrea Tracy-Tucker 
  18. Marisa Gunn 
  19. Anna Smith 
  20. Jeanna Bohanon 
  21.   Lori Mueller 

Here are the Stampin' Up Products used:
Built for Free Using: My Stampin Blog


Thanks so much for stopping by!  Blessings, Tina

Tuesday, February 9, 2016

SIP Challenge #34 Love

Hello all!  Hope you are having a great week!  We are having a little more snow here in Middle Tennessee but hopefully it won't cause the problems the last snow storm caused.  I am really looking forward to Spring!  This week it's a Love theme over at Stamp, Ink, Paper.  I hope you'll head over and check it out and then link up your own love themed card!


I'm sharing a Valentine's Day card I made for my youngest granddaughter, Laken.  It's a slider card and I know she will love sliding that cute little bear around and letting him flip over and over.  I admit I had a little fun sliding and flipping him over as well. :)  


This one started off with an A2 Thick Whisper White Cardstock base.  I layered a piece of Pink Pirouette onto Rose Red and ran them through my Big Shot with the retired Script Embossing Folder.  I used my Word Window Punch to punch out my slider tunnel.  To make the slider mechanism, you use two pennies with a dimensional sandwiched between them in the tunnel.  Then I placed a dimensional on the top penny before placing my little flipping bear on it. lol  I used the new Bear Hugs stamp set and coordinating framelits for my bears, hearts, and sentiment.  This was just a fun card and know Laken will have a lot of fun playing with it.

Built for Free Using: My Stampin Blog


Thanks so much for stopping by!  Blessings, Tina

Wednesday, February 3, 2016

ICS Blog Hop - It's a Love Thing


Hello!  Hope your February is starting off awesome!  I can't believe how quickly January just flew by!  Well of course since it is the first Wednesday of the month, it is time for another Inspire, Create, & Share Blog Hop and this month it's all about It's a Love Thing!  How fun is that??  If you have already been hopping you should have landed from the talented Tammy Dunlap's blog!  If you missed it, you'll definitely want to check it out!


I had so much fun inking up the Beautiful Ride Stamp Set from the Occasions Catalog!  On this card I stamped the car and couple images with Black Archival Ink onto Watercolor Paper and used my Aqua Painters and Stampin' Up! Ink Pads to color them in.  Obviously I did a little fussy cutting on them as well.  The sentiment was stamped on Whisper White cardstock with Black Archival Ink as well.  Both the floral DSP and the yellow crosshatch DSP are from Botanical Gardens Designer Series Paper Pack.   My Card base was Basic Black, with a layer of Mint Macaron cardstock.  

Next up is the fabulous Darla Roberts blog! Just click the next button and you'll be there! 


Here are the Stampin' Up Products used on my card today:


Built for Free Using: My Stampin Blog


Thanks so much for stopping by!  Blessings, Tina

Tuesday, January 5, 2016

SIP #29 Sketch Challenge Groovy Love


Hello!  Are you ready for a fresh start in the 2016?  I just love everything about a New Year and all that it brings.  It is such an awesome time to take a look at where you're at and to set goals for where you want to be.  Do you have any new crafting goals?  My goal is to better organize my craft space.  It is so much easier to make a card when everything has a place and is in it's place.  Sometimes my space can get a little... well a lot... crazy!    Well anyway here we are in 2016 and ready for another great year at Stamp, Ink, Paper and this month we have a fun sketch!

http://stampinkpaper.com/2016/01/sip-challenge-29-a-sketch-from-carolyn/
I really love sketches and this one I thought would give me an awesome start on my Valentine's Day cards.  I make six Valentines cards.. one for my Hubby and one for each of our five granddaughters. 


For this one I used the Groovy Love stamp set along with the retired Stacked with Love DSP stack.  I loved that paper stack so much so when it went to the Clearance Rack last year I had to buy some more of it.   hmmmm.. yep making hoarding it just a little!

Here are the current Stampin' Up!  products that I used:
Built for Free Using: My Stampin Blog


Thanks so much for stopping by!  Blessings, Tina