Showing posts with label OSAT Blog Hoppers. Show all posts

Thursday, May 10, 2018

OSAT Blog Hop On The Red Carpet

Hello!  It's that time again.....time for another One Stamp At A Time Blog Hop!  Can you believe it?  It's already the second Thursday in May!  Wow this year is flying by!   This month's theme "On The Red Carpet" can be interpreted different ways as you may have already noticed if you've already been hopping!  If you are starting with me, I hope you'll take the time to hop along and check out all of the cool inspiration!  For me On The Red Carpet means the Stars of the Show are coming out and I really believe the new Stampin' Up! Share What You Love Suite is one of the Stars of the Show!  So..... that being said, that is the suite I'm sharing with you today!

My cards and project today were made for my Mother-In-Law for Mother's Day.  She loves my cards and mentioned a few weeks ago that she needed some thank you cards so I thought this adorable little clutch and card set would really be appreciated.  I added velvet ribbon handles to my clutch but my inspiration came from a Pinterest post by Jan Farring at Jan's Stamping Creations.  For her awesome tutorial click here!  She has detailed instructions and pictures for making the clutch.


I have two cards and two envelopes on each of the two inside pockets of the purse.  If I hadn't used so much dimension and had fewer layers I'm sure I could have fit three or even four on each side!


I love when you have Designer Series Paper that really is the star of your card!  You really don't have to add too much stamping!  Here's a look of each of the four cards, all made with the same sheet of two-sided DSP.  It is such gorgeous paper!


I used the Share What You Love Cardstock Pack and chose Mint Macaron and Rich Razzleberry colors since they matched the DSP so beautifully!

Thanks so much for stopping by today!  Up next is my good friend and partner in crime Andrea Tracy-Tucker!  Just click her name on the Blog Roll and you'll be there!

Blog Roll...


Product List

Thursday, March 8, 2018

OSAT Blog Hop Happily Ever After


Hello!  Can you believe it's already the second Thursday in March??  It's time for another One Stamp At A Time Blog Hop!  This month's theme is Happily Ever After and I'm sure that means different things to different people.  When I think of happily ever after I think of a wedding that joins two people together with the intent of living the rest of their life happily together!  So with that in mind, I made a wedding card and a mini treat bag that I will use as a gift card holder!


I have to admit that when I first saw the Petal Palette Stamp Set I wasn't sure if I loved it... well let me tell you I do now!  It is absolutely awesome!  So many great sentiments and so many possibilities!  I really REALLY hope that Stampin' Up! will keep this one around!  It is perfect for a Wedding card, a Congratulations card, a Love You card, Thank you card, and it goes on and on and on!  I seriously think this is my favorite stamp set!  


I finished the inside by just adding the congratulations sentiment and part of the branch die from the Petals & More Thinlits Dies cut in the awesome Painted with Love Specialty Designer Series Paper.

Thanks so much for stopping by!  For a list of the products used, please see directly below the blog roll.  You are at Tina Riddle's blog now so to continue on, just click on the next blog!


Blog Roll...


Product List

Thursday, February 8, 2018

OSAT Blog Hop - Don't Go Breaking My Heart


Hello and Welcome to the February OSAT Blog Hop.  If you've already been hopping then you know we are riding along with a Love theme this month a.k.a. Don't Go Breaking My Heart!  Honestly.. February really is the month of love, right?  Not only is the 14th Valentine's Day but February 18th is my Anniversary!  Jeff and I will be celebrating our 10th Anniversary this year and it seems like it has really just flown by!  I think the saying goes "Time flies when you're having fun".. well we certainly have been having a lot of fun.  It is certainly nice to have a wonderful life partner!

Well back to the Hop at hand....I really wanted to use something out of the Annual Catalog for my card and after doing a quick inventory of my stamps, it seemed a hands down decision to use the Lift Me Up Stamp Set and the Up and Away Thinlits Dies!


I went simple with my color scheme.. Real Red, Pacific Point, Soft Sky, and Whsiper White.


Here's the front of the box with the card.. I wanted to add a tag but with the tag on the front, it hides the "Love You" oval so I added the tag to the other side.


I felt like the color combination and the addition of the striped ribbon to the box made it feel a bit more masculine.  

Thanks so much for stopping by!  Please make sure to stop by all of blogs for lots of inspiration.  If you are interested in any of the products used, I'll have links below the Blog Roll!  

Blessings, Tina


Product List

Thursday, January 11, 2018

OSAT Blog Hop - Sale A Brate The Occasions


Hello and Happy 2nd Thursday of the month a.k.a. OSAT Blog Hop Day!  What a fabulous line up we have for you this year!  You are going to LOVE all of the inspiration heading your way!


If you've already been hopping, you should have landed here from the amazing blog of Sara Levin and I would like to thank you for continuing on!  Our theme of course is "Sale A Brate The Occasions" and is all about the Stampin' Up! Occasions and Sale-A-Bration Catalogs.  They are both chocked full of fabulousness!  There are so many awesome options to focus on but I decided to go with the SAB Beautiful Peacock Stamp Set.  Sometimes it's nice to have a simple yet fun stamp set that gives you great options for an easy card.  I really think Beautiful Peacock does just that!


I've seen the peacock stamped in so many color combinations and every one have been gorgeous but I seem to be drawn to the blues and greens.  I used a combination of Dapper Denim, Pool Party, and Emerald Envy for mine on this card.  I recently realized that I haven't used my Square Layering Framelits so I decided to use them here.  I added a few layers with Whisper White, Dapper Denim and Emerald Envy for a little something extra.  The Pinewood Plank embossed diagonal layer was the added in Emerald Envy in the background as well as some Glitter Enamel Dots and some splatters to finish this one off.  Really a simple card that came together pretty quickly.


For my project, I made a small treat bag with a Whisper White A2 Envelope by sealing it and then slicing off a thin strip at the top to open it.  I scored the bottom and both sides at 3/4" inch to make the pleats and glued the bottom triangles down with glue dots.   I added a layer of the Pinewood Plank embossed Dapper Denim in the background.  I decided to change up my colors on the peacock this time to Tempting Turquoise for the feathers and Emerald Envy for the body to show another option in the same color range.

I hope you are ready to continue on for more Sale A Brate The Occasions Inspiration, just click the next button below and you'll be at Claudia Perry's awesome blog!


Here is a list of all of the Bloggers on this hop in case you've lost your way:

Thursday, November 2, 2017

OSAT Blog Hop - Winter Holiday

Hello and Happy Thursday!  I hope you are having a fabulous day!  I'm super excited to be joining my friends for the November One Stamp At A Time Winter Holiday Blog Hop!


If you've already been hopping you should have landed here from Jenny Hall's fabulous blog and thank you for continuing on!  If you are starting with me you'll want to be sure you stop by every blog for some awesome Winter Holiday Inspiration.  As for me.. Christmas is where it's at!  It's that time of year where most of us celebrate the birth of Jesus.  For me Jesus is the reason for the season!


Here's my card and project...


I love the Good Tidings Stamp Set from Stampin' Up! and thought it looked amazing with the Plaid Paper from the Christmas Around the World DSP.   The "Merry Christmas" banner was from the Santa's Sleigh Stamp Set.  I used Washi Tape to omit inking with Versamark the "wishes" from "Merry Christmas Wishes".   Then heat embossed the sentiment in White.  I also added a few Pretty Pink Posh Onyx Sequins because of course you have to have a little bling!


Here is the inside of my card...


I couldn't help but use the Merry Musical Specialty Paper on the inside.  I loved the sheet with "Deck the Halls" and thought it went perfectly since I had a Bough of Holly on the card.   

For my project I used a mini pizza box as a treat box and used more of the Merry Musical Specialty DSP matted in black on the top and all of the sides.  I used the same size oval framelits to make my tag and the same Good Tidings stamp set to make the tag.  I love using circle framelits or oval framelits to make tags by punching a hole on one of the sides.


Thanks so much for stopping by!  The next stop on the hop is amazing Rick Adkins!  Just click the next button and you'll be there!


Thursday, October 12, 2017

OSAT Blog Hop - Fall/Halloween!

Hello and Happy Thursday... and yes, almost Friday!  Woo Hoo!  I'm hopping with a bunch of super creative friends today for One Stamp At A Time's Fall Halloween Blog Hop!  If you're ready for some awesome Fall and Halloween inspiration you'll want to be sure to hop all the way through!   If you've already been hopping, you should have landed here from the fabulous Kelly Acheson's Blog and thank you for continuing on!  


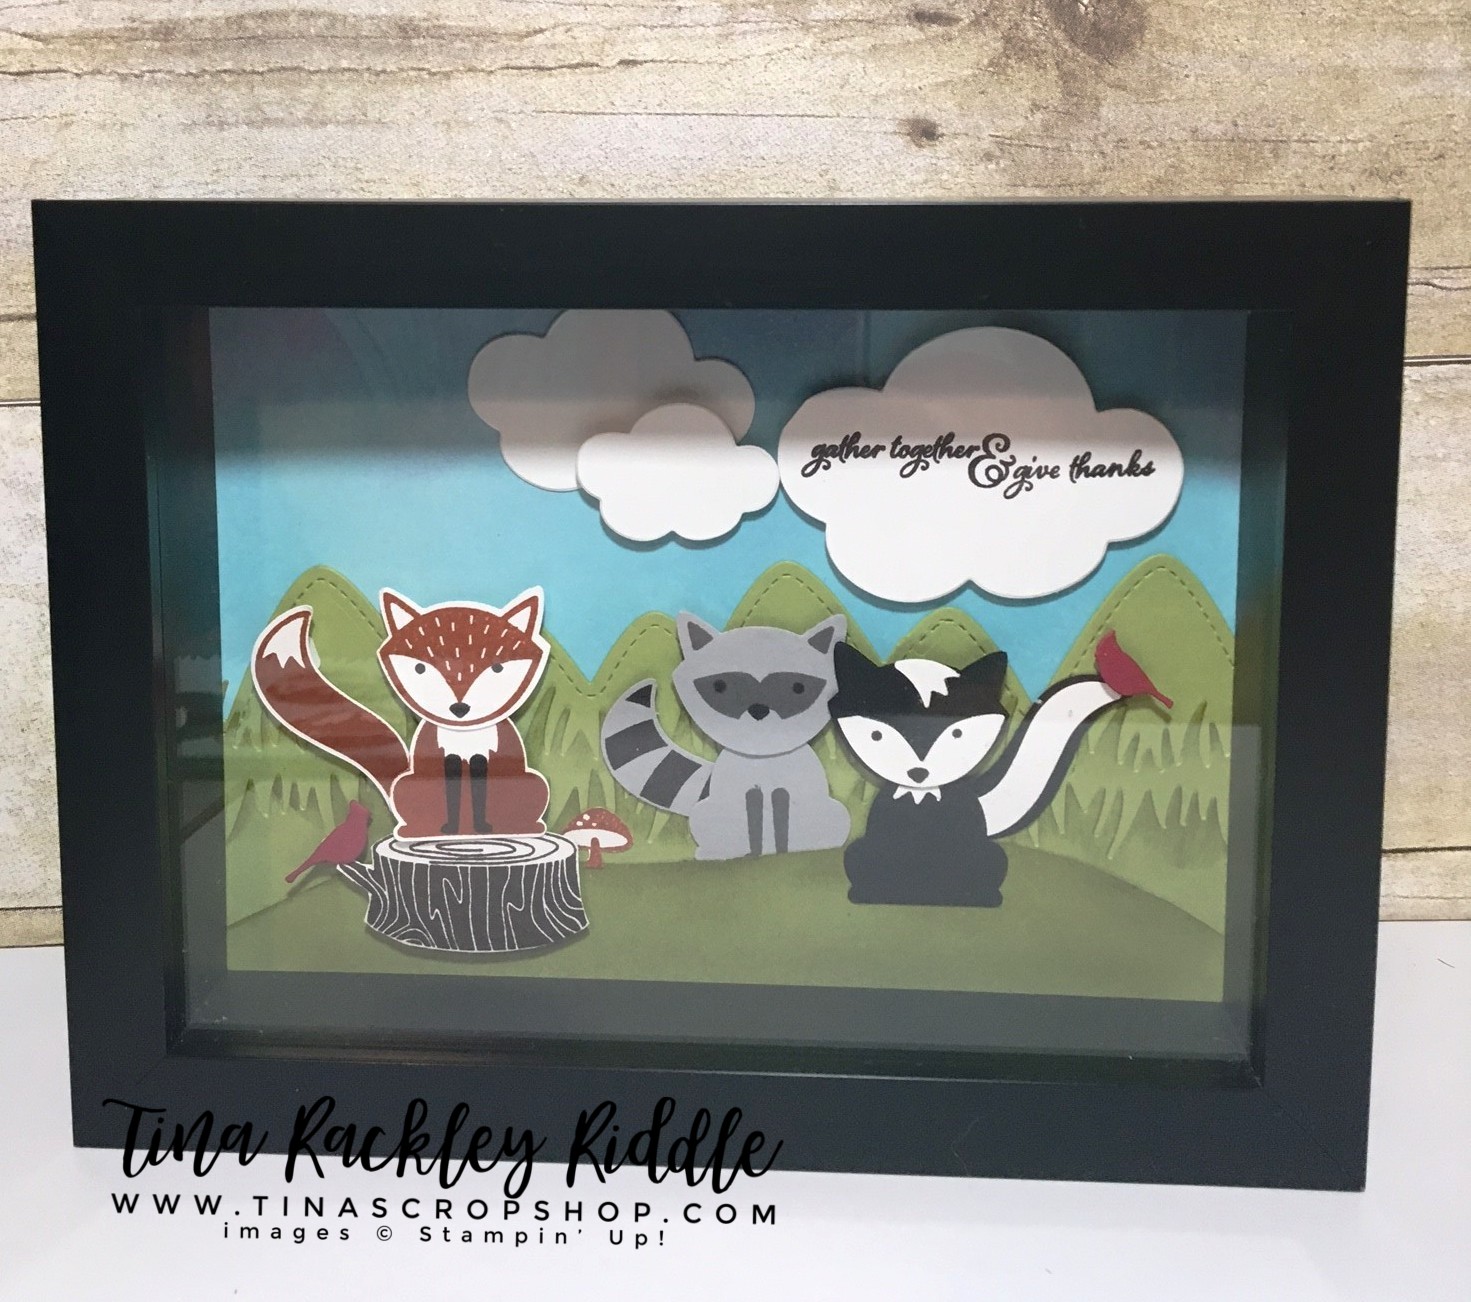
I decided to finally use a Stampin' Up! stamp set that has been in my collection since last year but not inked up yet.. Foxy Friends!  It has an awesome coordinating Fox Builder Punch.  Here's what I came up with for my card......


I love all of the creatures that can be made with the Foxy Friends stamp set... so many options!  I thought the sign was a great way to showcase the sentiment and it gave me a chance to add a little cardinal!  My husband and I love birds and cardinals are out favorite!  The adorable Keep Calm and Give Thanks Sentiment was from the September Paper Pumpkin Kit and I know I'll be using it a lot!  

And here is what I came up with for a coordinating project....


I picked up this adorable little 5" x 7" shadow box that can used with seasonal projects.  I loved the sentiment "gather together & give thanks" from the Painted Harvest stamp set!  It's one of my favorites!  You'll notice I snuck a couple of cardinals in this one as well! :)

Thanks so much for stopping by!  If you'll click the next button you'll land at Dena Rekow's Creativity Cave!  Dena is one of my all time favorite stampers and I LOVE her videos on You Tube!  If you don't subscribe, you should!  She is unbelievably creative!!


In case you lose your way.. here is a list of all of our bloggers...

  1. Elizabeth Jeanne
  2. Jenny Hall
  3. Kelly Acheson -
  4. Tina Riddle ... You are Here!
  5. Dena Rekow
  6. Maria Willis
  7. Lori Mueller
  8. Melissa Davies
  9. Megan Thompson
  10. Jennifer Hill
  11. Sue Plote
  12. Pam Staples
  13. Jessie Holton
  14. Rick Adkins
  15. Marisa Gunn

Thursday, September 14, 2017

OSAT Blog Hop - Throwback Thursday!


Hello and Welcome to the One Stamp At A Time Throwback Thursday Blog Hop!  If you have already been hopping you should have landed here from the awesome blog of  Renee Ondrajka and I'd like to thank you for continuing on!  If you've started with me let me introduce you to our theme.....Throwback Thursday!  Here's a throwback picture of me with Big Hair for you to get you in the mood.  Oh and notice the shoulder pads... lol


Ok, so enough big hair and back to the matter at hand.. Throwback Thursday!  I believe this may mean different things to different crafters but for me I thought I'd share one of my very first blog cards with you and show you how I've recreated the same type of card with new products.  My original card was from October 2013. 

 Before I get to my card I thought I'd tell you a bit about how it all started.  I started scrapbooking around 2003 when my son began playing football.  Later he joined the Marines and I scrapped all of his years of duty at various places around the world.  He still treasures those books and loves to look through them.  In 2008 I remarried and moved to Manchester, TN and continued my love of scrapbooking.  After moving here I met my sweet friend Polly and she invited me to her house to scrap.  From that point on I was at her house on Friday nights to scrap or craft.  I can still remember going over there and seeing a huge box of stamps and asking her what she did with them.  I started off by stamping things on my scrapbook pages.  Then she showed me how to use chalk ink to ink the edges of my pages.  Well that was my introduction to stamps and ink and wow has my addiction grown!  Fast forward to 2013..  I met a sweet friend named Nicole Nastali in one of the Facebook Stamping Groups and she was certainly an encourager.  I found out that she was a Stampin' Up! Demonstrator during one of our chats and I purchased quite a few additional supplies that I had been unable to find at local stores.  She always complimented my cards and often talked with me about blogging.  It was because of her that I started my blog.  My first blog post was in 2013, the same year that I made the card pictured below.  I picked this card for my Throwback Thursday project because it was my first attempt at finding a cardmarking tutorial and creating it with the stamps and patterned paper that I had. 

 Here's my card using Unity Stamp Co.  Acorn Greetings Stamp Set from 2013..


In my blog post from 2013 I explain how I made this card.  For info on the Starburst or Sunburst Design from my original blog post click here.  

For my updated version with new products I decided to go first with a Christmas Design.  Here's my Christmas Card using the new Stampin' Up! Stamp Set called Smitten Mittens. I decided to make the panel longer instead of using an edge punch to add to the panel on the bottom as I had done on my original card.


I actually got my inspiration for this card from a Stampin' Up! DSP share that I bought from Linda Heller when the new annual catalog came out.  As I thumbed through the patterned paper I loved the designs as well as the colors of Cherry Cobbler, Whisper White, and Garden Green in the Be Merry DSP.  I stamped the small Mittens in Garden Green and attached them with foam squares.  The "Smitten" Sentiment was stamped first with Versamark and then SU Cherry Cobbler Ink using my Misti and clear embossed.  I don't know how I survived without my Misti!  

My next card using this technique is a Fall Theme card using the Painted Harvest Stamp Set and the Wood Textures DSP Stack.


I stamped the flower from the stamp set onto Very Vanila Cardstock first in SU Daffodil Delight and then in SU Crushed Curry Ink.  The center was stamped in Soft Suede Ink.  I added some Pretty Pink Posh 4mm Espresso sequins in the center of the flower as well as scattered around the card.    

Last but not least I made one additional Fall theme Card..


My last card uses the Painted Autumn Designer Series Paper.  The sentiment if from the Painted Harvest Stamp Set as was the previous fall theme card.  I thought adding a Sunflower to this one would be too much so I added two Stitched Leaves from Fall Tiny Tags set by Lawn Fawn.  I ink blended some distress inks in various fall colors onto Bristol Smooth Cardstock and then die cut the leaves.  Once cut out I also sponged the edges and then tied them together and added some Natural Twine and attached them with Foam Squares.  

Thanks so much for stopping by!  I'm sure you'll want to check out every blogger's Throwback Thursday post!  Next up is Lori Mueller's blog.  Just click the next button and you'll be there!  


In the off chance you get lost along the way.. here's a list of all of our bloggers:

  1. Elizabeth Jeanne
  2. Jenny Hall
  3. Kelly Acheson
  4. Anna Smith
  5. Rose Grunewald
  6. Maria Willis
  7. Melissa Davies
  8. Jennifer Hill
  9. Jessie Holton
  10. Rick Adkins
  11. Dena Rekow
  12. Renee Ondrajka
  13. Tina Rackley Riddle - That's me!
  14. Lori Mueller
  15. Pam Staples
  16. Jeanna Bohanon
  17. Marisa Gunn
  18. Justin Krieger
  19. Andrea Tracy-Tucker


Thursday, July 13, 2017

OSAT Blog Hop - Very Vintage

Hello and Welcome to One Stamp At a Time's July 2017 Very Vintage Blog Hop!  If you have already been hopping you should have landed here from the Oh So Talented Melissa Davies' Blog and thanks so much for continuing on!  If you started with me, make sure you click the next button at the end of my post to check out all of the awesome inspiration this month!


I have to admit that I was a little stumped at first but as I googled vintage colors, cards, etc. I finally came up with an idea... thank goodness. lol  


For my card I used the Love Paris Stamp Set from Fun Stampers Journey.  I love the vintagey look of the stamp, script, etc.  For the sentiment I used the FSJ Tag Elements stamp set along with the Tag This Cartridge with my Punch Handle.  


I used Stampin' Up! Inks in Pear Pizzazz, Powder Pink and Soft Sky to stamp my background for both my card background and my Pillow Box.  


My Cardbase was Stampin' Up! Powder Pink Cardstock that measured 11" x 4 1/4" and was scored at 5 1/2" for a top folding card.  My stamped layer was Neenah Classic Crest Solar White 80# cardstock and measured 4" x 5 1/4" and was matted on a piece of SU Basic Black Cardstock that measured 4 1/8 x 5 3/8".  After I did my random stamping for the background, I matted the stamped layer and used some Natural Journey Thread to wrap it three times and added the Powder Pink Tag that had the "You are Special" sentiment stamped in FSJ Black Licorice Ink.    I stamped the Eiffel Tower in more of the FSJ Black Licorice Ink onto Neenah Classic Crest Solar White 80# cardstock.  I used my detail sheers to cut it out... about now I was wishing I had purchased the dies on this one. lol

To continue on to the fabulous blog of Renee Ondrajka, just click the next button below!


In case you've lost your way, below is a listing of all of the Blogs on this month's hop!

  1. Kelly Acheson
  2. Jessie Holton
  3. Jenny Hall
  4. Jennifer Hill
  5. Melissa Davies
  6. Tina Rackley Riddle - that's me!
  7. Renee Ondrajka
  8. Marisa Gunn
  9. Pam Staples
  10. Maria Willis
  11. Rick Adkins
  12. Jeanna Bohanon
  13. Justin Krieger
  14. Andrea Tracy=Tucker


Thanks so much for stopping by!  Blessings, Tina

Thursday, May 11, 2017

OSAT May Clean and Simple Blog Hop


 Hello friends!  Welcome to the One Stamp At a Time May Clean and Simple Blog Hop!  If you've already been hopping you should have landed here from the amazing Anna Smith's blog!  If you started with me, you'll want to make sure you hop all the way through and check out all of the fabulous cards and projects!  

Is Clean and Simple your style?  Well it honestly is not mine but I'm beginning to love it more and more.  Of course I always love everyone else's CAS cards... just not always my own!  


I started with an 11" x 4 1/4" piece of Stampin' Up! Bermuda Bay Cardstock scored at 5 1/2" for a top folding card.  My next layer was 3 7/8" x 5 1/8" SU Basic Black Cardstock and the Top Layer was Neenah Crest Solar White 80# cardstock.  The Doily is from the May Fun Stamper's Journey Bloom Box.  The stamp set is called Decorative Doily.  I stamped it in Versamark on Neenah Crest Solar White #80 cardstock and heat embossed it in White.  I used Tim Holtz Peacock Feather Distress Ink and an Ink Blending Tool to color in the image starting in the middle and working my way out so that it was darker in the center and lighter on the outside edges.  I used the coordinated dies to cut it out and and added it to my white layer and cut off part of the right side.  The sentiment is from Stampin' Up! Dragonfly Dreams.  It was heat embossed in white onto a thin strip of  SU Basic Black cardstock and adhered onto the doily with a thin strip of foam tape.  I finished it off with three Pretty Pink Posh Onyx Black Sequins.  I really love the simplicity of this one.  


For my gift card holder I used the Little B Gift Card Holder Die set to cut out a piece of 80# Neenah Crest Solar White Cardstock.  I folded the score lines and used FSJ White Liner Tape to adhere the sides.  My Doily was the smallest from the FSJ Decorative Doily Stamp Stamp Set.  I stamped it in Versamark  on more of the 80# Neenah Crest Solar White Cardstock and Heat embossed it in White.  I used Tim Holtz Peacock Feathers Distress Ink and an Ink Blender to color in the doily and then cut out with the coordinating dies.  I layered it onto a SU Black Stitched Circle from the Stitched Shape Framelits Dies and then a piece of Bermuda Bay Cardstock cut with the Circle Layering Framelits.  The small banner was dry embossed with "For You" and was part of the Little B's Gift Card Die set. I know it's a little card to see the embossed letters.  They did not photograph very well.. Sorry.

Thanks so much for stopping by!  I hope you'll continue on by clicking next.  You'll not want to miss the fabulous blog of Maria Willis! She's a Stampin' Rock Star!


Here a complete list of our bloggers in case you've lost your way!
  1. Jessie Holton
  2. Tina Rackley Riddle - That's Me!