Wednesday, May 30, 2018

PCC294 - Designer's Choice Challenge with Concord & 9th Geode Bundle

Hi Friends!  Happy Hump Day!  Tuesday really felt like a Monday all day so no doubt today will feel like a Tuesday!  Well today is another Paper Craft Crew challenge and seriously this one is hands down my favorite challenge because we can do whatever our little heart desires!

http://papercraftcrew.com/?p=6697
I just received my stamps and dies from the new Concord & 9th May 2018 release and I had to use the awesome Geode Bundle!  What is super cool is the size of this geode!  I had to use it to make a shape card since it was large enough!  The card measured 4 3/4" wide by 3 1/2" tall!
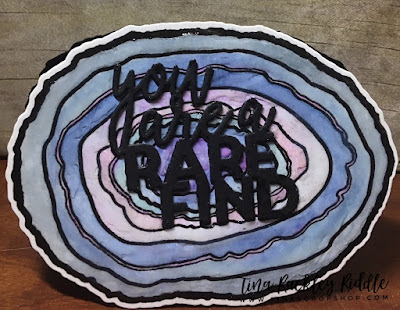

I stamped the geode on Bristol Smooth Cardstock with Versafine Onyx Black Ink and then clear embossed it.  I used a mixture of Distress Inks and Distress Oxides to watercolor the geode.  I spritzed it with some water and patted it with a paper towel and then heat set.  I used the coordinating die to cut the geode out and then also used the same die to cut an A2 Black cardbase by putting the top of the die just above the fold so that there would be a flap that would not cut through.  I adhered the watercolored front to the black card base with Tombow Multipurpose glue.  I cut the "you are a Rare Find" sentiment out 4 times in black cardstock and stacked them and then adhered to the front of the geode with more of the Tombow Mutipurpose glue.  Finally I added a boat load of Glossy Accents to the front of the rock so it would look like a rock... lol  It really turned out super cool but unfortunately by the time I finished it the lighting was not really good enough to get a great picture!  Trust me... it's awesome!  My oldest son, Trent has loved rocks since he was a little boy and especially geodes so I'm going to use this one for him!

Thanks so much for stopping by!  Blessings, Tina

Tuesday, May 29, 2018

SIP #152 - Color Challene with Hedgehog Hollow May Kit

Hello!  Happy Tuesday that for most of us will feel more like a Monday!  I hope you had a wonderful Memorial Day and are ready to start off a great week!  

This week over at Stamp, Ink, Paper our color challenge is a fun combination!  


How fun are these colors??  I decided it was about time for me to use my May Hedgehog Hollow Stamp Set so I stamped and colored up some of the fun popsicles and ice cream from the Waffle Flower Sweet Ice Cream Stamp Set!  


After I stamped the popsicles and ice cream in Memento onto Neenah Classic Solar White Cardstock, I used my copics to color them in and then fussy cut them closely so no white would show on the edges.  I also ran the brush edge of a Black SU Stampin Write Marker around the edges and then set them aside to dry.  I diecut a panel of Bristol Smooth Cardstock with a Wonky Rectangle Die and then did some ink blending.  I started with the bottom of the front panel by sponging Lemon Lime Twist on the bottom.  It wasn't quite lime enough so I sponged a little Cracked Pistachio Distress Oxide Ink over the Lemon-Lime Twist lightly towards the bottom and heavier towards the middle.  I sponged some SU Bermuda Bay Ink over the top part of the Cracked Pistachio to darken it a little bit.  I then started at the very top with Wilted Violet Distress Oxide Ink darker at the top and lighter as I came down toward the Bermuda Bay.  What a crazy combination of inks.. right?  I squirted a little water on it from my Distress sprayer and dabbed it with a Paper Towel.  It lightened a little more than I wanted it to so I ink blended a little more of the colors onto the spots.  Crazy background series but still fun to do. lol  I added the background to a panel of Black Swiss Dot Cardstock that was included in the kit and then added that to an A2 Cardbase of Gina K Designs 100# Turquoise Sea Heavy Base Weight Cardstock.   I honestly can't seem to make a cardbase out of cardstock that is not 100 or 110# cover weight anymore.  80# cardstock just seems so flimsy to me now.  I cut the "Hedgehog Hollow Die "Sweet" out of the same Turquoise Sea Cardstock three times and once I cut it out using a scrap piece of SU Black Cardstock.  I used Tombow Multipurpose Glue dotted on the back of each of the layers to stack the word and used the black on the very bottom of the die offset a little for contrast.  Once I decided where I wanted the "Sweet" on my card, I positioned the "you're so" from the Hedgehog Hollow Sweet Sentiments Stamp Set in my Misti and stamped it in Versafine Black Ink and then clear embossed it.  I adhered the "Sweet" on the card with more of the Tombow glue after my stamping and embossing was done.  The popsicles and ice cream were added with SU Dimensionals on the lower part of the card.  I used my SU Black Stampin Write marker to add a few splatters on the bottom... I always seem to get more than I intend to!  lol  Finally I added a few purple, turquoise and black sequins to finish off the card front.   The kit comes with an awesome color collection of Pretty Pink Posh sequins but I didn't use them because they didn't match the SIP color challenge colors.  I'll use them on other cards though... I'm sure! 

Thanks so much for stopping by!  Blessings, Tina

Tuesday, May 22, 2018

SIP #151 ABCs and 123s - Blend of Concord & 9th and Stampin Up! Stamp Sets


Hello and Happy Tuesday!  At some point Monday, I thought I might not survive work but here I am and I did!  lol  Hopefully Tuesday will be a much better day!  It's time for another Stamp, Ink, Paper Challenge.  This week's SIP Challenge is ABCs and 123s.

http://stampinkpaper.com/?p=4175

I decided to use my new Stampin' Up! Stamp Set for lettering called "Make A Difference".  It was one of the new stamp sets from the 2018-2019 SU catalog that I got on preorder and I love it!


If you follow my blog you know that I'm all over the place with my love of all things Stamping.  The big gorgeous rose (Painted Rose) is from Concord & 9th as is the fabulous background (Everyday Tintables Card Pack).  But my big surprise... is this new Stampin' Up! Make a Difference stamp set!  It is awesome!  So for this card I started out with my background by using Purple Tape to mask off rows on one of my Everyday Tintables Card Pack so that I could ink blend with Distress Ink every other double row.  I used Mustard Seed Distress Ink for the Ink blending.  Once I was happy with my stripes I cut the panel 4 1/4 x 5 1/2".  I had a beautiful sheer green scrap of ribbon that I tied around the panel prior to adhering to an Old Olive side folding A2 card base.  The outline of the painted rose was stamped with Versamark onto Watercolor Paper and heat embossed in white.  I watercolored with Distress Inks my focal Image.   Mustard Seed and Scattered Straw Distress Inks were used on the rose and Peeled Paint for the leaves. Once it was completely dry I also sponged a little of the same inks onto the rose and leaves to add more depth.  The coordinating die was used to cut it out and it was adhered with Dimensionals.  I snuck a partial piece of a SU White Pearlized Doily under the rose.  You can never go wrong with a hint of a Doily... right??  The Mom was created with the lettering from the Make A Difference Stamp Set in Old Olive on Whisper White Cardstock.  I cut it out with a Layering Oval Framelit and matted it with a Scalloped Old Olive Die Cut of the same set.  I finished this one off with 3 of the Sparking Clear Confetti from Pretty Pink Posh.

So back to that Make a Difference Stamp Set, not only does it have some gorgeous lettering and numbering choices but it also has some fabulous back of the card stamps for Handmade by, #Makeacard, #Sendacard, etc.  It is definitely worth checking out if you haven't already.  How cool is it to be able to stamp your address on the card, stamp any sentiment you want to put together, etc.  Sooooo much fun!  I'm a believer in this one!

Thanks so much for stopping by!  Blessings, Tina

Sunday, May 20, 2018

May Scrapbook Sunday Blog Hop Theme Challenge - Florals


Hello and Welcome to the May Scrapbook Sunday Blog Hop!  This month we have a Theme Challenge of Florals!  I love flowers, don't you??  There are sooo many options using Stampin' Up! products for flowers!  I am anxious to see what everyone creates!


If you've already been hopping, thanks so much for continuing!  If you are starting with my blog, I certainly hope you'll hop all the way through and check out all of the awesome inspiration from the Design Team.  I am inspired each month as I hop through and I'm sure you will be too!

I have been trying to catch up on some of my Scrapbooking of our Grandkids so although I am typically drawn to adding flowers to many of my pages, trying to kind a picture that I needed to scrap to use with florals was a little harder than I expected.  Finally I found a picture of Taylor and Laken from a photo shoot a few years ago and noticed there were some yellow wild flowers in the field.  This seemed like a perfect excuse to add flowers and to use one of the new Stampin' Up! In Colors!


The photograph that I chose to use was taken on such a super hot day that I felt that like I needed to create a few sunrays.  Instead of having the rays radiate down onto the photograph, I chose to have it radiate out of the photo.  Of course if you have children, or like me have grandchildren, they really are the sunshine of your life!  I used some Therm O Web icraft purple tape,  similar to painters tape or washi tape,  to tape off my sections.  I use this tape because I hate to waste my Washi Tape!  You can use the same pieces over and over to do this.  I used the new Stampin' Up! In Color of Pineapple Punch on Stampin' Up! sponges to sponge in my sun rays.. it's such a pretty vibrant yellow!


I also tried to recreate some of the grass and wild flowers that we saw that day! For the flowers I used the Daisy Delight Stamp Set and Daisy Punch, The Bouquet Bunch Framelits Dies, The Sunshine Wishes Thinlits Dies, and the Leaf Punch.  I did my journaling along the Sunshine Rays as that helps me to keep my handwriting straight.  For the flowers and leaves I used Whisper White, Pineapple Punch, Pumpkin Pie, Garden Green, and Old Olive.


Thanks so much for stopping by!  I hope you'll continue on the hop by clicking the name right after mine on the Blog Roll.  Blessings, Tina

Blog Roll...


!-- start InLinkz script --> Product List

Wednesday, May 16, 2018

PCC292 Sketch Challenge with Hero Arts May 2018 My Monthly Hero Kit!

Hello and Happy Hump Day!  I'm spending the day off with Jeff today!  He's on vacation all week so I picked a couple of slow work days to take off with him.  I'm thinking we may get caught up on a little work on our landscaping.  He really enjoys working outside and always loves when I am out there with him!  Jeff really loves rose bushes.  He's always finding another spot we can put one! 

Well since today is Wednesday, it's time for another Paper Craft Crew Challenge.  I didn't get a card made in time for last week's challenge so I'm happy I was able to create a design team card for this one!  It's a fun sketch of a square card and I love square cards :)


I was thrilled to get my Hero Arts My Monthly Hero Kit a few days ago and so of course I pulled it out for this fun sketch!


I love trees and I love silhouettes so this is a super fun stamp set for me.  There are literally so many awesome stamps and dies in this kit!  I should have a blast creating.  I used some Wilted Violet Distress Oxide Ink as well as Broken China Distress Ink to create the background of my card as well as the background of the focal image and even the strip used on the sentiment.  Of course I can't use Distress Inks without misting and dabbing for that cool speckled look.  

Thanks so much for stopping by!  Blessings, Tina
Thursday, May 10, 2018

OSAT Blog Hop On The Red Carpet

Hello!  It's that time again.....time for another One Stamp At A Time Blog Hop!  Can you believe it?  It's already the second Thursday in May!  Wow this year is flying by!   This month's theme "On The Red Carpet" can be interpreted different ways as you may have already noticed if you've already been hopping!  If you are starting with me, I hope you'll take the time to hop along and check out all of the cool inspiration!  For me On The Red Carpet means the Stars of the Show are coming out and I really believe the new Stampin' Up! Share What You Love Suite is one of the Stars of the Show!  So..... that being said, that is the suite I'm sharing with you today!

My cards and project today were made for my Mother-In-Law for Mother's Day.  She loves my cards and mentioned a few weeks ago that she needed some thank you cards so I thought this adorable little clutch and card set would really be appreciated.  I added velvet ribbon handles to my clutch but my inspiration came from a Pinterest post by Jan Farring at Jan's Stamping Creations.  For her awesome tutorial click here!  She has detailed instructions and pictures for making the clutch.


I have two cards and two envelopes on each of the two inside pockets of the purse.  If I hadn't used so much dimension and had fewer layers I'm sure I could have fit three or even four on each side!


I love when you have Designer Series Paper that really is the star of your card!  You really don't have to add too much stamping!  Here's a look of each of the four cards, all made with the same sheet of two-sided DSP.  It is such gorgeous paper!


I used the Share What You Love Cardstock Pack and chose Mint Macaron and Rich Razzleberry colors since they matched the DSP so beautifully!

Thanks so much for stopping by today!  Up next is my good friend and partner in crime Andrea Tracy-Tucker!  Just click her name on the Blog Roll and you'll be there!

Blog Roll...


Product List

Wednesday, May 9, 2018

PCC291 Card Sketch With Mama Elephant Tiny Ninjas!

Hello and Happy Hump Day!  I'm over with the awesome Paper Craft Crew Design Team today with my take on a cool new card sketch!    


Do you ever want to make an easy card?  Sometimes I just want to stamp.... no coloring, no layering, just stamp!  That was the mood I was in today so I found a sweet stamp set that I had not even used.. Mama Elephant Tiny Ninjas.  The little Ninjas in this set are absolutely adorable!


I came super close to just making this one Black and White but decided that I'd add a little gray and some Black and White DSP over my white card base.  This little guy is so cute and he looks like he's making some super adorable little Ninja moves!  I thought the hi-Ya! sentiment was perfect with his little hands in the air like he just doesn't care!  lol

I hope you have a wonderful week!  If you have a day job like I do at least you are half way through! Blessings!  tina