Showing posts with label Card Challenge. Show all posts

Wednesday, March 6, 2019

PCC329 Paper Craft Crew Sketch Challenge with Wonderful Romance and Beauty Abounds Bundles

Hello and Happy Hump Day!  I love Wednesdays because I know that when the day is over I'm over half way to Friday!!  Of course Wednesday also means another Paper Craft Crew Challenge.  This week we have another sketch for you.  


Here's what I came up combining the Wonderful Romance and Beauty Abounds Bundles..


My colors were Powder Pink, Fresh Fig, Mint Macaron and Whisper White.  I may have gotten a little layer happy with this one but I ended up loving it.   

I hope you'll head over to check out the other inspiration from the rest of the Paper Craft Crew Design Team.  Thanks so much for stopping by!  Blessings, Tina

Tuesday, February 12, 2019

SIP #186 - Product Feature, Vellum with Stampin' Up! Butterfly Gala Bundle

Happy Tuesday or as I like to call it "We survived Monday"!  What a busy, crazy, week it was last week.  I'm hope this week will be a bit better.  

Stamp, Ink, Paper has a product feature challenge this week.  Use Vellum in your card and link it up!  That's a fun challenge I think.  There are so many ways to incorporate Vellum in your project.


I am back with the Butterfly Gala Bundle again... I can't help it.  I  love those butterflies!


I'm a fan of purple and I love the new Stampin' Up! Gorgeous Grape Cardstock and Ink so that also turned out to be a product feature for me!   I also love to stamp Tone-On-Tone to make a pretty background.  To emboss the sentiment on the vellum strip in Gorgeous Grape, I first inked up the stamp in Versamark Ink and then inked in the Grape.  I quickly added Clear Embossing Powder.  I let my Heat Tool get really hot before taking it to the vellum to emboss to prevent warping.  

Thanks so much for stopping by.  A complete list of products is listed below.  Blessings, Tina


Product List

Tuesday, July 3, 2018

SIP Challenge #157 - Designer's Choice - Concord and 9th Geode Bundle

Hello and Happy Tuesday!  I hope you've been having a great week so far!  Tomorrow is Independence Day in the U.S. so many of us will have short work weeks.  It sure is nice to have a day off in the middle of the week to spend with friends and family.  I hope you'll have time to celebrate our country and our freedoms with your loved ones if you live in the U.S.  

Today is my all time favorite challenge over at Stamp, Ink, Paper... Designer's Choice!  


I absolutely fell in love with the Geode Bundle at Concord & 9th from the moment I saw it!  My oldest son, Trent,  has always had a fascination with rocks since he was a little boy!  He's 39 years old and still loves rocks and especially geodes!  As soon as I saw this set I knew that I wanted it to make his birthday card!  


Not only does Trent love Geodes but he really is a Rare Find.   He is currently living in Hawaii and has spent time in India, Mexico, and all over the world.   He loves adventure!  I wish you could see how gorgeous this card is in real life!  I used the new Concord & 9th Neutrals Glitter Cardstock in Graphite for the sentiment as well as the heart surround.  I know it's hard to tell on the heart but I die cut the heart shape and then hand cut the heart stamped image directly against the black embossing so that some of the glitter paper would show from around the edge.  The heart was stamped on Bristol Smooth cardstock and I used Zig Clean Color Markers to color in my geode.  The inside was watercolored in a lavender but I decided to use a pink glitter marker over it to add shimmer.   
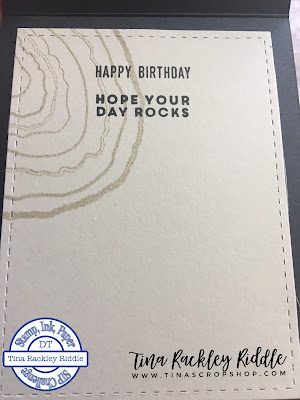

I finished off the inside with another tone-on-tone stamp of the geode.  The Happy Birthday sentiment is from another set and of course I hope your day rocks is from the Geode bundle.  I know he will love it and I hope you do too!

Thanks so much for stopping by!  Blessings, Tina

Tuesday, June 26, 2018

SIP #156 Shaker Card Challenge

Hello and Happy Tuesday!  Hope you've had a wonderful weekend and that your week is off to a great start!  It's time for another Stamp, Ink, Paper challenge and this week it's all about shaker cards!


I have to be honest in that my card was soooo super easy!  I used some awesome 6x6" patterned paper from Altenew called Reflection that is just beautiful and made for a quick and easy card!


Never underestimate the value of beautiful patterned paper!  It really did most of the work for me!  I added a sentiment from Altenew (Best Buds Stamp Set) and some sequins and then built a frame with square framelits, window sheet and  foam strips.  So simple yet really pretty!  

Thanks so much for stopping by!  Blessings, Tina

Tuesday, June 19, 2018

SIP Challenge #155 Summer Fun and Giveaway!

Hi Friends!  I have some super cool news to share!  Over at Stamp, Ink, Paper this week the top three Picks will get a free stamp Set! It's the Bold and Brushy Uppercase Alphabet!  (Must be in U.S. to win.)  Here's a picture of the cool stamp set to check out!  


There are sooooo many possibilities with this Stamp Set!  I LOVE Concord & 9th!  A matter of fact, I'm using a C&9 Stamp Set for this week's SIP Summer Fun challenge!


I'll tell you that I had a super busy birthday weekend and didn't have time to make a card until Monday night!  I whipped out my Pineapple Perfection Stamp Set and did a little coloring on Bristol Smooth Cardstock with my Zig Clean Color Markers and it was super fast and easy!


Now I don't know if a Pineapple made of flowers seems like fun to you but it does to me so I went for it!  The Zig Clean Color Markers blend so well on Bristol Smooth Cardstock.  If you haven't tried that combination I hope you will!  It really changed my world!  lol

Thanks so much for stopping by this week!  Blessings, Tina

Wednesday, May 16, 2018

PCC292 Sketch Challenge with Hero Arts May 2018 My Monthly Hero Kit!

Hello and Happy Hump Day!  I'm spending the day off with Jeff today!  He's on vacation all week so I picked a couple of slow work days to take off with him.  I'm thinking we may get caught up on a little work on our landscaping.  He really enjoys working outside and always loves when I am out there with him!  Jeff really loves rose bushes.  He's always finding another spot we can put one! 

Well since today is Wednesday, it's time for another Paper Craft Crew Challenge.  I didn't get a card made in time for last week's challenge so I'm happy I was able to create a design team card for this one!  It's a fun sketch of a square card and I love square cards :)


I was thrilled to get my Hero Arts My Monthly Hero Kit a few days ago and so of course I pulled it out for this fun sketch!


I love trees and I love silhouettes so this is a super fun stamp set for me.  There are literally so many awesome stamps and dies in this kit!  I should have a blast creating.  I used some Wilted Violet Distress Oxide Ink as well as Broken China Distress Ink to create the background of my card as well as the background of the focal image and even the strip used on the sentiment.  Of course I can't use Distress Inks without misting and dabbing for that cool speckled look.  

Thanks so much for stopping by!  Blessings, Tina

Tuesday, March 20, 2018

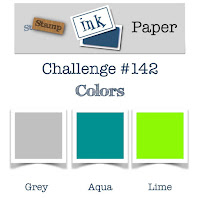
SIP #142 Color Challenge - Gray, Aqua and Lime!

Hello and Happy Tuesday!  Hope your week is off to a great start!  I'm back over with my friends at Stamp, Ink, Paper with my take on a color challenge this week!


My goal this week was to use some stamp sets that I have NEVER used!  I'm embarrassed to say there are a lot of those never inked stamp sets..... too many!!! 

So for this card I used a FSJ bundle called Dreams Follow for the butterflies and flowers.  The "hello" die is from Concord & 9th's Everyday Bundle.  I thought the peek through of the words showing the gray was a good way to bring more of the gray into the card.  

I hope you have a wonderful day!  Blessings, Tina


Tuesday, December 19, 2017

SIP #130 Say No To Christmas with Stampin' Up! Cake Soiree

Hello and Happy Tuesday!  Hope your week is off to a terrific start!  Last weekend was a fabulous weekend for us and I'm looking forward to the end of the work week so I can enjoy an extra long Christmas weekend!  I'll be off work for 4 days in a row!  Woo Hoo!  I just have to get through 3 more work days after today and it's sweet long weekend freedom!  

As usual, Tuesday means another Stamp, Ink, Paper Challenge and this week's it's Just Say No to Christmas which basically means.. make anything BUT a Christmas Card!  Well isn't that easy!


Have you ever had a day where everything just goes wrong?? Well that was the type of day I was having when I started playing around with this Cake Soiree Stamp Set and Sweet Soiree Framelits.  First of all.. it's a fabulous stamp and die set.  There are just soooo many possibilities.  I started stamping, coloring, and playing around with it and everything I tried to do just didn't work.  I finally decided to just breathe in, make it a little crazy and love it like that. lol


My background was created on SU watercolor cardstock by pressing some Tim Holtz Distress Inks onto wax paper... I used Peeled Paint, Mustard Seed and Picked Raspberry.  After inking the wax paper, I sprayed it with my Distress sprayer and then squished it onto the watercolor paper.  I used my heat tool to dry it.  Once completely dry, I embossed the Best Wishes Sentiment in the upper right hand corner.  I used my Lil' Inker Stitched Rectangle Dies to cut out the watercolored panel.   The cake was heat embossed in black onto Whisper White Cardstock.  I used the Stampin' Blends to color in the case.  The cake stand was cut out of Gold Foil Cardstock.   The flowers on the top of the cake were stamped in Daffodil Delight and Melon Mambo and the leaves in Old Olive.   I added some gold sequin trim in the upper left corner with a stapler and then added a some Pretty Pink Posh Sparkling Clear Confetti.  I adhered the panel onto another panel of Old Olive Cardstock and then adhered that onto Basic Black panel cut with the Mama Elephant Scallop die from the All Prettied Up Creative Cuts Dies.  All of that was adhered to a top folding Neenah Classic Crest Solar White card base.  Kind of crazy.. a lot going on... but I still like it!   I had tried mounting it just on the Old Olive and then white but it really needed the black to make the colors pop!  

Thanks so much for stopping by!  Blessings, Tina

Here's a list of the Stampin' Up Products Used:


Product List

Wednesday, December 13, 2017

PCC272 Sketch Challenge with Stampin' Up! Merry Little Labels

 Hello and Happy Hump Day!  I hope you're having an awesome week!  I've been sick the last 4 days so I'm hoping it will be looking up pretty soon!   Since it is Wednesday, I'm over with the Paper Craft Crew with a Design Team Card for a sketch challenge!  I think this is a super fun sketch with lots of possibilities!


I decided to use the Merry Little Labels stamp set and make a Let it Snow themed card..


So when I bought this stamp set I could have sworn I had the coordinating Everyday Label Punch... well I was wrong.  So I fussy cut around the stamped image... ugh!  I had stamped the Let It Snow stamp with Versamark onto Dapper Denim cardstock and then heat embossed the image in white.  The DSP used was from the Christmas Around the World DSP pack.  I cut the snowflake in Whisper White from the Seasonal Layers Thinlits Dies.  It was super fun and easy.  I loved this sketch!

Thanks so much for stopping by!  Blessings, Tina

Tuesday, December 5, 2017

SIP #128 - Let it Snow! Lawn Fawn Exclusive Christmas Like No Otter


Hello and Happy Tuesday!  Hope you are having a wonderful week so far!  This week over at Stamp, Ink, Paper we have a fun Let It Snow Challenge!  There are sooo many possibilities with this one!!


My original thought was to make a snow scene using the Lawn Fawn Birch Tree Dies and the design just expanded from there.  What do you think??


First of all I cut my birch trees out in 110# Neenah Classic Crest Solar White Cardstock.  Next I made my card base out of the same cardstock for a top folding card.  For my ink blended background I used a piece of Bristol Smooth Cardstock.. I love the way distress ink blends on it!  I started out by blending Broken China Distress Oxide Ink on the top of my Bristol panel.  I blended it into Wilted Violet and then blended that into Worn Lipstick at the bottom of the panel.  I decided that the top needed to be a bit darker so I blended in some Faded Jeans Distress Oxide ink.   I used my  Tim Holtz Distress Spritzer to spritz water and then dabbed a paper towel on it and heated it with my Heat Tool.  Once I was happy with that panel I used my Lil' Inker Designs Stitched Rectangle Die to cut a panel out.  I also used the top of the same stitched rectangle to make stitched details on the top of the birch trees.  I adhered them with Ranger Multi Medium Matt.  I then used more of the Neenah Classic Crest Solar White in 110# to cut out 3 layers of Lawn Fawn stitched hills.  I adhered two layers of stitched hills on the bottom of the card with more of the Ranger Multi Medium Matt.   For the top layer of stitched hill I used the same Lil' Inker Designs stitched rectangle die to make the stitching up the side and on the bottom so it would match the rest of the card and used foam tape on it to give it dimension.  The snow was made by adding small drops of Nuvo Crystal Drops in Simply White.  Once those were dry I added some Pretty Pink Posh Sparkling Confetti.  I used my Misti to add the sentiment from a Hero Arts Stamp set called Winter Animals.  It was an add on set for the November My Monthly Hero Kit.  My original idea was just to make a scene but then I realized it needed something extra.  I thought about the animal silhouettes from the Winter Animal stamp set but since they were silhouettes and I had so much white, I thought the all black silhouettes might be too much.  I decided to stamp one of the otters, the present and the santa hat from the Exclusive Lawn Fawn Simon Says Stamp Set called "Christmas Like No Otter".  I used Stampin' Up! Stampin' Blends to color them in and I fussy cut them out.  I used a black marker to color in the edges so as to hide my not so great fussy cutting.  I first adhered the otter on the back slopes with foam tape.... then I realized that the back slopes should be water... Duh!!  lol  So I added some Peacock Feathers Distress ink to a small acrylic block, added a little water and used my aqua painter to pain the back slopes like it was a stream.  I wasn't completely happy with how the water looked so once dry I used a stampin' blend marker to color over it.  Leave it to me to change my plan.. lol  I used a white gel pen to add a some small dots of snow to the water.  I added more sparking Confetti to the front snow slope around the sentiment.  Finally... I decided it looked pretty good.  I added the panel to the Neenah Classic Solar White 110# Cardbase.  I toyed with matting it but decided it looked better directly on the White.  Whew!!!  What a process this one was.  

Here's how I finished up the inside....


Thanks so much for stopping by!  Hope you'll take the opportunity to make a "snow" themed card and link it up for the challenge!  Blessings, Tina

Wednesday, October 18, 2017

PCC #264 Color Challenge with Stampin' Up! Brightly Lit Christmas!

Hello and Happy Hump Day!  I always feel like when I've made it to Wednesday I can get through the rest of the work week.  This weekend will be another trip to Knoxville to see three of our granddaughters.  That's something to look forward to for sure!

Well of course since it is Wednesday that means another Paper Craft Crew Challenge.  This week's card is for a color challenge.  


I have to tell you that at first I wasn't feeling it.  I've made so many Halloween and Fall cards and I really didn't want to go in that direction.    The great thing about this color challenge is that we can pick a mystery color to add to the mix.. well I wanted to make a Christmas card so I went with Red!


During World Card Making Day, I bought the Stampin' Up! Brightly Lit Christmas stamp set as one of their specials so of course I had to use it!   The light post and sign holder were stamped in Versafine Black Onyx and clear embossed on a 4 x 5 1/4" piece of Whisper White Cardstock.   I used a sponge with a small amount of Pumpkin Pie Ink on it to sponge the light in the light post.  The sign was stamped in Lemon Lime Twist directly under the sign holder.  MFT Die-namic Stitched Scallop Basic Edges Dies were used to cut a curved edge on the panel.  I mounted the panel on a 4" x 5 1/4" piece of plaid DSP from the Christmas Around the World DSP pack.  I then mounted that onto a piece of Lemon Lime Twist that measured 4 1/8" x 5 3/8" and attached that to a Real Red top folding Card Base.  I decided the lamp post needed the bow from the stamp set so I stamped it in Real Red on a scrap of white cardstock.  The bow was fussy cut and a Real Red marker's brush tip was used to color the edges so no white was showing.  I added a strip of White Glimmer paper hand cut like a snow bank to the bottom of the white panel to ground my light post.  To finish this off I used some Journey Glaze to cover the bow as well as the glass on the lantern.  I really love how this one turned out.  I've been struggling with Lemon Lime Twist so I was glad to be able to use it on a Christmas Card and feel good about it.  That color was just a bit of a stretch for me. 

Thanks so much for stopping by!  Blessings, Tina

Tuesday, October 3, 2017

SIP Challenge #119 Card Makers Choice with Altenew Budding Thanks

Hello and Happy Tuesday!  Hope you are having a wonderful week so far!  Is the weather where you live beginning to feel like fall?  It is here in Middle Tennessee and it feels so wonderful!  I spent a little time on Sunday sitting on the deck and enjoying the beautiful weather with our dogs while my husband was watching football.  What a wonderful peaceful day.. those are the best kind of days!

 This week over at Stamp, Ink, Paper we have my very favorite type of Challenge... Card Maker's Choice!  


I decided to pull out my Altenew stamp and die set "Budding Thanks" that I have barely used and love so I felt like it would be a great time to get some more use out of it.


I just adore these blooms and they layer so beautifully!  This was very simple but lately simple cards have been my favorite!  I started with a Neenah Classic Solar White 110# Card Stock base that measured 5 1/2" x 8 1/2" and was scored at 4 1/4".  My stamping was all done using Altenew Floral Mini Ink Cube Set  and done on the same Neenah Classic Cardstock.  I stamped the stems and leaves directly on the cardstock panel.  The flowers were stamped on another piece of the same Neenah cardstock and then added using fast fuse for the bud and foam squares for the larger bloom.  I stamped the "Best Wishes" sentiment that was from the Hero Arts "Color Layering Large Orchid Stamp Set" on the upper right corner in the Forest Glades Altenew Ink Cube (darkest of the green ink included in the Floral Mini Ink Cube Set.  The dies used for my stitched and scallop layers is the Mama Elephant Creative Cuts Basic Set.  It includes a lot of awesome dies and it one of my favorite layering sets.  I added some Pretty Pink Posh Sparkling Clear Confetti with Ranger Matt Medium to finish this one off. 

Thanks so much for stopping by!  Have a blessed day!