Showing posts with label Wedding Card. Show all posts

Thursday, April 9, 2020

OSAT Blog Hop Celebrate April 2020


Hello and Welcome to the April 2020 One Stamp At A Time Blog Hop!  This month's theme is all about Celebrations!  If you are starting with me, I hope you'll make sure to take the hop to all of the other blogs for some fabulous inspiration!  If you started elsewhere, thank you for continuing on!

For my celebration theme, I went with a Wedding Card and Gift Card Holder Pillow Box.   For my card,  I used the beautiful Forever Blossoms Bundle, the Birch Cling Stamp,  as well as the brand new Ornate Layers Dies that just became available to customers on April 1st!


I am loving the New Ornate Layers Dies.. they are just beautiful layered up! 


My cardbase is an 11" x 4 1/4" half sheet of Mint Macaron Cardstock that was scored at 5 1/2" for a top folding card.  I stamped the Birch Stamp onto a piece of Whisper White Cardstock with Sahara Sand Ink that had been stamped off once for a 2nd generation lighter image.  I used the Ornate Layers Dies to cut the layer and attached some Petal Pink Metallic Edge Ribbon around the panel and tied it in a bow on the right side.  I added another layer from the Ornate Layers Dies vertically over the card front on the left side with Dimensionals.  I stamped the beautiful floral image from the Forever Blossoms Bundle onto another piece of Whisper White cardstock with more of the Sahara Sand Ink.  I used Petal Pink light and dark and Mint Macaron light and dark Stampin' Blends to color in the floral image and used the coordinating die to cut it out and then attached it to the vertical layer with Multipurpose Adhesive.  I stamped the sentiment onto another scrap of Whisper White Cardstock and used another of the Ornate Layer Dies to cut out the sentiment and added it to the bottom of the card front just above the decorative edge of the front panel diecut.  I finished it off by adding three Champagne Rhinestone Basic Jewels.  


I used one of the Kraft Pillow Boxes for a gift card holder.  I stamped a sentiment on yet another scrap of Whisper White cardstock with Sahara Sand Ink.  Using yet another of the Ornate Layers Dies, I cut out the sentiment and added it to the front of the Pillow Box.  I added a simple bow with more of the Petal Pink Metallic Edge Ribbon on the upper left corner of the diecut sentiment with a glue dot.  I stamped a single blossom and double leaf from the Forever Blossoms bundle with the same Stampin' Blends that I used to color in the other floral image.  I used the coordinating dies for those as well and added it to the lower left side of the die cut sentiment to finish it off.

Thanks so much for stopping by!  I hope you'll go to the next blog and continue on for lots of awesome inspiration!  Remember, you are at Tina Riddle's blog, so click the name directly under mine on the below Blog Roll!

Blessings, Tina


Product List

Tuesday, May 21, 2019

SIP #200 Designer's Choice - Case a Designer

Hello and Happy Tuesday, also known as "I survived Monday"!  My kitchen remodel is still not complete... ugh!  I have most of my kitchen packed up in my craft room still.  This does not make for a fun card marking experience!  This week's Stamp, Ink, Paper is Designer's Choice.  Luckily for me I had recently received my Everything is Rosy Product Medley and it was easy to get to!

Here's my card using the Everything is Rosy Product Medley!


The colors I chose were Blushing Bride, Soft Suede, and Whisper White with Rose Gold Accents.  The background of Blushing Bride was stamped tone on tone with last month's Paper Pumpkin Rose stamp.  I love that etched image and have used it several times.   I loved that the Everything is Rosy Product Medley had labels ready to stamp a sentiment on.  I honestly could have used some of the floral die cuts that came with the suite but I decided to stamp and die cut my own.  I added some die cut Rose Gold foil greenery and added a few dots of the Rose Gold Shimmer Paint.   I finished it off with 3 of the Rose Gold flat sequins.  This kit is a little pricey but sure has a lot of fun components!

Thanks so much for stopping by!  Blessings, Tina

Thursday, March 8, 2018

OSAT Blog Hop Happily Ever After


Hello!  Can you believe it's already the second Thursday in March??  It's time for another One Stamp At A Time Blog Hop!  This month's theme is Happily Ever After and I'm sure that means different things to different people.  When I think of happily ever after I think of a wedding that joins two people together with the intent of living the rest of their life happily together!  So with that in mind, I made a wedding card and a mini treat bag that I will use as a gift card holder!


I have to admit that when I first saw the Petal Palette Stamp Set I wasn't sure if I loved it... well let me tell you I do now!  It is absolutely awesome!  So many great sentiments and so many possibilities!  I really REALLY hope that Stampin' Up! will keep this one around!  It is perfect for a Wedding card, a Congratulations card, a Love You card, Thank you card, and it goes on and on and on!  I seriously think this is my favorite stamp set!  


I finished the inside by just adding the congratulations sentiment and part of the branch die from the Petals & More Thinlits Dies cut in the awesome Painted with Love Specialty Designer Series Paper.

Thanks so much for stopping by!  For a list of the products used, please see directly below the blog roll.  You are at Tina Riddle's blog now so to continue on, just click on the next blog!


Blog Roll...


Product List

Tuesday, July 7, 2015

SIP Challenge #4 Inspiration Challenge

Hello and Happy Tuesday!  Hope you've been staying dry in your neck of the woods.  There's been quite a bit of rain and some pretty bad storms through Tennessee the last few days.  Today I'm back over at the Stamp, Ink, Paper Challenge Blog with an Inspiration Challenge!
http://stampinkpaper.com/2015/07/sip-challenge-4-inspiration/

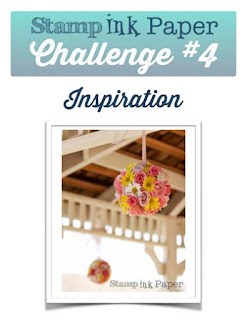
This beautiful Inspiration Picture is from my friend Andrea's Wedding. Those flowers were absolutely gorgeous!  


I decided since the picture was from a wedding, that I would make a wedding card for a sweet friend at work that is planning her wedding.  I started with an A2 110# Neenah Crest Solar White Cardbase. I layered on a 5 1/4" x 4" piece of Daffodil Delight cardstock that was embossed with the Spring Flowers embossing folder.  I glued on a piece of Blushing Bride Chevron Ribbon on the left side of the yellow layer and then adhered it to my card base.  I cut a piece of Pink Pirouette cardstock with my My Favorite Things stitched circles die as well as a smaller circle in Whisper White cardstock.  I stamped my circle of leaves from the "Your Perfect Day" stamp set on the whisper white in Garden Green ink.  I then stamped some flowers on it in Daffodil Delight and Blushing Bride.  I punched out 4 Daffodil Delight and 4 Pink Pirouette flowers out from scrap cardstock and inked the edges tone on tone.  I added them to the circle of leaves with glue dots and added Basic Pearl Jewels into the middle of both the stamped flowers and the punched flowers.  I also used Daffodil Delight to stamp the sentiment into the middle of the circle.  I layered the circles with Stampin' Dimensionals and adhered them to the card.  I made a bow of Whisper White Seam Binding and adhered to the bottom of the Chevron Ribbon with White Twine.  I topped the bow with a rose that was cut from Blushing Bride Flower Trim.  I really love the way it turned out!

Here are the Stampin' Up Products I used:

Built for Free Using: My Stampin Blog


The Non-Stampin' Up! Products used:

My Favorite Things Stitched Circle Die Stax

Thanks so much for stopping by!

Blessings,
Tina