Showing posts with label Stampin' Up! Feel Goods. Show all posts

Wednesday, May 4, 2016

ICS Blog Hop - Girl's Night Out!


Hello and welcome to May's Inspire, Create, & Share Blog Hop!  If you've already been hopping then you should have landed here from Terri Takashige's fabulous blog! and already know that this month's theme is Girl's Night Out!  

Girl's Night Out may mean something different to me than it does to you.  My version of a night out with my friends is to head over to Starbucks for some coffee, maybe a little shopping and of course always a nice dinner.  When I think of my friends, it reminds me that people are so much more important than things.  I have some wonderful friends and wouldn't trade them for the world! One of my favorite sets and is unfortunately soon retiring, is "Feel Goods" and I just love the sentiment "the best things in life aren't things"!


I started off with an 11" x 4 1/4" piece of Basic Black cardstock that was scored at 5 1/2".  I added a piece of the Neutrals Collection Designer Series Paper Stack in Black with white polka dots.   I stamped my sentiment in Memento Tuxedo Black Ink onto Whisper White Cardstock.  I cut the sentiment out with one of my Circle Framelits and adhered it to my card front with Fast Fuse.  I also cut out a Window Sheet with the same size Circle Framelit.  I made a frame out of two circle framelits by using a size larger Circle Framelit, and a size smaller framelit (skipping the size I used to cut out my sentiment and window sheet) so that it was a thick enough frame to add some strips of foam tape.  The edge of the window sheet was attached to the back of my circle frame with the foam tape   The sequins in my shaker card were from the Brights collection with a few random white sequins that I had hanging around my craft room.  After laying the sequins onto the sentiment, I attached the shaker frame with the foam tape already on it, onto the area surrounding the sentiment.   The Melon Mambo flowers were cut out using the Botanical Builder framelits. I added the small black center and then added a coat of Clear Wink of Stella onto the Petals.  For my white flowers, the larger layers were punched with the Pansy Punch, two smaller layers were from the Blossom Bunch Punch, and then a black layer that was back from the Botanical Buiders framelits again.  I put a Basic Pearl in the center of each flower.  I also used the Botanical Builder Framelits for my leaves that I cut out of Wild Wasabi Cardstock.  I used dimensionals to adhere my flowers and used multipurpose glue to adhere the leaves.  I added some Black and Melon Mambo baker's twine in two loops around the top of the card and then tied it in a bow on the right hand side to add some balance.  

Next up on the hop is my friend, and double-up line, Darla Roberts!  Just click the next button and you'll be at her blog!


Here are the Stampin' Up! products I used today:

Feel Good Stamp Set
Circle Framelits
Botanical Builder Framelits
Blossom Bunch Punch
Pansy Punch
Basic Black Cardstock
Melon Mambo Cardstock
Whisper White Cardstock
Brights Sequins
Neutrals Collection DSP Paper Stack
Black and Melon Mambo Baker's Twine
Basic pearl jewels
Mini Glue Dots
Tombow Multipurpose Glue
Fast Fuse
Stampin' Dimensionals

Thanks so much for stopping by!  Blessings, Tina


Tuesday, September 22, 2015

SIP Challenge #15 Color Challenge

Good Morning!  Have you ever looked at colors in a color challenge and wondered why you hadn't thought of those colors together?  That's exactly what I did when I saw the banner for this week's SIP Color Challenge!

How gorgeous are these together, right??  There are so many possibilies but I decided to pull out my favorite sentiment set, Feel Goods, and do a simple Reverse Smooshing background.


Reverse Smooshing.. yep, that's what I said.  How fun is that??  I saw such a fun quick tip tutorial on it on an email from Unity Stamp Co.  The quick tip came from Heather Hoffman.   If you don't follow Heather, I can tell you right now, she is Fabulous!!  


Now, I've Smooshing for a while now but I had never Reverse Smooshed... well now I'm hooked. lol So here's how it's done... I started with a 4 x 5 1/4" piece of watercolor paper.  I heat embossed my sentiment in black embossing powder first.  Then I laid a piece of wax paper over my card front and pushed my ink directly onto the wax paper (remember it will be reverse from where you are putting it now).  Once I had applied both colors of ink, in this case Daffodil Delight and Pool Party, I spritzed the card front a few times and then placed the wax paper ink side down onto it.  Rub your hands over the back of the wax paper to apply the ink and allow it to smoosh out.   That's it.  How easy is that!  I mounted it onto a Basic Black card base, added a few Pretty Pink Posh sequins and called this one done!


Here are the Stampin' Up! Products used:
Built for Free Using: My Stampin Blog


Non Stampin' Up Products:

Pretty Pink Posh Sequins
Wax Paper

Thanks so much for stopping by!

Blessings,
Tina

Tuesday, August 11, 2015

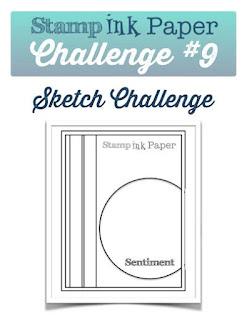
SIP Week #9 Sketch Challenge

Hello all!  Hope you're having a wonderful week so far.  As a reward for surviving Monday, we have a fun sketch challenge for you over at SIP!
I took a little bit of creative license with mine and used vines on the left side and the new Lots of Labels Framelit Dies instead of a circle.


I started with a A2 Card Base of Cajun Craze.  I then embossed a 4" x 5 1/4" piece of Crumb Cake cardstock with one of my new favorites, the Brick Wall Embossing Folder! With my aqua brush I painted in the raised portion of the brick.  After adhering it to my cardbase, I attached two vines that I cut with a Memory Box Woodland Branch die onto Mossy Meadow Cardstock with Two-Way Glue. One person's branch, is another person's vine, right??  I added some flowers punched from Daffodil Delight cardstock with one of my mini punch pack punches. The edges were sponged tone on tone and a small basic pearl jewel was added to the center and then adhered to the vines with glue dots.  My awesome sentiment is from the "Feel Goods" stamp set and was stamped in Cajun Craze onto Very Vanilla cardstock and cut it out with the Lots of Labels Framelets Dies.  The edges were sponged with Cajun Craze Ink and edge of the right side was cut to mimick the sketch.  I then adhered the Sentiment/Label to my Brick Wall with Stampin' Dimensionals.  I used a Candy Dot on the Left side and added another Daffodil Delight flower on the lower right side of my "Sign".

Here are the Stampin' Up! Products I used:


Built for Free Using: My Stampin Blog


Thanks so much for stopping by!

Blessings,
Tina