Wednesday, September 21, 2016

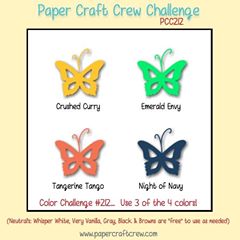
Paper Craft Crew Color Challenge #212

I have some super exciting news!  I have the honor of joining the Paper Craft Crew Design Team!  I'm thrilled to join such an amazing group of Paper Crafters!  I hope you'll check out the PCC challenge and link up a card of your own!  Just pick any 3 of the 4 colors for your card!

http://www.papercraftcrew.com/pcc-212-bold-color-challenge/

I decided to go with Crushed Curry, Emerald Envy and Night of Navy for a simple Celebrate Today Balloon Shaker Card.


For my card I started with an 11" x 4 1/4" piece of Night of Navy Cardstock, scored at 5 1/2".  On a piece of Whisper White Cardstock that measured 4" x 5 1/4", I stamped in Emerald Envy the Celebrate sentiment from the Celebrate Today Stamp Set on the lower right side.  I then cut out Balloons with the Balloon Framelit Dies in Emerald Envy, Crushed Curry, and Night of Navy.  I stamped the Balloon bubbles tone on tone on the Crushed Curry and Night of Navy Balloons.. seriously I have no idea what you call the stamp I used but I call it balloon bubbles. LOL  I glued my Crushed Curry Balloon directly onto the White Cardstock layer.  I attached the Night of Navy Balloon with dimensionals on the right side to layer onto the Crushed Curry Balloon.  In the Emerald Envy balloon, I used one of the layering circle framelit dies to cut a hole inside of it.  I then used another of the layering circle framelits to cut a back that was bigger than the opening, in the Emerald Envy for the back of the shaker.  I cut out another circle in between the two sizes in a Window Sheet.  I used foam adhesive strips to attach my window sheet to the back of the balloon front.  I doubled up another layer of foam strips on top of that to give my Doodlebug Limeade sequins plenty of room to shake around.  Next I added my sequins to the balloon shaker and then attached my balloon back.  I then used Multipurpose glue to layer over my other two balloons.  I attached the twine to the bottom of all of the balloons by tying a little knot and then used some Ranger Multi Medium Matte to attach the twine where they met at the side of the card layer.  The great thing about the Multi Medium Matte is that it glues matte so it isn't shiny or sticky once it is dry. 

Thanks so much for stopping by!  Blessings, Tina


Product List

Tuesday, September 20, 2016

SIP Challenge #66 - Anything But a Card!

Hello and Happy Tuesday again!  I hope your week is off to a great start!  I had a craft fair last weekend and have two more coming up this Saturday and the next!  Today's challenge at Stamp, Ink, Paper is a super fun one.. Anything But a Card!!!

http://stampinkpaper.com/2016/09/sip-challenge-66-anything-but-a-card/

Have you ever made a mistake and it turned into something cool!  Well that is exactly what I did on this project!  I was scoring and cutting some 12x12" cardstock to make One Sheet Wonder Mini Albums and I made a cut someplace where I should have scored!  Ugh!  Not to worry.. I decided to make a triple gift card or tag holder!


So here you see the front of the gift card holder.  Luckily I had some retired DSP with Mooses on it to go perfectly with the Moose Head from the Jolly Friends Stamp Set.  The sentiment on the front is front the Santa's Sleigh stamp set.


For a closure, I used BasicGrey Small Magnetic Snaps.


As the gift card holder unfolds, you see the inside sentiment, also from the Santa's Sleigh stamp set.  You will also see the first gift card pocket.


And as you completely unfold it, you will see all 3 gift card or tag pockets!

So see, sometimes when you make a wrong cut, it all works out wonderfully!  lol  I am happy to get some use out of some of my retired DSP.   At the end of this post is a list of all of the current Stampin' Up! products used as well as directions!  Thank's so much for stopping by!  Blessings, Tina
 
Directions
 
Score a piece of 12x12 cardstock on one side at 2 3/8" and 7 1/4"
Rotate and score the next side at 3 7/8", 4 1/8", 8" and 8 1/4"
Use your bone folder on all of the score lines so that they will easily fold.
When you look at the cardstock, you will see 3 short sides (for the flaps) and 6 rectangles that are approximately the same size. 
Cut off the 1st of 3rd small flap rectangles.
Cut between the 1st and 2nd bottom rectangles and the 2nd and 3rd bottom rectangles to make the larger flaps that will fold up to make the pockets
Cut off about 1 1/2" from the bottom rectangles and use a circle punch to punch a dip in each of those three rectangles.
Use a strong glue or tear tape to adhere the sides of the bottom rectangles when you fold them up to create your pockets.  I used tear tape and it worked very well!
Decorate as little or much as you want to. 
 

Product List

Tuesday, September 13, 2016

Thoughtful Branches Love!

Wow!  Two posts in one day never happens!  lol  I just realized that I had made a card with Thoughtful Branches that I hadn't shared.  I just LOVE this bundle and I hope that they bring it back to the next annual catalog but for now, it is only available in September!  If you don't have it, please don't pass it up!  There are sooo many possiblities!


This was just a super simple Tone on Tone card that was super fast and I really love it!  That little bird is just adorable!  

Here's the inside...


Here's a list of the supplies needed if interested!  Blessings, Tina 

Product List

SIP Challenge #65 - Monochromatic!!

Hello and Happy Tuesday!  Of course, as usual, since it's Tuesday, that means I'm back over at Stamp, Ink, Paper with another Design Team Card.  This week we have a Monochromatic Challenge!  
http://stampinkpaper.com/2016/09/sip-challenge-65-monochromatic/
 I'll be very honest.. I really wanted to NOT use blue but I couldn't do it!  lol  I guess I'm just such a fan of the blues.. Maybe it's because I'm from Memphis. LOL  Of course, I'm also very much a fan of Nautical cards!  So there lies the problem.. how to go Nautical without blue??


This card is a combination of Our Daily Bread Fishing Net Background Stamp, Stampin' Up! By the Tide (sadly retired!), and Hero Arts Color Layering Goldfish.  I really love the sentiment.. Just Keep Swimming from the Hero Arts set!  I have a friend at work that is going through some tough times so I thought this would be a great card to give to her for some encouragement.  My cardbase is a 8 1/2" x 5 1/2" piece of  Mint Macaron scored at 4 1/4", My mat is Island Indigo and I did my stamping on a small scrap piece of Soft Sky.  I first stamped my fish from the By The Tide Stamp Set in Island Indigo and then cut a mask of the fish by stamping it on masking paper and then fussy cutting it.  I placed the mask over my fish and then stamped the fishing net in Tempting Turquoise.  I stamped the seahorse (also from the By The Tide set) in Island Indigo.  I then used my Stampin' Up! sponges to sponge on some Marina Mist and then some Island Indigo leaving the darkest around the edges.  I decided I wanted the seahorse popped up so I stamped him again on a scrap of Mint Macaron with Island Indigo ink and then fussy cut him and glued him over the other stamped image!  My sentiment was stamped in Island Indigo Ink onto Mint Macaron cardstock and backed in an Island Indigo mat.

Thanks so much for stopping by!  I hope you'll head over to Stamp, Ink, Paper and link up a monochromatic card of your own!  Blessings, Tina

Thursday, September 8, 2016

OSAT Blog Hop - Birthdays Bash!


Hello and welcome to One Stamp At A Time's September Birthdays Bash Blog Hop!  If you have already been hopping then you should have landed here from the Super Talented Pam Staples blog and I'd like to thank you for continuing on with the hop!  If you are starting here with me, please make sure that you visit all of the blogs on the hop for some super fun and unique inspiration!

For my card and project I decided to use the awesome Blooms & Bliss Designer Series Paper from Stampin' Up!  I love the colors and I especially love the combination of Island Indigo and Mint Macaron!  The flowers on one of the DSP designs looks much like a blue poinsettia to me so I decided to use my Festive Flower Builder Punch to recreate it.  


Usually I sponge the edges of punched flowers but since I was recreating the flowers on the DSP, I left them as is.  Sometimes simple is fine.. I have to tell myself this at times.  The large flower is Island Indigo and Mint Macaron, and the two smaller flowers and Mint Macaron and Sahara Sand with a bit of white.  I used the small flower in the Tree Builder punch for my flower center.  The Happy Birthday sentiment on the banner is from the Crazy About You Stamp Set.

I also created a Curvy Keepsake Box to match and kept this one really simple by making it in Mint Macaron with an Island Indigo and Mint Macaron flower and an Island Indigo tag.  I added a little matching sequin trim to both the card and the Curvy Keepsake Box.


Last but not least, I added a few Doodlebug Sequins that matched the Island Indigo on both the card and the Curvy Keepsake box.  

Please make sure to stop by the Amazing Justin Krieger's blog by clicking the next button!


Here is a list of all of our Talented Bloggers in case you lose your way!
  1. Megan Thompson 
  2. Anna Smith
  3. Alisa Tilsner
  4. Rick Adkins
  5. Sara Levin
  6. Renee Ondrajka
  7. Melissa Davies
  8. Maria Willis
  9. Pam Staples
  10. Tina Rackley Riddle  -That's Me!
  11. Justin Krieger
  12. Dena Rekow
  13. Andrea Tracy-Tucker 
  14. Kelly Acheson
  15. Kim Smith
  16. Lori Mueller
  17. Marisa Gunn 
  18. Jeanna Bohanon
Below is a list of the Stampin' Up! Products Used on my Card and Project

Product List
Thanks so much for stopping by!  Blessings, Tina

Wednesday, September 7, 2016

ICS Blog Hop - Technique Time!


Hello and Welcome to the Inspire, Create & Share September Blog Hop!  If you have already been hopping, then you know that this is a Technique Blog Hop!  If you landed her from the Super Talented Claudia Perry's blog, thanks so much for continuing on!  If you started with me, please make sure you click the next button as the end of the post for a lot of Technique Inspiration!

There are honestly so many techniques that I love it was super hard for me to choose but I went with Emboss Resist and threw in a little extra twist with the Joseph's Coat Technique on the leaves!

Here's my card....


I love to use unexpected colors for Fall and Holiday cards so for this card, I did just that!  I started with a 5 1/2" x 8 1/2" piece of Rich Razzleberry Cardstock, scored at 4 1/4".  For my next layer, using Versamark Embossing Ink, I stamped a 5 1/4" x 4" piece of Whisper White cardstock with the Hardwood Stamp.  I then heat embossed it using Stampin' Up! White Embossing Powder.  After the embossed image had cooled, I sponged on Soft Sky and Marina Mist, and Dapper Denim Ink onto the layer keeping the darkest inks toward the outside.  After I sponged, I used a paper towel to rub off any ink that was on my white embossed image.  Next for the Joseph's Coat technique on the leaves, I started sponging Marina Mist, Sweet Sugarplum, Rich Razzleberry and Dapper Denim onto scraps of Whisper White Cardstock in random sections and blending some of the inks together.  Next I clear embossed various leaves from the Vintage Leaves Stamp Set onto the sponged cardstock.  Keep in mind that once you heat up the clear embossing powder, the images seem to disappear onto the sponged cardstock.  Not to worry.. you will see them soon.  Once the clear embossed images were cool, I used my brayer to apply Chocolate Chip Ink all over the cardstock... and then those beautiful leaves reappear!  Yay!  Once I had all my brayering finished, I allowed them to dry a bit and then cut them out using my Leaflet Framelits Dies.  I then arranged them onto the front of my card and adhered with Stampin' Dimensionals.  I made a big Linen Bow and attached it to the leaves stems with glue dots.  Finally I stamped a Banner and sentiment from the Thoughtful Banners Stamp set in Sweet Sugarplum.  I punched it out with the coordinating Duet Banner Punch and also Punched out the same Banner shape with Rich Razzleberry and attached it to the back of the sentiment with Fast Fuse.  The entire Banner sentiment was attached with Dimensionals to the bottom right of my Emboss Resist Hardwood layer.  

For the inside I kept it pretty simple..

I stamped the Maple Leaf from the Vintage Leaves set in a stamped off Sweet Sugarplum so that it was a very light image.  I stamped the Banner and Sweet Friend sentiment (also from Thoughtful Banners) in Marina Mist.  I punched it out with the coordinating Duet Banner punch and used Fast Fuse to Add over the Light Leaf image.  

I hope you enjoyed the Emboss Resist and Joseph's Coat Technique and are ready to head over to the awesome blog of Tammy Dunlap for more technique inspiration.  Just click the next button and you'll be there!


If you are interested in any of the supplies, I used today, below are the links to all of the Stampin' Up Products!  Thanks so much for stopping by today!  Blessings, Tina


Product List

Tuesday, September 6, 2016

SIP Challenge #64 Clean & Simple - Less is More!


Hello and Happy Tuesday once more. Lately it seems like my Tuesday Blog Posts are the only ones I have time to do!  Well here I am again with the Stamp, Ink, Paper Design Team and let me tell you this is one that is wayyyyy outside my comfort zone but I threw caution to the wind and tried to make a Clean & Simple - Less is More card.  Make sure you go over to the SIP Challenge Blog and link up one of your own if you are feeling brave.. lol  


So let me start off my telling you that I absolutely LOVE stitched cards!  Even just little stitches here and there add so much interest!  I even bought a little Jenome sewing machine to stitch on them. I seriously have yet to learn to thread.  Seriously.. don't judge!  lol    Well since I so wanted stitching, I decided to use my black marker to create a few.  Here's my card and I really ended up loving it even though this is not a simple style for me at all!


For this card I decided to use one of my favorite Unity Stamp Co. Kits of the Month called "A Summer Story".  This kit was from May 2016 and has so many beautiful images!  I started off with a Whisper White Thick card base that measured 11" x 4 1/4".  I scored it at 5 1/2" for a top folding card base.  Then on a scrap piece of Whisper White Cardstock, I stamped my treat cup image with Memento Luxe Tuxedo Black Ink and then heat embossed it with clear embossing powder.  I used my copics to color in my treat cup and then fussy cut it out.  I tore off a piece of Stampin' Up! Playful Palette Designer Washi Tape and adhered it to the lower left side of my Whisper White Heavy weight Cardstock base.  I used my Faber-Castell black medium tip marker to draw in some faux zig zag stitching.  Since the color of the cup background looked so much like Kraft.. I die-cut a circle of Kraft to mat the punched 2 1/2" circle of Blushing Bride cardstock for my sentiment.  I stamped the sentiment with Memento Luxe Tuxedo Black Ink and clear embossed it onto the bottom portion of the circle of Blushing Bride.  I used my trimmer to cut a straight edge on the top of both of my circles and then layered them with Fast Fuse and used more Fast Fuse to adhere them to the upper right portion of my card.  I added three black candy dots and then decided to add a little shimmer by adding Clear Wink of Stella to the whipped cream.  I also added a layer of Glossy Accents to my hearts on my cup.  Here's a better look at the shine...


And that my friends was how easy this card came together!  Why don't I make more super easy cards???  lol  I think I try to overthink most of them!

Thank you so much for stopping by!  Blessings, Tina