Showing posts with label Unity Stamp Co.. Show all posts

Tuesday, November 5, 2019

SIP #205 - Color Challenge with Unity Stamp Co. Fall To Go and Rustic Textiles Patterned Paper

Hello and Happy Tuesday!  Challenge #205 over at Stamp, Ink, Paper is a Color Challenge that is perfect for your fall or Thanksgiving Cards!


Since I'm all about Coffee, I decided to pull out my Unity Stamp Co. Fall To Go Stamp Set and paired it with the awesome Unity Rustic Textiles Patterned Paper!


I cut apart the sentiment "Grateful Thankful Blessed" so that I could use just the Blessed.  I wanted as much of that gorgeous Patterned Paper to show.  Actually the Blessed would have fit in the bottom section of the Coffee Cup Image but I chose to stamp it seperately this time.  I used Stampin' Up! Stampin' Blends to color in the Orange (Pumpkin Pie), Red (Cherry Cobbler) and Brown (Crumb Cake) in the image.  I used a Stampin' Up! Stitched Rectangle to cut the image out and then backed it with a Soft Suede Cardstock layer.  It then layered on the beautiful plaid patterned paper and was mounted on an A2 Card Base made of Soft Suede Cardstock.  

Sunday, September 29, 2019

Growing in Unity Blog Hop!


Hello and welcome to The Growing in Unity Blog Hop!  If you've already been hopping, thanks so much for continuing on.  If you've started with my blog, please make sure to take the hop for lots of Unity Inspiration!  I have two cards to share with you today.

My first card is all about coffee!  I've used the Fall To Go Stamp Set along with the Coffee Lovers Paper Pack!


I stamped my cup with Versafine Onyx Black Ink onto a sheet of Bristol Smooth Cardstock.  The cup was colored with Zig Clean Color Markers... they blend beautiful onto the Bristol Smooth  Cardstock!  The cup is so big and beautiful that I almost didn't use a sentiment at all but I realized there was some blank space at the bottom of the cup that was just enough room.  Then I did the unthinkable... I cut the blessed off of the sentiment.  But don't worry... I cut it in such a way that if I want to add it back to stamp the full sentiment, it will fit back in like a puzzle piece.  Isn't the background paper from the Coffee Lovers Paper Pack beautiful!  I matted the background in Black and then added some mustard lace trim that I thought fit the color scheme nicely.   After cutting the cup image out with a stitched rectangle die, I added it to the cardfront with some foam squares at the top and the bottom and avoided the middle where the lace trim was.  

My next card is a simple Christmas Card using the Yuletide Border Background Stamp and the A Joyous Season Sentiment Kit Stamp Set.  It has such beautiful Christmas greetings!


The background border stamp was stamped in Soft Suede Ink and colored with Stampin Blend Alcohol Markers.  I used a stitched rectangle die to cut out a panel and added it to a Cherry Cobbler A2 Cardbase.  I stamped the sentiment onto a piece of Neenah Classic Solar White Cardstock first with Versamark, and then with Real Red Ink and then heat embossed it with clear embossing powder.  The sentiment was cut out with a smaller stitched rectangle die and added with foam squares onto the middle of the card panel.  I finished this one off with three sparkling gems.

Thanks so much for stopping by!  Please make sure to stop by!  Since I'm the last on the hop, to continue on, just click Crystal's link and start back at #1.  Blessings, Tina


9. Tina: http://www.tinascropshop.com/ --- You are here!

Wednesday, July 31, 2019

Growing in Unity 2019 - Day 3

Hello and Happy Hump Day!  It's Day 3 of my Growing in Unity Week!  I made a simple birthday card today because I'm always needing birthday cards!!  The Unity Stamp Sets used on today's card are Holy Cow and  Barn Wall stamp sets.


This is such a simple card and I think the Barn Wall Background stamp gives it a fun masculine feel. The Barn Wall was stamped onto Soft Suede Cardstock using Soft Suede Ink for a fun tone-on-tone look.  It was layered onto 80# Neenah Classic Solar White Cardstock.  I ran a piece of ribbon around the two layers and adhered it to the back before mounting the layers onto a Basic Black Cardstock A2 Card Base.   Both the Cow and sentiment image were stamped in Versafine Black Onyx Ink onto 110# Neenah Classic Solar White Cardstock and then cut out with Square Framelits.  I matted the square with a scallop in Black Cardstock.  I added Dimensionals onto the top and bottom of the square avoiding the section where the ribbon would be.  I tied a piece of Linen Thread into a knot around the ribbon on the left side of the cow panel.  I ran the Linen Thread through a brown button and tied it into a simple bow on the front of the button.  Two mini glue dots were adhered to the back of the button to keep it in place.  

Here's the inside of the card using another of the sentiments from the stamp set.....


 I'm always in need of masculine birthday cards so I thought this one was perfect!  

Make sure you comment for a chance to win one of two Unity Prize Packs this week!  Thanks so much for stopping by!  Blessings, Tina

Monday, July 29, 2019

Growing in Unity 2019 - Day 1

Hello and Happy Monday!  I'm so excited that today starts my Growing in Unity Week with Unity Stamp Co.  Unity was one of the first on line stamp companies that I found when I first began cardmaking about 15 years ago!  I have loved them ever since that very first day I discovered their fabulous website!!!  My love for them has cetainly grown as they continue to have some of the most beautiful designs and there are so many stamps to choose from!  My first stamps from Unity were from their Itty Bitty Stamp Collection.  Just so you know.. the Itty Bitty Stamps are NOT itty bitty at all.....they are honestly perfect for cardmaking!  This week I'll be using a wide variety of Unity Stamps.  Today's card features the Border Background Stamp Set called "Charm" and a Sentiment Stamp Set called "...so very grateful"!


One of the things I love so much about Unity stamps is the detail.  This background stamp is a perfect example of such beautiful detail in the image that it really requires very little coloring.  I stamped the image on Bristol Smooth Cardstock with Versafine Black Onyx Ink.  Once dried I used Zig Clean Color Markers to add just a little color and used an Aqua Painter to move the color around.  The fabulous thing about Bristol Smooth Cardstock is that it really allows the water to move the color.   I stamped the sentiment from the so very grateful sentiment set in Versafine Black Onyx Ink on another piece of Bristol Smooth.  I used some Circle Dies to cut out the sentiment and matted it with a piece of  bright Pink Cardstock.  I used rectangle dies to cut out the Charm Border Background Panel and then matted it in the same bright Pink Cardstock and then Black Cardstock before adhereing to an A2 Cardbase of Neenah Classic Solar White 110# Cardstock.  The matted sentiment circle was popped up with Dimensionals in the center of the card front.  Lastly I added 3 Pretty Pink Posh Sparkling Clear Confetti Sequins to finish it off!

This card is going to a very special person.  My son recently was diagnosed with Guillain-Barre Syndrome and it has really thrown my family into a tail spin.  My son, Wayne, is 32 years old, a former U.S. Marine and as healthy as could be until last Monday.  His fabulous girlfriend and now Fiance,  Kaitlin, has  been right by his side and helping with everything from the very first day.  After 8 days of being in the hospital and now in In-Patient Rehab, she continues to do everything she can to make his room as homey as possible to make things just a little more bearable for him.  I am so very grateful for her heart of gold!  I don't know how we would have made it through all of this without her!  His perfect idea of a proposal wasn't exactly in ICU but plans change and he didn't want to waste another second letting her know what she meant to him!


So Kaitlin, I hope you love your card as much as I loved making it!

Don't forget to comment on my Growing in Unity posts for a chance to win a Unity Prize Package!  I will be chosing two winners from this week's commenters!  

Thanks so much for stopping by!  Blessings, Tina

Wednesday, January 17, 2018

PCC276 Color Challenge - Two Card Post with Stampin' Up! and Unity

Hello and Happy Hump Day!  Hope your week is going well!  It's been snowing here in Middle Tennessee and has been soooo cold!  We typically don't get much snow here so we don't have the equipment to clean off the roads.  I had gone into work on Tuesday morning and left the office early because I had heard that the road condition was getting bad.  I did really well almost all the way home until I got to my exit and started sliding all over the place.  Thankfully I had left early and there was no one else in the vicinity.  It was pretty scary and I definitely felt blessed that everything came out ok!  Hopefully today will be much better although we aren't expected to warm up around here until the weekend!  I'm thinking I should retire in Florida and enjoy some warmer winters!

So today I'm over with my talented friends at the Paper Craft Crew with a card for a color challenge!


So I made two cards.. I couldn't decide between the two.   My first was with Stampin' Up! Bloomin' Hearts Thinlits dies.


The first card was primarily die cutting.. the only stamping was the sentiment and that was heat embossed.   I kept this one fairly simple!


The second card is with Unity Stamp Co. Huge Possibilities.  


The Elephant was heat embossed in black and watercolored with Tim Holtz Distress Inks.  I just love this elephant!  I also love the coordinating sentiment!  It's nice to have encouraging sentiments in your inventory!  

Thanks so much for stopping by!  Blessings, Tina

Friday, December 29, 2017

GIU Post #5 Love Brings You Home!

Hello and Happy Friday!  Can you believe this is the last Friday of 2017??  It seems like this year has gone by super fast.  Well now that I think about it, this week has gone by super duper fast!  I've had such a wonderful time creating with Unity Stamps this week and having the honor of being a Growing in Unity Gal.  It was my first time and was soooo much fun!

What a time I had making this last card... I really messed up.  The first card I made was with a retired Unity Stamp Set.  Ugh!  I had it made, photographed and was about to blog it and realized it was retired when I couldn't link the stamp set from the Unity website.  Do you want to see it anyway?  lol  Well here is the first card but it doesn't count...


The stamp set I used.. just in case you might own it is Grandma's Closet and it was part of a Jillibean Soup Collection.  I loved the doilies and it has some super cute sentiments.

Oh well on to the card that will count.. lol  This one uses the stamp set "Love Brings You Home". 
When I first saw this stamp set my boss (at that time) had just adopted two little boys from Ethiopia and I envisioned making a card with it using the other sentiment in the set.  Well I never made that card but I had a bit of fun making this one.. hope you like it!
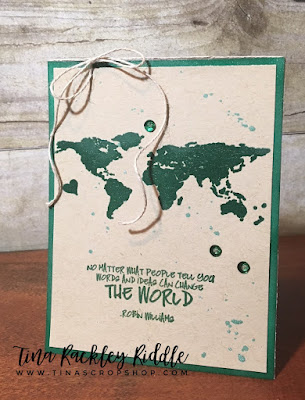

For some reason when I looked at this stamp set this time I knew I wanted to stamp it in Emerald green on Kraft.  I used Stampin' Up! Emerald Envy Ink and added a layer of versamark so that I could clear emboss both the map and the sentiment.  The stamping was done on a 4" x 5 1/4" piece of Kraft Cardstock.  Since the Emerald Envy Ink stamped on the Kraft looked darker than the true color, I inked the edges of my Emerald Envy 4 1/4" x 5 1/2" mat to darken them.  I then pushed a versamark pad down on all four sides of the mat and Clear Embossed them.  I found some Darice Kelly Green sequins that seemed to match fairly well so I added three and then added a seed bead on the top of each sequin.  I adhered the front panel to a top folding 110# Neenah Classic Crest Solar White Cardbase.  I added some Natural Twine to the top of the card and tied it in a bow.  Last but not least, I added a bit of FSJ Cool Pool Silk splashes to the front of the card.  That was it on this one.. I kept it really simple.  I tend to overthink sometimes so it's best to just walk away.. :)

Have a wonderful day and weekend and Happy New Year!  Blessings, Tina

Tuesday, December 26, 2017

Growing In Unity Post #2 - Holy Cow!

Here I am again with another super easy but I think super cute card!  Do you have any cow friends?  Well I do!   One of my very best friends, Suzi, collects cows!  She even has cow art work in her living room.  I know she will love this card for her birthday!

The Unity Stamp Co. stamp set I used is "Holy Cow" by Lisa Arana.  It has three sentiments and I managed to use two of them!


Thankfully with the help of my Misti, I was able to do some repetative stamping in the background without messing it up too bad!   I used a Kraft Cardbase and my repetative stamped layer is Kraft as well.  I stamped the "Herd it was your Birthday" sentiment diagonally with Stampin' Up! Crumb Cake Ink for a tone-on-tone look.  I added a slightly larger and skewed layer of Basic Black Cardstock behind it for some contrast.  The Cow image was heat embossed in Black on Whisper White Cardstock as was the sentiment below the cow.  I used a set of Stampin' Up! dies called Lots of Labels Framelits to cut out my tag.  The dies cut a fancy scallop on the top and bottom but I used my Paper Trimmer to cut the bottom scallop off and then punched a small hole in the top of the tag. After running some black and white gingham ribbon through the hole,  I used foam tape to adhere to the front of the card.  Some natural twine was used to tie a bow around the ribbon.  Although this was an easy card, it certainly turned out cute and I know Suzi will love it!

Blessings, Tina

Growing in Unity - Comfort to Go!

Hello and Happy Day after Christmas!  I hope your Holidays were fabulous!  I'm so excited to share that I was chosen as one of the Unity Stamp Co. Growing In Unity (G.I.U.) peeps!  I made a simple card with the Comfort to Go Stamp Set.  It is super cute and I love a stamp that seriously does all of the work for you.  That's exactly what this one does.   So the truth is I love anything that Angie Blom designs!  She is amazing!  You can stamp or emboss in any color and it would look fabulous!  For Christmas, it would look fabulous stamped in Red.  Silver would be super cool as would any metallic... I'm thinking gold, copper... I may need to make several of these!


I started to go with a black and white card but decided to add a little color.  Since I like my colors to repeat at least three times I did a skinny layer of turquoise behind the patterned paper and the stamped panel.  I used Pretty Pink Posh Onyx sequins and added a small clear seed bead over the top of the sequins to finish it off.  If you are a coffee lover like I am, you probably already have this fabulous stamp set... if you don't you should!   And guess what.... it's on sale right now!  Hope you'll head over and check it out!  

Thanks so much for stopping by!  Please take the time to leave some love as there will be a prize for 2 lucky commenters at the end of the week!  It could just be you! 

Blessings, Tina

Thursday, April 13, 2017

OSAT April Flower Power Blog Hop

Hello my friends!  I hope you've had a wonderful week!  I'm so thankful that I'm off on Good Friday so I have a nice long Easter weekend to enjoy with some gorgeous weather!  We aren't even traveling this weekend so hopefully I can enjoy a little bit of down time!  The older I get, the more I need it!  lol  Well since it is not only Thursday, but the 2nd Thursday of the month, that means it's time for another One Stamp At A Time Blog Hop!  This month's theme is Flower Power!  Who doesn't love flowers, right??


If you've already been hopping, you should have landed here from the fabulous blog of Melissa Davies!  Isn't she awesome??!!  If you happened to start at my blog, you'll want to make sure you hop along and check out all of the flower power inspiration of our 15 bloggers by clicking the next button at the end of my post!  


So for my card I wanted to try a new product... Kuretake Gansai Tambi Pearl.  I need a little practice with them but they are fun to play with!  I started off by Heat embossing flowers and leaves from the My Favorite Things Fancy Flowers Stamp Set in white onto Bristol Smooth Cardstock.  I used my Kuretake Gansai Tambi Pearl Watercolor Paints to paint in the images.  I then die cut with the Fancy Flowers dies .  After die cutting I used Tim Holtz Picked Raspberry Distress Ink and inked the edges of the flowers, and Peeled Paint Distress Ink on the edges of my leaves.   For my stems I used some scraps of White cardstock and ink blended more of the Peeled Paint Distress Ink and then hand cut some stems.  The Fancy Flowers set had stems in the set but I wanted a longer stem and felt like ink blending and cutting would work just fine.  I adhered the stems and leaves with Tombow Multipurpose Glue directly onto my Neenah Classic Crest Solar White Card Base.  The flowers were popped up with foam tape. The Happy Birthday sentiment from Stampin' Up! Thoughtful Banners Stamp set was heat embossed in White on Basic Black cardstock and adhered with Tear Tape.   I added some Pretty Pink Posh sequins in pink and yellow to finish this one off.  It ended up a super simple card but I really love the simplicity of it!


I decided for my project to use the Stampin' Up! Mini Treat Bag Thinlits to make a small treat bag as a holder for a gift card.  I used the Lawn Fawn Rainbow Perfectly Plaid Paper Stack for my treat bag.  I added the awesome sentiment from April's Unity Stamp Co. Kit of the Month for the treat bag.  The sentiment was heat embossed in white on more Basic Black Cardstock and then cut into a tag with the Reverse Confetti Tag Me Confetti Cuts Dies.  I ran a piece of green seam binding through the tag and tied a piece of natural thread around it.  I adhered the tag with foam tape.  I  painted some of the Pink Kuretake Gansai Tambi Pearl white cardstock and heat set it.  I used more of the Tim Holtz Picked Raspberry Distress Ink to Ink the edges and then punched some flowers with the Stampin' Up! Pansy Punch and Petite Petals punch.  I used my Bone Folder to add some curve to the flower petals.  For the larger flower, I layered two of the pansy punches and one of the petite petals punch with glue dots.  Once the flower was assembled, I added it with foam tape to the front of my treat bag.  I added a yellow pretty pink posh sequin in the center.  The small flower was a one layer Petite Petals punch that had a yellow sequin in the center.  I then added several Pretty Pink Posh sequins in both yellow and pink to finish this one off.  

Thanks so much for stopping by!  The next stop on the hop is the talented Pam Staples!  Just click the next button and you'll be there!


In case you've lost your way, the following is a list of all of the OSAT Bloggers...

  1. Andrea Tracy-Tucker
  2. Crystal Komara
  3. Jessie Holton
  4. Rick Adkins
  5. Melissa Davies
  6. Tina Riddle - That's me!!
  7. Pam Staples
  8. Renee Ondrajka
  9. Jennifer Hill
  10. Jeanna Bohanon
  11. Lisa Altman
  12. Lori Schaefer Mueller
  13. Maria Willis
  14. Marisa Gunn
  15. Justin Krieger

Tuesday, June 28, 2016

SIP Challenge #54 Color Challenge!

Hello and welcome to Stamp, Ink, Paper's Challenge #54!  I came very close to not getting this post done this week.  You see I usually make my card for Tuesday's post on Sunday afternoon but my newest little granddaughter decided to be born on Sunday instead of the planned Tuesday!  My husband and I drove from our home in Manchester, TN to Knoxville, TN on Saturday to help my daughter get some last minute things done.  We returned late Saturday night so the plan on Sunday was to get some rest and make my card.  Sunday morning as I poured my first cup of coffee my daughter called to let me know that she was in labor.  Well I put my coffee down and off we went, back to Knoxville!  Here's a picture right after Blakely Addison Rose was born :)

  
And here is one from this morning :) Isn't she gorgeous!


I'm back and home now and made about the quickest card ever!  This week's challenge are some yummy colors.. I hope you'll head over and check out all of the inspiration!


Here's my card..


I used an Old Olive 11" x 4 1/4" sheet of card stock that was scored at 5 1/2".  I added a thin 5 3/8" x 4 1/8" sheet of Tangerine Tango cardstock and then some awesome printed cardstock that I bought at Old Time Pottery.  The name of the stack is DCWV Fiesta Forever Stack.  It is a 48 sheet pack of 12x12" printed cardstock for only $6.99 and it has some awesome patterns.  The stamp set I used was Unity Stamp Co. "Swagger".  I just love that little chick!  I stamped his on Whisper White Cardstock and then again onto a another piece of the Fiesta printed cardstock pack in yellow.  I fussy cut just the chick body out of the yellow printed cardstock and glued it over the stamped image on the Whisper White Cardstock.  I colored in the ground with an Olive Green Alcohol Marker (actually it was one of the retired Blendabilites from Stampin' Up!)  I colored in the beak with an orange marker and the hearts with a Red Alcohol Marker.  I used MFT stitched circles to cut out the ship and the Olive Green Circle Mat.    I heat embossed the sentiment in White on the Tangerine Tango Cardstock and cut it out with the same stitched circle die as well as the mat for it.  The top layers of the circles were attached to the mats with Snail and then attached to the Card with Dimensionals!

Thanks so much for stopping by!  Blessings, Tina


SIP Challenge #54 Color Challenge!

Hello and welcome to Stamp, Ink, Paper's Challenge #54!  I came very close to not getting this post done this week.  You see I usually make my card for Tuesday's post on Sunday afternoon but my newest little granddaughter decided to be born on Sunday instead of the planned Tuesday!  My husband and I drove from our home in Manchester, TN to Knoxville, TN on Saturday to help my daughter get some last minute things done.  We returned late Saturday night so the plan on Sunday was to get some rest and make my card.  Sunday morning as I poured my first cup of coffee my daughter called to let me know that she was in labor.  Well I put my coffee down and off we went, back to Knoxville!  Here's a picture right after Blakely Addison Rose was born :)

  
And here is one from this morning :) Isn't she gorgeous!


I'm back and home now and made about the quickest card ever!  This week's challenge are some yummy colors.. I hope you'll head over and check out all of the inspiration!


Here's my card..


I used an Old Olive 11" x 4 1/4" sheet of card stock that was scored at 5 1/2".  I added a thin 5 3/8" x 4 1/8" sheet of Tangerine Tango cardstock and then some awesome printed cardstock that I bought at Old Time Pottery.  The name of the stack is DCWV Fiesta Forever Stack.  It is a 48 sheet pack of 12x12" printed cardstock for only $6.99 and it has some awesome patterns.  The stamp set I used was Unity Stamp Co. "Swagger".  I just love that little chick!  I stamped his on Whisper White Cardstock and then again onto a another piece of the Fiesta printed cardstock pack in yellow.  I fussy cut just the chick body out of the yellow printed cardstock and glued it over the stamped image on the Whisper White Cardstock.  I colored in the ground with an Olive Green Alcohol Marker (actually it was one of the retired Blendabilites from Stampin' Up!)  I colored in the beak with an orange marker and the hearts with a Red Alcohol Marker.  I used MFT stitched circles to cut out the ship and the Olive Green Circle Mat.    I heat embossed the sentiment in White on the Tangerine Tango Cardstock and cut it out with the same stitched circle die as well as the mat for it.  The top layers of the circles were attached to the mats with Snail and then attached to the Card with Dimensionals!

Thanks so much for stopping by!  Blessings, Tina