Showing posts with label Paper Piecing. Show all posts

Tuesday, May 26, 2020

Card Making Tips Day 3 - Paper Piecing!

Hi There!  I'm back on Day 3 of My Card Making Tips Series with a fun idea to add color to a project without coloring... Paper Piecing!!  You can use this simple technique to any lined image.

Today's card is once again from the Tasteful Touches Stamp Set.  Are you tired of me using it yet??  The funny thing about it was I didn't order that stamp set on the first pre-order.  It was an after thought that I grabbed when I placed my second pre-order.  I'm so happy I got it!    I added an image and sentiment from the fabulous Forever Fern Stamp Set.  That one I knew I loved from the first time I laid eyes on it!  It truly is one of my very favorites from the upcoming 2020 - 2021 Annual Catalog!


There is so much to love about this card.  The paper piecing of the flower images add color to the flowers without using markers, sponging or watercoloring.  The flowers are easy to cut out and if you make a mistake, just take the edge of a black marker and go around the edges.  This card started with an 11" x 4 1/4" half sheet of the new Magenta Madness Cardstock, scored at 5 1/2" for a top folding card.  On a 4' x 5 1/4" piece of the beautiful In Good Taste DSP, I stamped the greenery and floral images from the Tasteful Touches stamp set, on the edge of the left side with Memento Tuxedo Black Ink.  I then stamped the flower image again twice on some of the 2020 - 2022 In Color DSP in Magenta and cut them out with paper snips.  The DSP flower images were adhered over the ones stamped on my front panel with Multipurpose Adhesive.  The sentiment from Forever Fern was stamped directly onto that panel as well and I love how it looks.  I also stamped the small splatter image from Forever Fern in Memento Tuxedo Black Ink as well.  I love the addition of the splatters.  Once I was happy with my front panel, I cut it out with the 2nd largest of the Stitched Rectangle Dies.  I matted that panel with Basic Black cardstock and then adhered those onto the Magenta Madness Cardbase.  

Here is a picture of a card from a couple of years ago using the "You've Got This" Stamp Set and Pacific Point and Daffodil Delight Brights Collection DSP from that year.


You may note some old images and old DSP from that one.  I stamped the image directly onto the wood patterned paper background and then again onto the Pacific Point and Daffodil Delight DSP and then cut the images out to add over the appropriate sections of the card front.

Thanks so much for stopping by!  Blessings, Tina


Product List

Wednesday, January 6, 2016

ICS Blog Hop Let's Sale-a-brate!


Hello and welcome to Inspire Create & Share's January 2016 Blog Hop!  We are Sale-A-Brating the new Sale-A-Bration Catalog as well as the Occasions Catalog that can help you earn free Products this month.  If you have been hopping along, you should have landed here from Terri Takashige's fabulous blog!   If you started with me, make sure you hop along and check out all of the awesome inspiration that the ICS Bloggers have to share with you this month!

I have to tell you.... I love pretty much EVERYTHING in these two catalogs!  Trying to decide which one to use was super hard for me!  In the end I had to go with the Sale-A-Bration Honeycomb Happiness because this little Chick was screaming at me to ink him up!


I love an open stamp that you can paper piece and this chick was just the perfect stamp for that.  I started with an 11" x 4 1/4" piece of Tempting Turquoise Cardstock, scored at 5 1/2".  I added a 5 1/4" x 4" piece of Daffodil Delight Polka Dot DSP from the Brights DSP Paper Stack.  The middle section was a piece of 3" x 4 1/4" watercolor paper that I did a watercolor wash on the background.... the bottom was Pear Pizzazz, the middle section was Tempting Turquoise, and the upper section was Blushing Bride.  I used my heat tool to dry the background before stamping the chick with the Black Archival Ink.  I also stamped the chick onto the Script DSP  from the Brights DSP Paper Stack (on the reverse side of the polka dot).  I used my paper snips to cut out the chick ignoring the feet since it was already stamped onto the watercolor paper.  I glued my Script DSP chick onto the watercolor one with Tombow Multipurpose glue.  I used a Pumpkin Pie marker to color in his feet and beak.    The sentiment was stamped in Tempting Turquoise and the heart under the sentiment was punched using one of the punches from the Itty Bitty Punch Pack in Tempting Turquoise and adhered with a glue dot.  I topped the punched heart with one of the Itty Bitty Accents Epoxy Stickers.  I have to admit this is the first time I've used one of these Epoxy Stickers over a punch and can I just say WOW.. I love it!  I matted my watercolor paper with a 3 1/8 x 4 3/8" piece of Tempting Turquoise.  I ran a piece of Daffodil Delight 1/4" Cotton Ribbon across the bottom and tied it in a bow on the right side.  I then adhered the entire layer onto the center of my card using Stampin' Dimensionals.  I really think it turned out super cute and hope you love it too!

Next on our hop is Jen Guarino's awesome blog.. you won't want to miss it, just click the next button!


Thanks so much for stopping by!  Blessings!  Tina

Here is a list of the products that I used on my card:

Built for Free Using: My Stampin Blog

Tuesday, December 29, 2015

SIP #28 Anything but Christmas

 Hello!  I hope you have had a wonderful Christmas and are ready for an even better year ahead!  This week over at Stamp, Ink, Paper we have a challenge that couldn't be easier.  Are you ready... it's Anything But Christmas! How awesome is that!


After being sick for a few weeks and hurrying through getting a few Christmas Cards out at the last minute I can assure you, I was absolutely ready for something other than another Christmas Card!  Plus I just received an awesome new MFT Stamp Set called "You Have My Heart" and needed to make a Birthday Card (sorry Lisa.. yep I know, it's late!)


Yep, my fellow design team member, Lisa Altman, loves dogs as much as I do and I really do think she is "Pawsitively Awesome"!  I just love this set and of course I bought the coordinating dies but then didn't even use them on this one. lol

I used some of the Stampin' Up! Background DSP in Pool Party for the polka dot layer and then did some paper piecing of her dress in the same DSP.  I also used some MFT stitched rounded rectangle dies for my layers.  For my A2 Daffodil Delight Card Base, I used a corner chomper to round the corners of my card to match (somewhat, anyway) the rounded corners of the rectangles. 

Thanks so much for stopping by!  Blessings & Happy New Year!!  Tina


Tuesday, July 28, 2015

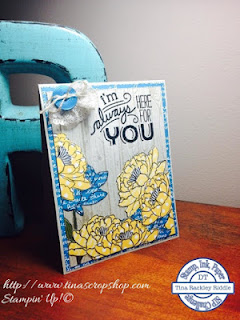
SIP Challenge #7 - Color Challenge, You've Got This

Hi all, Hope you've been having a good week so far!  It's another Tuesday and that means a brand new Stamp, Ink, Paper Challenge!  This week we've got a fun color challenge for you!


I love these colors but I had one problem.... I didn't have Pacific Point ink or cardstock!  What was I to do???  My friend Andrea reminded me that I had some of the Brights Collection Background DSP and man was I relieved!  I still wasn't sure how to use the Pacific Point DSP though without something else that coordinated with it.  Well here's what I came up with and I really did love how it turned out!


I decided to use the You've Got This Stamp Set and do some paper-piecing.  I started with an 11" x 4 1/4" card base scored at 5 1/2".  I layered on a 4" x 5 1/4" piece of the Pacific Point DSP from the Brights Background DSP stack.  I then cut a piece of 3 3/4" x 5" Sahara Sand cardstock that had been stamped tone-on-tone with the Hardwood Background Stamp in Sahara Sand Ink.  I stamped one flower on the left side of the hardwood background and used a Mossy Meadow Stampin' Marker to color in the stem and leaf.  I then stamped the flower with Memento Tuxedo Black ink several times onto the Daffodil Delight and Pacific Point DSP and fussy cut out the bloom only.  I layered one over the flower that I stamped onto the Hardwood and then began to layer other flowers around the sides and bottom of the hardwood.  I used a White wink of stella glitter pen in the center and then used a Black Medium Tip Faber Castell artist pen to outline the stamped portion so that it would stamp out a little more.  I then used embossed the I'm here for you sentiment in black in the upper right and then as usual I felt it needed something else so I threaded some linen thread into a Pacific Point button from the Brights Buttons and glued it onto a gathered piece of Sahara Sand Lace Trim.

Here are the Stampin' Up Products used:

Built for Free Using: My Stampin Blog


Thanks for stopping by!
Blessings,
Tina

Sunday, June 7, 2015

You've Got This Paper-Piecing

Hello and Happy Sunday!   I finally got a chance to use my "You've Got This" stamp set today.  I've seen so many cute cards made with it.  I wanted to do something a little different than what I've been seeing.

For my card I used a Mint Macaron and added a layer of Gold Soiree DSP and then a layer of Whisper White cardstock that I had stamped with background stamp in Mint Macaron.   I heat embossed the flower with Stampin' Gold embossing powder onto the background as well as onto the Gold Soiree DSP that I wanted to use for my Paper Piecing and then fussy cut the flower and adhered onto the flower that was stamped onto the background.   I also heat embossed the sentiment in Gold and added some Gold Pink Posh sequins.  I glued a thin piece of the new Mint Macaron lace onto the edge of some Gold Sequin Trim and adhered to the upper left corner with a glue dot.  I added a Basic Gold button and topped it with a large Pink Posh Gold sequin.  

Here are the Stampin' Up Products used:


Built for Free Using: My Stampin Blog


Blessings,
Tina