Showing posts with label Hardwood. Show all posts

Wednesday, March 2, 2016

ICS Blog Hop - Welcome Spring!


Hello and welcome to the March Inspire, Create & Share Blog Hop!  This month's theme is Welcome Spring and I can tell you I am ready to welcome it!   If you've been hopping already, you should have landed here from the fabulous blog of Jen Guarino!  Jen is super talented and I'm sure you've loved her projects!   When I think of Spring, I think of flowers and birds so that's what I went with for my card and project this month.  


For my card and project, I used the new Grateful Bunch Bundle along with Hardwood and the Bird Builder Punch.. oops and the the sentiment is from Honeycomb Happiness :)


My card base was an 11 x 4" piece of Tempting Turquoise that was scored at 5 1/2".  My next layer was a 3 3/4" x 5 1/4" piece of Very Vanilla Cardstock.  I stamped around the edges with the leaves stamp from the Grateful Bunch stamp set in Garden Green.  I used my aqua painter and Old Olive Ink to watercolor in the leaves.    For my birdhouse I stamped piece of Sahara Sand Cardstock with the Hardwood Stamp in Tip Top Taupe ink.  I cut the body of the birdhouse 2 1/2 x 3 1/4".  I also cut a 5/8" strip to use for the roof.  The hole in the birdhouse was punched out using my large oval punch.  I adhered the piece that was punched out to my Very Vanilla leaves layer and then popped the rest of the birdhouse up with dimensionals to look like it was the opening of the birdhouse.  I used my piercing tool to punch a hole in the top of the birdhouse and ran some linen thread through the hole and knotted it and then ran the long end behind that layer to appear that it was hanging.  I then began punching out some Mossy Meadow leafy branches with my bird builder punch and adhered them to various places on the outside and inside of the birdhouse.  I stamped the flowers from the Grateful Bunch stamp set on Tempting Turquoise cardstock with Tempting Turquoise Ink and punched them out with the coordinating punch.  I added Very Vanilla candy dots to the centers of the flowers.  I layered them with dimensionals and adhered them in various places on the birdhouse and hanging above and below the birdhouse.  My bird was punched out in Soft Sky cardstock and the edges were sponged with Tempting Turquoise Ink.  I adhered the bird's body with glue and the wing with a dimensional.  I used a small pearl for the eye.   The sentiment "Oh, Hello" from Honeycomb Happiness was stamped in Tempting Turquoise on a strip of Very Vanilla cardstock and the end was cut with my Banner punch.  I layered the Very Vanilla sentiment banner on a wider Tempting Turquoise strip that was also cut with a banner end.  I used my bone folder to put a wave in the banner and attached it with dimensionals.   


For my 3-D project I made a Birdhouse Curvy Keepsake Box.    It was cut out of Sahara Sand cardstock and stamped in Tip Top Taupe ink with the Hardwood stamp.  A small oval was cut for the birdhouse opening with a small oval framelit die.  I adhered a piece of window sheet to the inside so that the treats wouldn't fall out of the birdhouse! :)  I used my bone folder to curve the curvy keepsake box prior to adhering the two pieces together with tear tape. I added some Mossy Meadow leafy branches and Tempting Turquoise flowers and a bird just like the one on my card!  


For the inside of my bird's nest, I used some scraps of Mossy Meadow cardstock to cut some grass using my Fringe scissors and then of course, I added some foil covered chocolate eggs!  

Thanks so much for stopping by!  I hope you'll continue on to Terri Takashige's Fabulous Blog!!


The Stampin' Up! Products used were:

The Grateful Bunch Bundle (stamp set and coordinating punch)
Hardwood Background Stamp
Honeycomb Happiness Stamp Set (Sale-a-Bration)
Bird Builder Punch
Curvy Keepsake Die
Sahara Sand Cardstock
Tempting Turquoise Cardstock
Mossy Meadow Cardstock
Soft Sky Cardstock 
Basic Pearl Jewels
Neutrals Candy Dots (Very Vanilla)
Tempting Turquoise Ink
Garden Green Ink
Old Olive Ink
Tip Top Taupe Ink
Tombow Multipurpose Glue
Stampin' Dimensionals
Big Shot

Tuesday, February 16, 2016

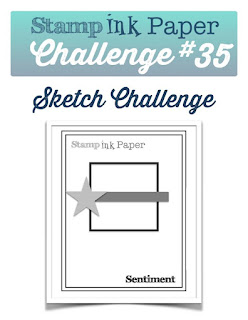
SIP #35 Sketch Challenge

Hello and Happy Tuesday!  I hope you had a wonderful weekend!  I made Jeff his very favorite soup on Valentine's Day!   It is an Italian Sausage, Bean and Pasta soup recipe and although it takes a while to cook it is definitely worth the wait!  I know you are probably over Love themed cards about now but I have one more to share with you!  Our Anniversary is four days after Valentine's Day so I had one more card to make.  This week's Stamp, Ink, Paper  challenge gave me plenty of inspiration!
Jeff's favorite hobby is fishing so I combined the Stampin' Up! By The Tide stamp set and Hardwood stamp with an awesome Gina Marie fishing stamp set (for the sentiment) and came up with this!


On This one I started with a 11" x 4 1/4" piece of Early Espresso cardstock that was scored at 5 1/2".  My next layer was Bermuda Bay cardstock that was stamped with the Hardwood stamp tone on tone with Bermuda Bay Ink.  I sponged some Crumb Cake ink to give the edges a weathered look.  My watercolored layer was 3" x 3 1/2".  I used the smooshing method to add Sahara Sand, Pear Pizzazz, and Bermuda Bay Ink to my watercolor paper.  Have you ever smooshed??  It's so simple.  I apply ink from the pad directly onto the a large acrylic block.  I'll use three different colors of ink in blocks of color on the block.   After applying the ink, I spritz it with water and then turn the block over and press it down to smoosh it onto the watercolor paper.  I allow to sit on the watercolor paper a few minutes.  After drying it with my heat tool, I rubbed on some Versamark ink on the bottom and then sprinkled heat and stick powder on top of that.  I then used my heat tool to heat it and make it sticky.  Then came something unexpected... Pink Himalayan Sea Salt was ground over the sticky heat and stick powder.  It turned out really cool and looks so much like sand!  I heat embossed the fish image with gold embossing powder and added some Pretty Pink Posh clear droplets.  My watercolored layer was matted with a 3 3/4" x 3 1/4" layer of Early Espresso and added to the Bermuda Bay hardwood layer with Stampin' Dimensionals.  I added a 1" x 3 1/2" strip of Early Espresso that had twine wrapped around it horizonally three times and knotted.   I stamped the Nantucket anchor emblem with Early Espresso Ink onto Very Vanilla cardstock.  Since I didn't have the right side of punch to punch that circle out I fussy cut it and then added a 1" circle of Early Espresso cardstock behind it to hide my terrible circle fussy cutting!  lol  The sentiment from the Gina Marie Fishing Stamp Set was stamped on Very Vanilla cardstock with Early Espresso Ink.  I added three Early Espresso Candy Dots to balance that layer out.   Jeff is such a fishing fan, I know he'll love it and he really is the best catch of my life!  

Stampin' Up Products Used:


Built for Free Using: My Stampin Blog


Non-Stampin' Up Products:

Pretty Pink Posh Clear Droplets
Gina Marie Fishing Stamp Set
Twine

Thanks so much for stopping by!  Blessings, Tina

Tuesday, August 4, 2015

SIP Week #8 Card Maker's Choice Challenge - You've Got This

Hello and Happy Tuesday again!  I hope you've been having a wonderful week so far.  It's still pretty hot in my neck of the woods.  I think I'm ready for fall and a bit cooler temperatures!

Well since it is Tuesday, that means I'm back over at the Stamp, Ink, Paper Challenge blog with another design team card.

This week you pick the Stamp, Ink, and Paper!  How cool is that??


Here's my card using two of my favorite colors, Island Indigo and Real Red!


For this card I used part of 4 different stamp sets.  I used "Hardwood" for the background, "You've Got This" for the sentiment, "Thoughts and Prayers" for the small flowers that I embossed in white, and Floral Wings for the Butterfly.  Whew!  That is crazy! I stamped the sentiment in Hero Arts Ombre Ink.  I seem to be going to the "You've Got This" stamp set a lot lately.  I just love the sentiments in that set as well as the font!  The butterfly was stamped in Pool Party with Red Red (stamped off) roses and Island Indigo (stamped off) leaves.   I really LOVE the butterfly in the new "Floral Wings" Hostess stamp set.  It really is one of my new favs!


I stamped the butterfly twice and layered for some dimension.  I then added some basic pearl jewels to the body of the butterfly.  I also looped a little silver metallic thread under the butterfly.  


I LOVE to finish out the inside of a card and the Floral Wings set has this gorgeous little vine that was perfect as well as the Love Ya sentiment!

Here are the Stampin' Up! Supplies I used:

Built for Free Using: My Stampin Blog


Non Stampin' Up! Products:

Hero Arts "Pool to Navy" Ombre Ink
Doodle Bug Sequins

Thanks so much for stopping by!

Blessings,
Tina

Tuesday, July 28, 2015

SIP Challenge #7 - Color Challenge, You've Got This

Hi all, Hope you've been having a good week so far!  It's another Tuesday and that means a brand new Stamp, Ink, Paper Challenge!  This week we've got a fun color challenge for you!


I love these colors but I had one problem.... I didn't have Pacific Point ink or cardstock!  What was I to do???  My friend Andrea reminded me that I had some of the Brights Collection Background DSP and man was I relieved!  I still wasn't sure how to use the Pacific Point DSP though without something else that coordinated with it.  Well here's what I came up with and I really did love how it turned out!


I decided to use the You've Got This Stamp Set and do some paper-piecing.  I started with an 11" x 4 1/4" card base scored at 5 1/2".  I layered on a 4" x 5 1/4" piece of the Pacific Point DSP from the Brights Background DSP stack.  I then cut a piece of 3 3/4" x 5" Sahara Sand cardstock that had been stamped tone-on-tone with the Hardwood Background Stamp in Sahara Sand Ink.  I stamped one flower on the left side of the hardwood background and used a Mossy Meadow Stampin' Marker to color in the stem and leaf.  I then stamped the flower with Memento Tuxedo Black ink several times onto the Daffodil Delight and Pacific Point DSP and fussy cut out the bloom only.  I layered one over the flower that I stamped onto the Hardwood and then began to layer other flowers around the sides and bottom of the hardwood.  I used a White wink of stella glitter pen in the center and then used a Black Medium Tip Faber Castell artist pen to outline the stamped portion so that it would stamp out a little more.  I then used embossed the I'm here for you sentiment in black in the upper right and then as usual I felt it needed something else so I threaded some linen thread into a Pacific Point button from the Brights Buttons and glued it onto a gathered piece of Sahara Sand Lace Trim.

Here are the Stampin' Up Products used:

Built for Free Using: My Stampin Blog


Thanks for stopping by!
Blessings,
Tina