Showing posts with label Brutus Monroe. Show all posts

Wednesday, September 8, 2021

Bundles of Hugs Card using Brutus Monroe Bundles of Autumn Stamp Set and Weathered Wood Paper Pad


Hi Friends!  Hope you're having a fabulous day!  I'm sharing an adorable card today using the gorgeous Bundles of Autumn Stamp Set along with the Weathered Wood Paper Pad!


This huge Bundles of Autumn Stamp Set has some fabulous images and sentiments!  I started with an A2 Kraft Card Base and layered on a panel of the Weathered Wood Paper that measured 5-1/4" x 4".  I love the beautiful colors and textures in this paper... it's so so beautiful!  The focal stitched rectangle panel was cut from Watercolor Paper.  I stamped the squirrel first with Versafine Onyx Black Ink directly to the panel.  I also stamped the squirrel on masking paper and placed over the stamped squirrel so that I could stamp the group of acorns behind the squirrel.  I used a variety of Distress Inks to color in the squirrel, the acorns and to make a background wash.  I added some Wink of Stella to the acorns to add some shine!


To finish off the panel, I stamped the sentiment in the upper left in more of the Versafine Onyx Black Ink and added some Dark Brown paint splatters to the panel.  I matted the watercolor panel with Dark Brown Cardstock and ran some natural twine around the bottom of the panel three times and then tied it in a bow on the left side. I popped up the matted panel with Dimensionals over the Weathered Wood Paper Background.  

Thanks so much for stopping by!  Blessings, Tina


Monday, August 30, 2021

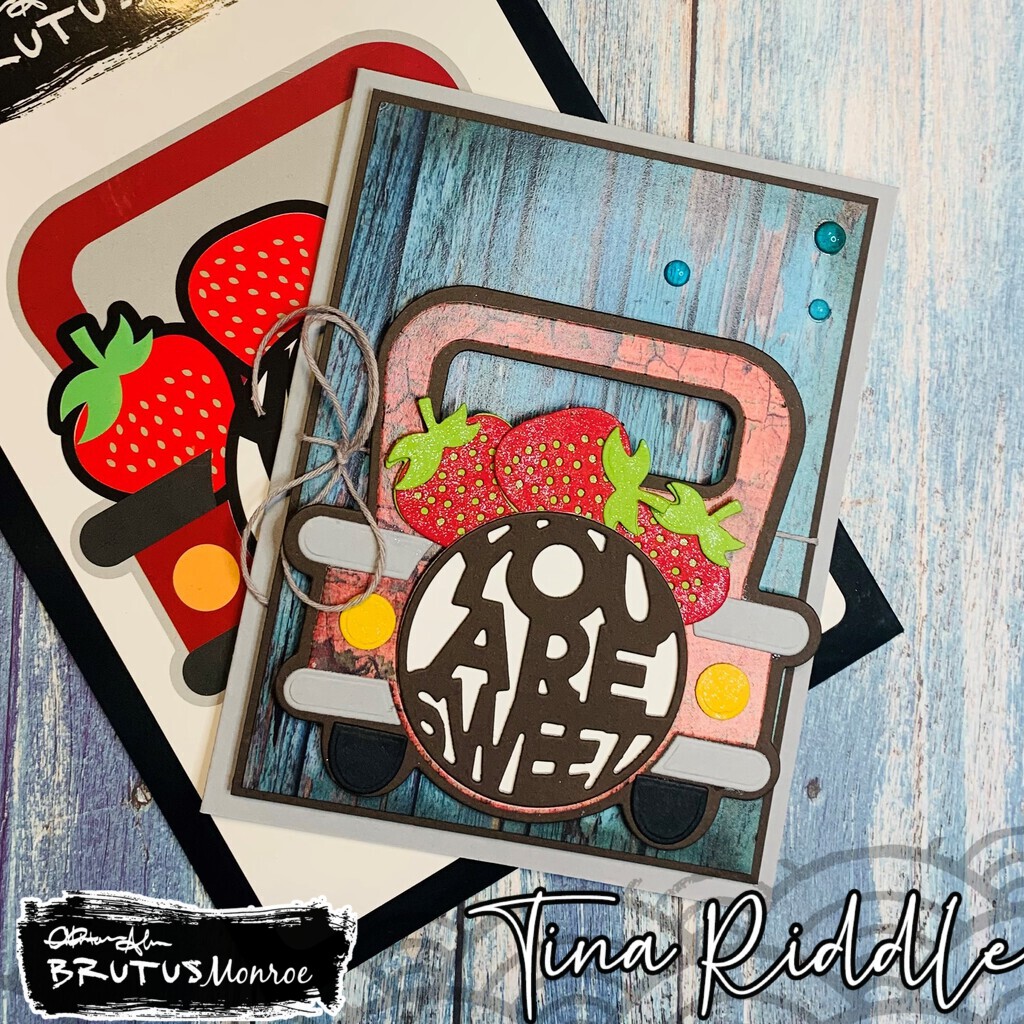
You are Sweet Strawberry Truck using the amazing Pick Up Lines Die Set from Brutus Monroe

 Hello and Happy Monday!  I hope your week is off to an amazing start!  The highlight of my weekend was making this adorable card using the fun Pick Up Lines Die Set from Brutus Monroe!


And if this die set wasn't adorable enough.. I added the gorgeous  Weathered Wood Paper Pad  for my background as well as to cut out the distressed red truck!  Who doesn't love an old Red Pick Up Truck, right??  I love the crackled look of the distressing!


I added a little Wink of Stella to the berries and leaves to help them stand out against the otherwise distressed look of the card!  


I hope you love it as much as I do!  I have so many ideas running through my brain for this fun die set!  Maybe next time I'll add some die cut pumpkins and another round sentiment in that circle!  I can't wait to see what is next!

Thanks for stopping by today!  Blessings, Tina


Monday, August 23, 2021

Hummingbird Flight Card Everything is Possible! Brutus Monroe

Hi There!  I hope you've had a wonderful weekend and are ready for an awesome week! Are you a bird lover?  My husband and I totally are!  We have 3 dogs and spend as much feeding birds as we do feeding our pups!  We especially love our Hummingbirds and make fresh nectar (sugar water) for them every couple of days.  They are just beautiful!  That's why  I'm super excited to share my card today!  I used Brutus Monroe's gorgeous Hummingbird Flight Stamp Set!   


I used watercolor paper and Chroma Mist Sprays in Lilac Purple, Leaf Green and Cobalt Blue to make my background.  I started off my spritzing the watercolor paper with water and then added spritzes of the three different colors of Chroma Mists.  I moved the color around until I was happy with the blend and then used a heat tool to dry it.  Once it was completely dry, I spritzed it with Pearl Shimmer Mist and then dried it again.  Once completely dry, I used a stitched rectangle to cut out the focal panel.  I stamped the sentiment with Versafine  Black Ink and then clear embossed it to help it stand out a little more.  The focal panel was matted on a Black Scalloped Rectangle.


Both the Hummingbird and Flower were stamped in a Copic Friendly Ink and colored with Copics and then fussy cut.  They were then added to the matted panel with Dimensionals.  The panel was added to an A2 Card base made of Lagoon Cardstock. . A few black splatters were added along with three Rainbow Crystal Gems to finish it off.  

Thanks so much for stopping by!  Blessings, Tina 


Sunday, August 8, 2021

Brutus Monroe Bunches of Love Gatefold Card

Hi There!  I hope you've had an awesome week and that today is a nice down day for you!  I love weekends but I think Sundays are my favorite because they really are a day to recover from the week, thank the Lord for what he has done, and to look toward a brand new week!


I'm sharing a card with the Brutus Monroe Bunches of Love Stamp Set today.  It is a super cute 3" x 4" stamp set that has a beautiful focal image as well as 5 sentiments!   


I made a gatefold base of Whitewash 100# Cardstock that measured 8-1/2 x 5-1/2, scored at 2-1/8" and 6-3/8" on the 8-1/2 side.  The gatefold panels were also Whitewash Cardstock that I stenciled Distress Oxides in Picked Raspberry and Seedless Preserves through the Floral Hoop Mixed Media Stencil.  I also spritzed the panels with some water in a Distress Sprayer and then added Pearl Shimmer Mist!  Can I just say if you don't have any of the Pearl Shimmer Mist.. run, don't walk, and get some!  It is amazing!  You won't regret it!  


Can you see the beautiful shimmer??  The focal image was stamped in Memento Tuxedo Black Ink onto Whitewash Cardstock and colored in with Copic Markers.  I focused on coloring the floral images and just added some very light coloring on her legs, arms, and the floral wrap paper.  I fussy-cut the main image and added it to a Whitewash Diecut that already had the "I love you bunches" sentiment stamped on it. I added some Rainbow Crystal gems and a couple of ribbon scraps under the end of the diecut layers on the lower right side and called this one finished!  

Thanks so much for stopping by!  Blessings, Tina


Friday, July 30, 2021

Brutus Monroe Judy's Wreath Hello Card

Hi There!  I hope you've been having an awesome week!   It's Friday and that is almost always a very good day!  I'm over at the Brutus Monroe Blog today with a card using the beautiful Judy’s Wreath Die Set … such an awesome set of dies!!


Not only does this set contain a beautiful wreath base but it has a ton of beautiful leaves and flowers to add on or to use on their own.  I love the font for the "hello" that is included in the set with both the word and shadow!  My A2 Card base was cut from a Dark Emerald Green Cardstock.  I layered on a 4-1/4" x 5-1/2" panel of Wood Grain Paper from Brutus Monroe's Weathered Wood Paper Pad.  If you don't have this beautiful paper, you need it!  It is gorgeous! 


I love to use those little scraps of cardstock left over from other projects.  I grabbed some yellow, pink, coral, and greens to cut out all of the parts to the wreath.  The base of the wreath was the same Dark Emerald Green as the card base.  The other layered leaves were cut from a Jade Green Cardstock that was the same tone but just a shade or two lighter to add a little dimension.  The inserts in the yellow flowers were yellow and colored in with a Bronze Alcohol Marker and then brushed with a little Wink of Stella.  I used Vellum Cardstock for the word shadow and the same darker green that I used for the wreath base to cut out the hello.   I added a large messy bow of Linen Thread on the lower right side and three Jewels to finish it off!  

Thanks so much for stopping by!  Blessings, Tina


Friday, July 23, 2021

Brutus Monroe Flowered Heart Die Hello Card

Good Morning!  I'm sharing a sweet card today made with the beautiful Flowered Heart Die set from Brutus Monroe this morning.  There are so many possibilities with this gorgeous set of dies but I chose to go with a soft look with not only the dies but a beautiful 6x6" Brutus Monroe paper pack called Farmhouse Floral Paper.


I love the soft feminine look of the beautiful white flowered heart.  Once cut I added foam tape to the back to hold all of the sections in place and then spritzed the front of the hearts with the gorgeous Pearl Shimmer Mist!


It's hard to see all of the beautiful shimmer but it is certainly there.  The "Hello" Die Sentiment is from the Judy's Wreath Die Set.  I cut it out in the same light pink and used white for the shadow and then spritzed it with the Pearl Shimmer Spray as well.  It is all so sparkly and pretty!

For the inside, I added another cut heart..


Thanks so much for stopping by!  Below is a complete list of the products used.


Thursday, July 8, 2021

Brutus Monroe Abstract Umbrellas I'm Here For You Card!

 Hello Friends!  I hope you are having a fabulous week!  I'm sharing a card made with the gorgeous Brutus Monroe Abstract Umbrellas Background Stamp today!


These umbrellas are absolutely gorgeous and would be fabulous colored in but I thought they were so intricate that a simple Distress Oxide Blended Background would be just as beautiful!  I started with a Bristol Smooth Cardstock panel that measured 3-5/8" x 4-7/8" and used Blending Brushes for a smooth transition.  From the top of the panel, I began blending with Mustard Seed Distress Oxide, and then moving to Mermaid Lagoon and finishing with Picked Raspberries.  Each ink color was blended into the previous color which created a green between the yellow and blue and a purple between the blue and pink... so pretty!  I love that you can use just three Distress Oxide Ink colors and end up with five! After I finished my ink blending, I spritzed the panel with water and blotted with a paper towel to add those fun lighter splotches!  I hit my card panel with a heat tool to make sure that the Oxide Inks were completely dry and then used my Stamp Positioner to Stamp the Abstract Umbrellas in Embossing Ink and then heat embossed in Raven Embossing Powder.   Once the embossing was completely dry, I used some Pearl Shimmer Paint from my stash and mixed it with 70% Isopropyl Alcohol in a spritzer and then spritzed the panel several times for a fun all-over shimmer!


It was really hard to capture all of the shimmer in a photo but trust me... it's beautiful!  I mounted the beautiful ink blended panel onto a 3-3/4" x 5" matt of Raven Cardstock and then added that to an A2 Whitewash Cardstock card base.  I heat embossed the "i'm here for you" sentiment on a 1/4" strip of Raven  Cardstock from the Bunches of Love stamp set in Alabaster Embossing Powder and added it with some foam tape to the card front.  Last but not least I added three PPP Sparking Clear Confetti Sequins to finish it off!  I love how it turned out and can't wait to send it off to someone that needs to know I'm here for them!


Thanks so much for stopping by!  Blessings, Tina

Saturday, June 19, 2021

Brutus Monroe Mermaid Lagoon Card - Splashing to Say Hello

 Hello and Welcome to my first post as a Brand Ambassador for Brutus Monroe.  I have loved and used Brutus Monroe products for quite some time so I'm super happy to be able to be a Brand Ambassador for them! They have fabulous products for stamping, scrapbooking and general crafting!!


 The most amazing part is that my very first post is using one of my favorite stamp sets... Mermaid Lagoon!  I am seriously all about anything nautical and especially Mermaids!


I had a blast making this card since it is so very much about Amazing Images, Stenciling,  Media Paste and of course... Distress Inks!  My intent was to make my Mermaid and three of the fish look as though they are riding in on waves "Splashing to say Hello"! I hope I got my point across!  My background was a 4" x 5-1/4" panel of  Bristol Smooth Cardstock.  You could certainly use watercolor paper or heavy weight cardstock as well.    Using Blending Brushes,  I did some Distress Ink blending on it first with Tumbled Glass and then added in some Broken China.  I used the Tangled Waves Stencil, and a medium mover to add some Media Paste for dimension to the right side of my card panel.  Once the Media Paste had dried, I did some additional Ink Blending over the paste and even added some subtle blending to the left side of my card by lining the stencil back over the card front and using a Blending Brush to add some additional ink.   I spritzed just a bit of water over the panel and then blotted it off with a paper towel to get some of the lighter blotches. 


  Once the panel was completely dry, I heat embossed the sentiment in the upper left side with Raven Embossing Powder.  My background panel was adhered with Multipurpose adhesive to a matt of  Black cardstock and then adhered with more Multipurpose Adhesive onto a 100 lb. Cover Weight Whitewash Cardstock.   On another piece of Bristol Smooth Cardstock, I stamped the Mermaid, starfish and fish from the Mermaid Lagoon Stamp Set with Raven Ink.  Once they were dry, the images were watercolored with more Distress Inks and an Aqua Pigment Brush filled with water.   Using the Aqua Pigment Brush allows me to add water when needed to lighten the color.  Once I was finished watercoloring and everything was completely dry,  I used my Paper Snips to fussy cut everything.    If you, like me, are not an expert fussy cutter, I find that adding a water-based maker in a color close to your background helps.  Thankfully I had a medium blue marker to help out just a bit. 


 I added my images to my card panel with foam tape, except for the Starfish that I added to the Mermaid's Hair with liquid Multipurpose adhesive.    I love that Brutus Monroe carries but 1/16" and 1/8" foam tape.  On this card I used the 1/16" foam tape so that I could double up on some images so that some are popped up more than others!    I finished off the front by adding three Mermaid Sequins.

For the inside of the card, I added some simple stenciling..


I really like the simplicity some the light Broken China Distress Ink Blending using the same Tangled Waves Stencil on the inside.  Sometimes simple just works!

Thanks so much for following along!  Have a wonderful day and make time to get crafty!

Blessings, Tina