Tuesday, May 26, 2020

Card Making Tips Day 3 - Paper Piecing!

Hi There!  I'm back on Day 3 of My Card Making Tips Series with a fun idea to add color to a project without coloring... Paper Piecing!!  You can use this simple technique to any lined image.

Today's card is once again from the Tasteful Touches Stamp Set.  Are you tired of me using it yet??  The funny thing about it was I didn't order that stamp set on the first pre-order.  It was an after thought that I grabbed when I placed my second pre-order.  I'm so happy I got it!    I added an image and sentiment from the fabulous Forever Fern Stamp Set.  That one I knew I loved from the first time I laid eyes on it!  It truly is one of my very favorites from the upcoming 2020 - 2021 Annual Catalog!


There is so much to love about this card.  The paper piecing of the flower images add color to the flowers without using markers, sponging or watercoloring.  The flowers are easy to cut out and if you make a mistake, just take the edge of a black marker and go around the edges.  This card started with an 11" x 4 1/4" half sheet of the new Magenta Madness Cardstock, scored at 5 1/2" for a top folding card.  On a 4' x 5 1/4" piece of the beautiful In Good Taste DSP, I stamped the greenery and floral images from the Tasteful Touches stamp set, on the edge of the left side with Memento Tuxedo Black Ink.  I then stamped the flower image again twice on some of the 2020 - 2022 In Color DSP in Magenta and cut them out with paper snips.  The DSP flower images were adhered over the ones stamped on my front panel with Multipurpose Adhesive.  The sentiment from Forever Fern was stamped directly onto that panel as well and I love how it looks.  I also stamped the small splatter image from Forever Fern in Memento Tuxedo Black Ink as well.  I love the addition of the splatters.  Once I was happy with my front panel, I cut it out with the 2nd largest of the Stitched Rectangle Dies.  I matted that panel with Basic Black cardstock and then adhered those onto the Magenta Madness Cardbase.  

Here is a picture of a card from a couple of years ago using the "You've Got This" Stamp Set and Pacific Point and Daffodil Delight Brights Collection DSP from that year.
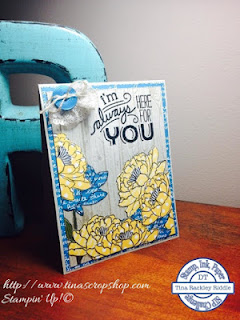


You may note some old images and old DSP from that one.  I stamped the image directly onto the wood patterned paper background and then again onto the Pacific Point and Daffodil Delight DSP and then cut the images out to add over the appropriate sections of the card front.

Thanks so much for stopping by!  Blessings, Tina


Product List

The Spot #112 - Color Challenge with Granny Apple Green, Melon Mambo and Pool Party!

Hi there!  I hope your Tuesday has started off well after this beautiful Memorial Day Weekend!  The weather here in Middle Tennessee was beautiful all weekend and we really needed that after all of the rainy days we've had in May!  The sunshine felt so good as I sat on the deck enjoying the dogs playing and exploring in the back yard.  They were happy for some dry days as well!

Over at The Spot Challenge blog this week, we have a fun color challenge for you!


The challenge is to pick 3 or more of these beautiful colors!  I picked Granny Apple Green, Pool Party, and Melon Mambo!


I started out with a base of Granny Apple Green cardstock that measured 11" x 4 1/4", scored at 5 1/2" for a top folding card.  On a piece of Whisper White cardstock, I stamped one of the images in 2nd Generation Pool Party (stamped off once) in the upper left and lower right corner.  I stamped the greenery from the set in Granny Apple Green coming in from the middle and lower left side and added the flower image in Melon Mambo coming in from the lower and middle right side to balance it out.  The sentiment "Just Saying Hello" from the set was stamped upper middle in Melon Mambo.  Using the largest scallop rectangle from the Stitched So Sweetly dies I cut my top layer first.  From the section that was left over I cut out the 2nd largest Rectangle from the Stitched Rectangle Dies.  Using a scrap of Melon Mambo I cut out another of the largest scallop rectangle to put underneath the top layer.  I used my Granny Apple Green blends to color in the greenery and used my Lovely Lipstick blends to color in the Melon Mambo floral images.  The Lovely Lipstick is a very good match for Melon Mambo but I can't wait to get my hands on the new Melon Mambo blends coming out with the new 2020 - 2021 Annual Catalog!  I stamped another flower image onto a scrap of Whisper White cardstock and colored it in as well but then fussy cut it.  I but it close to the edge and used the darker of the Lovely Lipstick Blend to cover any white showing on the edge.  To start assembliing, I added the outside rectangle piece onto the Granny Apple Green cardbase with liquid Multipurpose Glue.  I added the solid Melon Mambo scallop with more of the liquid glue inside the rectangle where the top layer was cut out.  Next the top scallop layer was added with Dimensionals over the Melon Mambo scallop.  Finally I added my fussy cut flower onto the lower right side with Stampin' Dimensionals.  Last but never least I added three of the darker pink gems from the From My Heart Faceted Gems that were in the Jan- June 2020 Mini Catalog.  

Thanks so much for stopping by!  Blessings, Tina


Product List

Monday, May 25, 2020

Card Making Tips Day 2 - 3 Additional Tips

Happy Memorial Day!  I love that our country takes a day to reflect on those Heros that are no longer here, but have served their country selflessly to preserve our freedoms! So many have given the ultimate sacrifice defending us!  We are truly blessed to have the freedoms we have!  I hope you have a wonderful day with beautiful weather and surrounded by the ones you love!

For Day 2 of Card Making Tips, I decided to focus on one of my very favorite techniques.... Tone-On-Tone Stamping.  My card today features this technique by stamping Mint Macaron Ink on to Mint Macaron Cardstock.  I used the Tasteful Textures Bundle again.. I love it!


You'll notice that my card base has some Tone-On-Tone Stamping as well.  I love that this adds a lot of interest, particularly when you are mounting a layer onto another layer that is the same color.   I could also have sponged the edges of the top layer with this ink and that would have also added some contrast.  For the white on white layers on the labels I did some 2nd generation stamping (stamping off 1 time onto scratch paper) to add a subtle bit of the same greenery.   Here are my tips for today:

  1. Tone-on-Tone Stamping in from the edges on the card base.  I usually add around two corners and sometimes going almost to the other end of the bottom or top of the card.  I also stamped the leaves Tone-on-Tone.  My leaves are from the Floral Essence Stamp Set and were punched out with the leaf punch (sadly retiring).  I'm not sure why they are retiring a punch that coordinates with a stamp set that is carrying over but I'm keeping my punch as long as it matches a current stamp set!
  2. Using an embossing folder on the top panel to add texture and interest.  Pinewood Planks 3D embossing folder was used on this card
  3. Adding a pop of color to an otherwise mono-chromatic card.  My floral image was heat embossed in white on Flirty Flamingo Cardstock for a pop of color.  I'm not a huge fan of fussy-cutting and luckily the heat embossing makes the fussy-cutting easier since the image becomes raised on the cardstock.  


Thanks so much for stopping by!  Blessings, Tina


Product List

Saturday, May 23, 2020

New Card Making Tip Series, Day 1

Hey There!  Hope you are having a fabulous weekend!  It's been pretty quiet around here this weekend so far.  We had thought that our world was getting back to normal a little since our Granddaughter, Taylor, finally had a ball tournament scheduled.  We were so excited to be back watching softball but the tournament got cancelled.  Right now it seems we may have a softball tournament in Chattanooga in the first weekend in June.  It seems like forever since we've been on a ball field.   With Monday being Memorial Day and Jeff having surgery on his foot this Wednesday, it should be a short work week for me this week.  I'll work on Tuesday and be at the hospital with Jeff on Tuesday and will most likely work remotely from home the rest of the week as he will need some help.  I'm not sure how we will deal with this.  He will be in a cast for 6 - 8 weeks and can't put any pressure on his foot.  They will be getting him a knee scooter (is that what's it's called??)  but I'm sure it's not going to be easy getting around on it at first.  

I decided that I would add a Card Making Tip Series.  Sometimes we need simple, quick cards that we can put together pretty easily.  Today I have 3 tips for quick, yet beautiful, cards!

  1. Pick out a beautiful DSP (Designer Series Paper) or Patterned Paper and let it do most of the work for you!
  2. Coordinate your Cardbase as well as layers and embellishements to go with your DSP.  
  3. If you are adding a sentiment on a punched label or die cut, try stamping off the edge to add some interest to your card!  You can even stamp an image and add your sentiment over the image in a darker ink.

Here's an example of a card made following these easy techniques..


The Stamp and Die set I used is from the Tasteful Touches Bundle.  It includes the Tasteful Touches Stamp Set and the beautiful Tasteful Labels Dies.  The DSP I chose to use for my background is so beautiful.  It is from the In Good Taste DSP that will be in the new Stampin' Up! Annual Catalog going live June 3, 2020.  It looks like a distressed Italian tile!  The Photographic Images and visual textures in this gorgeous DSP work well for a variety of projects.  My Seaside Spray top folding Cardbase was 11 x 4 1/4" and scored at 5 1/2".  The DSP was cut at 4" x 5 1/4" and matted on a Night of Navy layer that measued 4 1/8" x 5 3/8" .  Seaside Spray was the ink used to stamp the feather on a  Scrap of Whisper White Cardstock.   The sentiment was stamped partially over the feather in Night of Navy Ink.  Both the sentiment label and the Night of Navy label behind it were cut using the beautiful Tasteful Labels Dies.  The ribbon that I ran across the card prior to adding the sentiment label was from the Forever Greenery Trim Combo pack.  This ribbon feels like a super soft gauze and ties beautifully.  I added the sentiment with Dimensionals at the top and bottom of the label, avoiding the ribbon that ran through the center area.  Finally to finish this one off  I added three Clear Epoxy Droplets that had been colored with the Dark Night of Navy Blends Marker.  


Even though I've already blogged this next card, I thought I'd share it because it follows the same concepts. 


I've used DSP on my panels that do much of the work for me.  I stamped the sentiment partially over the floral and greenery images and I die cut the label so that the entire image is not showing up.  It looks as though the flowers and greenery were stamped off the label.  Also, on the inside of the card, the floral image is stamped off the panel in the upper right and lower left corner.

I hope these tips have been helpful to you.  Have a blessed day and weekend!

Tina


Friday, May 22, 2020

Playing with the New Stampin' Up! 2020 - 2022 In Colors - Highlighting Just Jade!

It seemed like it took forever to get my pre-order and then when I did, I was too busy to play with it!  Well now I have a nice LONG weekend and you can bet I'm going to do some playing around with some of these beautiful stamps, dies, and dsp!

I am Loving the new In Colors!  My first choice was Just Jade!  I've always loved Jade!  It's such a gorgeous shade of green!  This one is a little lighter than what I expected.  I think I had expected more of a dark jewel tone but this is really pretty!!


So I played around with a fun fold on this one.  The card base measured 5 1/2" x 11" and was scored on the 11" side at 2", 3 3/4", 7 1/2" and 9" and was cut from the beautiful new Just Jade cardstock.
I added panels of Whisper White to each front side that measured 5 1/4" x 1 3/4" and a panel of the In Color DSP in Just Jade that measured 5" x 1 1/2".  The center panel was Whisper White and was cut at 5 1/4" x 2 3/4".  I stamped the flower from the beautiful Tasteful Touches Stamp set in Flirty Flamingo in the upper right and lower left side while stamping off of the panel.  I added the sinside sentiment in Shaded Spruce.  For the outside of my card I used a scalloped rectangle from the Stitched So Sweetly Dies cut from Just Jade Cardstock and adhered using liquid adhesive on the left side only.  On another piece of Whisper White cardstock I added the You are So Special Sentiment in the middle with Shaded Spruce.  In the lower left I added the floral image in Flirty Flamingo and added the greenery image fromt he set in Mint Macaron in the upper left and around the right side upper and lower.  The Tasteful Touches bundle contains a beautiful set of dies called Tasteful Labels Dies.  I used the largest of those dies to cut the stamped front sentiment panel.  After cutting the panel with the die, I attached it with dimensionals onto the scalloped rectangle panel.  This turned out so pretty!  I hope you like it as much as I do!  Now I'm off to play with more of the In Colors!

Blessings, Tina


Product List

Pre-Order is in! With Celebrate Sunflowers Bundle from the new 2020 - 2021 Stampin' Up! Annual Catalog

Hi Friends!  I finally had just a little time to play with some of my new Pre-Order Goodies!

Since I didn't have the new In Colors Inks yet (they weren't in the warehouse in time for pre-order!), I decided to use Mango Melody and Pretty Peacock on this one and loved the combination.  It was certainly a color combination I would never have thought of. 

Here's what I came up with for a pretty quick card.


I don't really have any idea what made me pair Pretty Peacock with Mango Melody but I really love it!  Do you know what else I LOVE ?? .... it's the gorgeous Old World Paper 3D Embossing folder!!!  Such texture that folder gives to the background!  I know this will be a favorite and get a LOT of use!   For the sunflower, here's what I did that I would not do next time.  I stamped the Sunflower with Mango Melody Ink onto Whisper White Cardstock.  That was silly because then I had to color it in with my Blends.  The next time I will definitely stamp onto colored cardstock and save the step of coloring.  I did the same with the leaves... so I'll know better next time!  I love the look of adding the adhesive towards the center of the flower and leaving the die cut petals pulled out from the flower.. it really gives it such a pretty look!  This is just the first of many cards.. I'll learn as I go!  

Thanks for stopping by!  Blessings, Tina