Thursday, February 10, 2022

OSAT Blog Hop Slim Shady - Slim Line Card featuring the Hello Ladybug Bundle


Good Morning and welcome to the One Stamp At A Time February 2022 Slim Shady Blog Hop!  Do you love the super trendy Slim Line Cards?  If so, you will LOVE all of the Amazing Inspiration that you will get along this hop! I chose to use the super cute Hello Ladybug Bundle along with the Circle Layering Dies, Forever Flourishing Dies and the Medium Daisy Punch on my card today!


I started off with an 8-1/2" x 7" piece of Granny Apple Green Cardstock, scored at 3-1/2" on the 7" side for my Slim Line Card Base!  I layered on a 3-3/8" x 8-3/8" panel of Real Red Cardstock.  I used the Layering Circle Dies to cut 4 circles out of the focal panel of 3-1/4" x 8-1/4" piece of Pattern Party DSP.  I used scraps of Basic White Cardstock to stamp two of the Lady Bugs that coordinate with the Lady Bug Builder Punch using Real Red and Memento Tuxedo Black Inks.  I stamped 6 of the Daisy Images onto more scraps of Basic White cardstock and used the Medium Daisy Punch to punch them out.  I offset a layer onto another layer of a daisy to make 3 fuller daises.  I used another scrap of Basic White to stamp the other Lady Bug Image from the set using the same Inks.  Using my Granny Apple Green Dark Blends, I added some ground/grass to the bottom of the walking Ladybug image!  I used the light Pool Party Blends Marker to fill in the background.  The sentiment in one of the smaller circles was stamped with the three small flower stamp from the stamp set in Blushing Bride Ink on another scrap of Basic White Cardstock.  The sentiment was stamped over the floral image in Real Red Ink.  I again used the light Pool Party Blends marker to lightly color around the sentiment and flowers.  In a larger scrap of Basic White Cardstock, I stamped the large leaf image in Granny Apple Green and again lightly colored around the image in the light Pool Party Blends marker.   Finally I used the Forever Flourishing Dies to cut out some leafy branches in Granny Apple Green.  For one of the circle backgrounds I only colored in a Pool Party Blends background and added part of the leafy branch die to it.  I added all of the background scraps behind the circles with scotch tape to the back of the Pattern Party layer.  Once I was happy with the placement of the inside of the circles, I added the two stamped and punched ladybugs, added some of the Granny Apple Green Leafy Branches and the Double Layered Daisies.  I added three Iridescent Rhinestone Basic Jewels to the center of the Daisies.  A small Brushed Brass Butterfly was added to the sentiment circle and two of the larger Brushed Brass Butterflies was added over the sentiment circle.  To finish off the card front, I used the Black and White Twine from the Playful Pets Trim Combo Pack along the left side of the card front adding two small pieces of scrap ribbon (Real Red Ruffled Ribbon and Black and White Gingham Ribbon) prior to tying into a knot.  


For the inside of the card, I layered 3" x 8" Basic White Cardstock onto a 3-1/4" x 8-1/4" panel of Real Red Cardstock.  I stamped two daisies in Daffodil Delight onto the bottom of the card front and added a small piece of the leafy branch from the Forever Flourishing Dies.  On another scrap of Basic White Cardstock, I stamped two more Daisies and punched them out with the Medium Daisy Punch to offset layer onto the stamped daisies.  The inside sentiment is from the Sunny Sentiments Stamp Set and was stamped in Real Red Ink.


For my Treat Holder, I used one of the Sweet Little Boxes and added layers of Real Red Cardstock and Pattern Party DSP to match the card.  I added one of the Leafy branches cut from the Forever Flourishing Dies and another of the stamped and punched Lady Bugs to again match the Slim Line Card.  I finished it off by adding a small bow of the Black and White Twine.  All of the products used will be added below the Blog Roll. 

Thanks so so much for stopping by today.  Please remember to continue on the Hop to see some amazing Slim Line Cards!  Just click on the name on the Blog Roll directly below mine!


Product List

Thursday, September 9, 2021

OSAT Blog Hop Step It Up! Fall Cards with the Love Of Leaves Stamp Set and Stitched Leaves Dies


Hi There!  I hope you've been having a wonderful week!  I'm super excited about this month's One Stamp At a Time Blog Hop Theme... Step It Up!  I love the process of taking a card from Simple to Amazing by adding little touches here and there!  If you have already been hopping along, thanks so much for stopping by!  If you are starting at my blog, please make sure to check out all of the fabulousness from Stampin' Up! Demonstrators around the country!  


For all of my projects I used the Love of Leaves Stamp Set and the coordinating Stitched Leaves Dies but added more products here and there as I continued to step up the cards.


For the first card, I kept it really simple.  I started off with an Early Espresso 8-1/2" x 5-1/2" half sheet of cardstock, scored at 4-1/4" for an A2 card base.  I added a 3-3/4" x 5" panel of Crumb Cake Cardstock.  I also added a 3/4" x 5" strip of the beautiful Harvest Meadow DSP leaving about 1/4" of the Crumb Cake Cardstock showing on the left side before adhering with Multipurpose Adhesive.  The sentiment was stamped in Early Espresso on the bottom right side.  Leaves from the Stitched Leaves Dies were cut out of Mossy Meadow, Pumpkin Pie, and Daffodil Delight Cardstock and adhered to each other with Glue Dots after arranging and adding Dimensionals to the bottom of them to attach to the card panel.  I tied some Twine from the Essentials Twine Collection to the stems of the leaves.  I added a few splatters with an Early Espresso Stamp and Write Marker and then three Matt Decorative Dots to finish it off.


For the stepped up version of the Simple Card, I added some embossing of the Crumb Cake background with the amazing Timber 3D Embossing Folder.  I stamped the sentiment in Early Espresso on a scrap of Crumb Cake cardstock that was cut with the Swirly Circle from the Painted Labels Dies.  I popped the sentiment circle up with Dimensionals.  The Stitched Leaves, Splatters and Decorative Dots were added just as in the Simple card.  


For the last and more stepped up version, I again used the Timber 3D Embossing Folder but added a Stitched Rectangle of the Harvest Meadow DSP matted in Early Espresso to the lower right side.  For the Swirly Circle, I cut it in Early Espresso and used the Layering Circle Dies to cut out the sentiment stamped in Early Espresso onto Very Vanilla Cardstock.  I also used the Circle Dies to cut a scallop in Crumb Cake Cardstock to matt the sentiment circle.   I used the Baby Wipe Technique to make an Ink Pad using folded up Baby Wipes and Mossy Meadow, Bumble Bee, and Pumpkin Pie Re-Inkers.  The leaves from the Love Of Leaves Stamp Set were inked in the Baby Wipe Ink Pad and then cut out using the Stitched Leaves Dies.  I added the stamped and diecut leaves in the same was as the previous cards.  I added Early Espresso Ink Splatters and Decorative Matt Dots as I did in the previous cards.


The inside of the card was kept fairly simple, I stamped the leaf in Daffodil Delight and stamped the sentiment in Early Espresso over the leaf.  


Thanks so much for stopping by!  To continue on, please click the name directly mine on the following blog roll.  Blessings, Tina


Product List

Wednesday, September 8, 2021

Bundles of Hugs Card using Brutus Monroe Bundles of Autumn Stamp Set and Weathered Wood Paper Pad


Hi Friends!  Hope you're having a fabulous day!  I'm sharing an adorable card today using the gorgeous Bundles of Autumn Stamp Set along with the Weathered Wood Paper Pad!


This huge Bundles of Autumn Stamp Set has some fabulous images and sentiments!  I started with an A2 Kraft Card Base and layered on a panel of the Weathered Wood Paper that measured 5-1/4" x 4".  I love the beautiful colors and textures in this paper... it's so so beautiful!  The focal stitched rectangle panel was cut from Watercolor Paper.  I stamped the squirrel first with Versafine Onyx Black Ink directly to the panel.  I also stamped the squirrel on masking paper and placed over the stamped squirrel so that I could stamp the group of acorns behind the squirrel.  I used a variety of Distress Inks to color in the squirrel, the acorns and to make a background wash.  I added some Wink of Stella to the acorns to add some shine!


To finish off the panel, I stamped the sentiment in the upper left in more of the Versafine Onyx Black Ink and added some Dark Brown paint splatters to the panel.  I matted the watercolor panel with Dark Brown Cardstock and ran some natural twine around the bottom of the panel three times and then tied it in a bow on the left side. I popped up the matted panel with Dimensionals over the Weathered Wood Paper Background.  

Thanks so much for stopping by!  Blessings, Tina


Monday, August 30, 2021

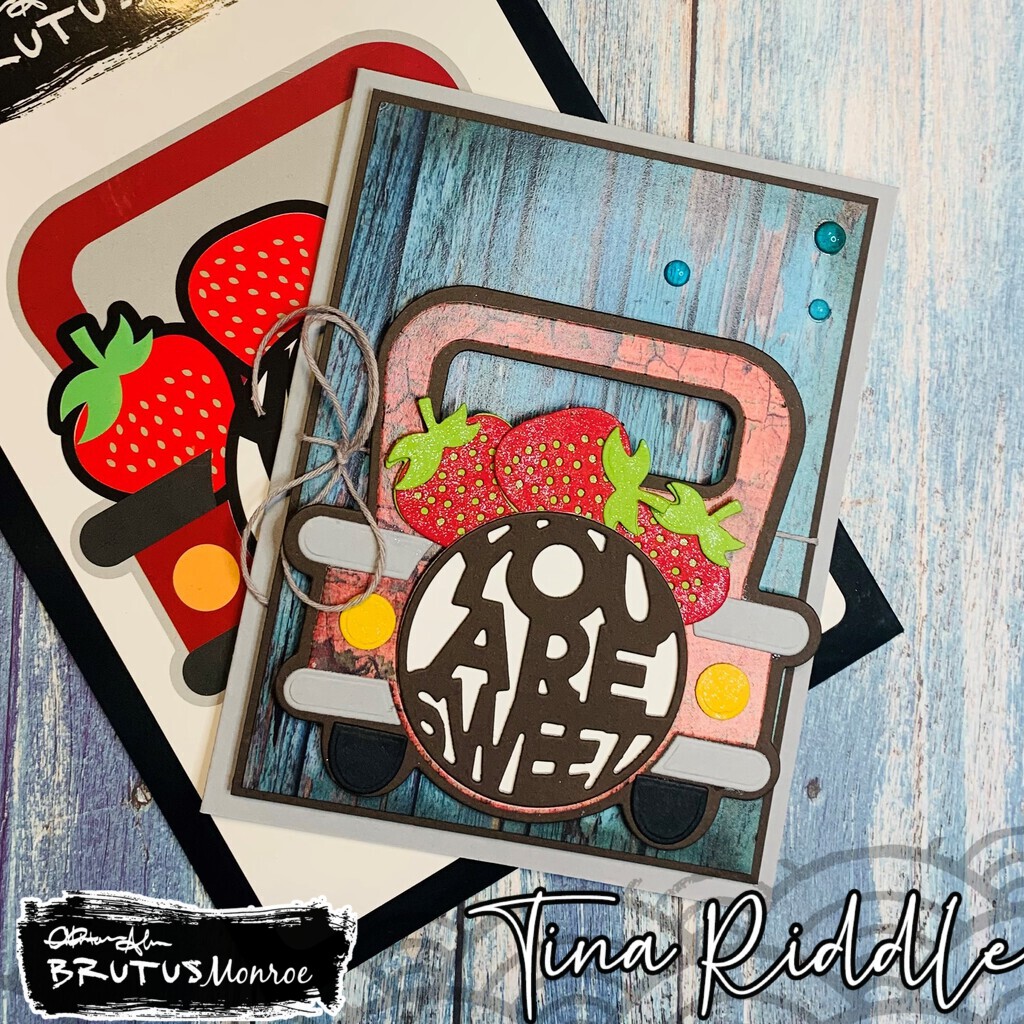
You are Sweet Strawberry Truck using the amazing Pick Up Lines Die Set from Brutus Monroe

 Hello and Happy Monday!  I hope your week is off to an amazing start!  The highlight of my weekend was making this adorable card using the fun Pick Up Lines Die Set from Brutus Monroe!


And if this die set wasn't adorable enough.. I added the gorgeous  Weathered Wood Paper Pad  for my background as well as to cut out the distressed red truck!  Who doesn't love an old Red Pick Up Truck, right??  I love the crackled look of the distressing!


I added a little Wink of Stella to the berries and leaves to help them stand out against the otherwise distressed look of the card!  


I hope you love it as much as I do!  I have so many ideas running through my brain for this fun die set!  Maybe next time I'll add some die cut pumpkins and another round sentiment in that circle!  I can't wait to see what is next!

Thanks for stopping by today!  Blessings, Tina