Wednesday, February 3, 2016

ICS Blog Hop - It's a Love Thing


Hello!  Hope your February is starting off awesome!  I can't believe how quickly January just flew by!  Well of course since it is the first Wednesday of the month, it is time for another Inspire, Create, & Share Blog Hop and this month it's all about It's a Love Thing!  How fun is that??  If you have already been hopping you should have landed from the talented Tammy Dunlap's blog!  If you missed it, you'll definitely want to check it out!


I had so much fun inking up the Beautiful Ride Stamp Set from the Occasions Catalog!  On this card I stamped the car and couple images with Black Archival Ink onto Watercolor Paper and used my Aqua Painters and Stampin' Up! Ink Pads to color them in.  Obviously I did a little fussy cutting on them as well.  The sentiment was stamped on Whisper White cardstock with Black Archival Ink as well.  Both the floral DSP and the yellow crosshatch DSP are from Botanical Gardens Designer Series Paper Pack.   My Card base was Basic Black, with a layer of Mint Macaron cardstock.  

Next up is the fabulous Darla Roberts blog! Just click the next button and you'll be there! 


Here are the Stampin' Up Products used on my card today:


Built for Free Using: My Stampin Blog


Thanks so much for stopping by!  Blessings, Tina

Tuesday, February 2, 2016

SIP Challenge #33 Color Challenge with Market Fresh

Hello!  I hope your week is off to an awesome start!  I've had a few days where I've got a lot of needed craftiness done.  Now if I could just get some much needed housework done! lol 

Well of course it's Tuesday which means another Stamp, Ink, Paper Challenge!  This week we have an awesome color challenge for you!  

I wanted to use a set that I love but haven't had a chance to get much use out of... Market Fresh.  I love the Strawberry "Just Ripe for You" Image but it hadn't even been inked up yet.  Isn't it sad to have all of these great stamp sets and not enough time to use them all!  


I started off with a Very Vanilla A2 card base, layered with a 4" x 5 1/4" piece of the Farmer's Market DSP in a Very Vanilla and Black stripe. Next was a 4" x 3 1/4" piece of real red with a piece of Black Stitched Satin Ribbon around it and knotted to the left side.  My Strawberry image was stamped with Black Archival Ink onto Watercolor Paper and watercolored with Real Red, Pear Pizazz and Mossy Meadow.  I also stamped the image with Versamark onto Black Cardstock and heat embossed it with Gold Embossing Powder.  I then fussy cut the banner off of the embossed image and adhered it with Tombow Multipurpose glue onto the watercolored image.  I punched it out with a 2 1/2" circle punch and layered it behind a Basic Black Circle cut out with Little B's Pierced Circle Dies.  I adhered the circle layers with Stampin' Dimensionals and added some Pretty Pink Posh gold sequins.  I really love it and love that it's so different from most of my cards.  

Here is a list of the Stampin' Up Products used:


Built for Free Using: My Stampin Blog


Thanks so much for stopping by!  Blessings, Tina

Tuesday, January 26, 2016

SIP #32 Tic-Tac-Toe Challenge

Hello!  Well what a week we've had around the country with all of this snow!  Here I am in Middle Tennessee where we rarely get snow and we got about 4 inches of the white stuff after a thick layer of ice was dealt us.  Ugh!  I literally did not leave the house for 3 days!  I'm so ready for Spring!

Well it's Tuesday so that means another Challenge at Stamp, Ink, Paper.  This week's challenge is another fun Tic-Tac-Toe Challenge! I went straight across the top row with mine!
I was digging through some of my Unity Stamps this weekend and ran across this super cute Pun Itty Bitty Stamp Set called "Pitcher Us Together" so I decided to use it this week!


I used an A2 card base of Basic Black cardstock and added some retired Stampin Up! paper from a 4x6" stack in last year's Occasions Catalog.  The Unity image was stamped on Watercolor Paper and was colored in with my aqua brush and Stampin' Up Inks.  I used my Wonky Stitches Avery Elle Dies to cut out my rectangle and pieced more of the DSP stack on the bottom of it.  I ran some black and white twine across the top of the DSP section of my rectangle.  My sentiment was stamped with Stampin' Up! Archival Black Ink onto Whisper White cardstock.  I die cut the sentiment with a 1- 1/2" circle die and then punched a hole in the top of the circle to use it as a tag.  I attached the tag to the baker's twine and then added Dimensonals to the back of the rectangle panel to attach to my card.  I added three Dew Drops with Eileens Fast Grab glue.  To finish this one off, Black stitched satin ribbon and Real Red Pom Pom Trim was added to the upper right corner with my Stampin' Up! Stapler.  I thought this one turned out super cute!  Hope you like it too!

Thanks so much for stopping by!  Blessings!  Tina


Tuesday, January 19, 2016

SIP #31 Birthday Theme - Look who's turning 29 again!

Hello and Happy Tuesday!  On the 29th of January, my sweet daughter, Christine, will turn 30!  So when this week's Stamp, Ink, Paper Challenge was announced as a birthday theme I was super excited! Finally, I have a chance to be ahead of the game!  lol  Seriously you'd think as many cards as I make that I would always have a card ready but the truth is I really like the cards that I give friends and family to be personal.  So here I am with the opportunity to have her card made way before I need it!   Yay for me!  Now the truth is, Christine is not taking this birthday too well!  She is beginning to feel.... you guessed it, OLD!  So I thought this was the perfect stamp set for her card!

So here is my beautiful, sweet daughter, Christine!


And here is Christine's card.  I love how it came out and hope she does too!


The colors I used were Pink Pirouette, Melon Mambo, and Tempting Turquoise on a Whisper White Thick card base.  The white doily under the numbers was Doodlebug as were the sequins.  

Here are the Stampin' Up Products that I used:

Built for Free Using: My Stampin Blog


Thanks so much for stopping by!  Blessings, Tina

Thursday, January 14, 2016

OSAT Blog Hoppers No Rules New Year


Hello!  I'm back over at One Stamp At a Time's fabulous blog hop!  Our January 2016 theme is No Rules.  I LOVE the opportunity to create a card and project with no rules.. don't you??  If you have already been hopping, you should have landed here from Elizabeth Jeanne's awesome blog!  She is so talented and always has amazing cards and projects!  If you started with me, please make sure you hop all the way through.  You won't want to miss a thing on this hop! 

Here is my card and project that were all about one of my faves.. TEA!!


I love this new "A Nice Cuppa" Stamp Set with coordinating Cups & Kettle Framelits Dies and of course I LOVE that it comes in a bundle because as you know you save 15% right off the bat!  Boom!  I love to save money, don't you??  I also love this new Have A Cuppa DSP Stack.  I used papers from this on both my card and project.  The Cardstock colors are Bermuda Bay,  Melon Mambo, and Whisper White. 

My card started off with a A2 cardbase of Bermuda Bay.  I added a 5 3/8" x 4 1/8" skinny layer of Melon Mambo and then a layer of 5 1/4" x 4" of Have a Cuppa DSP.  The Melon Mambo Stitched Satin Ribbon was added to the DSP/Melon Mambo layers before attaching to the card base.   I cut a 2", 1 1/2" and 1" strips of more of that Have a Cuppa DSP and used my Triple Banner Punch to Punch out my ends. Using the coordinating dies I cut out the Tea Kettle with Bermuda Bay and popped it up with Stampin' Dimensionals over the banners.  My sentiment was stamped with Bermuda Bay onto Whisper White and cut into a little rectangle with my stampin' trimmer   I then made diagonal cuts on the upper sides of the rectangle to resemble a tea bag.  I used some Sahara Sand Ink to distress the edges of my tea bag.  Linen thread to attached with my stapler and then secured with a stampin' dimensional.  I used Aileen's Fast Grab Tacky Glue to attach the linen thread to my card.  It holds really well and works quickly!

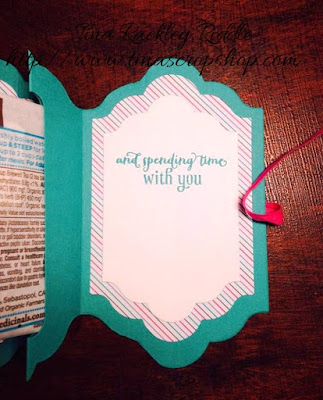
Here is the inside of my Tea Bag Holder..
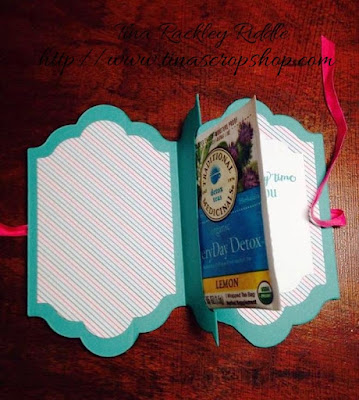

For my Tea Bag Holder.  I started out with a 8 1/2" x 5 1/2" piece of Bermuda Bay Cardstock.  I scored the 8 1/2" side at 3 1/4", 4 1/4" and 5 1/4".  I used my bone folder to smooth down the little accordion score lines.  I cut the shape of my tea bag holder using the largest of the Lots of Labels Framelits Dies making sure to not cut through the folded side of the cardstock.   After cutting out the shape of my tea bag holder, I used my Word Window punch to cut out a section of the center for the tea bag to be inserted. 

After cutting out the section for the tea bag to be inserted, Tear Tape was used to adhere the pleat.  I cut my tear tape in half horizontally to make it thinner since I didn't want my tea bag to poke out of the side of my holder. 
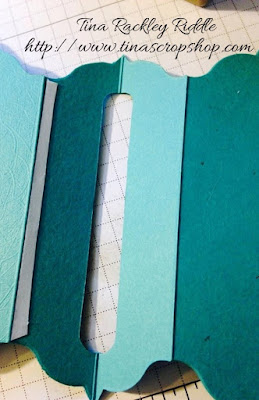
After making my tea bag holder our of cardstock, I cut more of the Have a Cuppa DSP stack  into a size smaller of the Lots of Labels Framelits Dies, one for the front and coordinating for both inside flaps.  I used more tear tape to adhere the 1/4" cotton ribbon in Melon Mambo across the front and back of the holder.  My tea cup stack and sentiment was stamped in Bermuda Bay onto Whisper White Cardstock and was fussy cut and adhered to the front with stampin' dimensionals.  I thought it was the perfect size for this cute little tea bag holder.  I also added a small piece of Whisper White Lots of Labels Die cut under the DSP layer on the inside for the inside sentiment.   I think this little tea bag holder is so super cute and makes such a cute little set with the card.  I hope you loved it too!

To continue hopping just click the Next button at you'll be at Renee Ondraika's Blog! Renee is so creative.. you won't want to miss it!


Here are all of our Fabulous Bloggers in case you lose your way!
 Here are all of the Stampin' Up! Proucts used:


Built for Free Using: My Stampin Blog


Thanks so much for stopping by!  Blessings!  Tina

Tuesday, January 12, 2016

SIP #30 Color Challenge Balloon Celebration and Perfect Pairings

Hello and Happy Tuesday!  I hope you are off to a start of a fabulous week!  We went from 60 degrees to 20 degrees pretty quickly around middle Tennessee.  Is it too early to wish Spring would show back up?  This week over at Stamp, Ink, Paper we have a fun color challenge!  The colors are Rose Red, Crumb Cake, and Gold! 


I've been on a gold kick lately so this was right up my alley. lol  Here's my card using the new "Balloon Celebration" Stamp Set, "Perfect Pairings" Stamp Set, and the Balloon Bouquet Punch!


This was such a super easy card!  I LOVE this new balloon bouquet punch and I really love that it comes in a bundle with the Balloon Celebration Stamp Set.  The Rose Red Balloon was stamped tone on tone and then punched out.  The Gold Glimmer Balloons were simply punched out!  I used Stampin' Dimensionals to pop them up and used simple black and white baker's twine tied to the stem of the balloon.  I used my Allene's fast grab tackly glue to adhere the twine to my card.  It holds really well and dries quickly.  I also used the same adhesive for my Pretty Pink Posh gold sequins.  The sentiment is from the Sale-A=Bration Set "Perfect Pairings"

Thanks so much for stopping by!  Blessings Tina

Here are all the Stampin' Up! Products Used:

Built for Free Using: My Stampin Blog

Monday, January 11, 2016

Global Design Project Sketch Challenge 18 with The Open Sea

Hi everyone!  I hope you're Monday has been a good one, is that possible?? lol  I worked about 10 hours today and was totally exhausted when my friend Andrea Tracy-Tucker sent me a picture of the sketch challenge for Global Design Project.  Oh my....I loved it!  What a great opportunity to run into my craft room and throw a card together. lol  So that's is just what I did!

So, in true Tina Style, I decided to make a nautical shaker card but I used a set I haven't used before so.. yay me!  lol   So here's what I came up with!


I used seed beads and they are mostly in the bottom so it m  ay be a little hard to see but they are there.  For the sentiment I used my new Going Global stamp set from the Occasions Catalog.    I hope you like it!  Thanks so much for stopping by!  Blessings, Tina