Showing posts with label Unity Stamp Co. Show all posts

Sunday, September 8, 2019

Christmas card with Unity Stamp Co. A Joyous Season Sentiment Kit from October 2016

Hello and Happy Sunday!  I wanted to take a minute to share the beautiful Stamp Set I chose from Unity as my gift for participating in Growing in Unity!  It's such a fun Christmas set (which of course I can always use!) called A Joyous Season Sentiment Kit from October 2016!


I really wanted to make a card  but I hadn't felt very good today and walked into my Craft Room trying to find something easy when I noticed two things!  The first thing was an ink blended panel that I made a couple of weeks ago and hadn't used.  The second thing was this awesome A Joyous Season Sentiment Kit.  How simple was it to stamp a couple of images in Versafine Onyx Black Ink onto the Ink blended panel and add the sentiment.  So simple I felt a little guilty.. lol  I clear embossed the sentiment I stamped from the kit to make it stand out just a bit more.  I cut the panel out with a Stitched Rectangle and matted it in Black and ran some black and white twine around it before adding it to a 110# Neenah Classic Crest Solar White Cardstock.  

Have a wonderful day!  Blessings, Tina

Friday, August 2, 2019

Growing in Unity - Day 5

Well friends this is my last Growing in Unity Day!  For my last card I went to my first love.... Coffee!  Yes, I love all things coffee and probably have every coffee themed stamp that Unity has made.  Today I used the One Sip At a Time Stamp Set.


This was such a simple card to make.  I stamped the coffee cup image with Versafine Onyx Black Ink on a sheet of Bristol Smooth cardstock.   Once dry, I watercolored it with Zig Clean Color Markers.  Once colored I used the one of the light gray Zigs to ground it.  I stamped the sentiment on the lower left side with Versafine Onyx Black Ink and then clear embossed it.  I cut the panel to 3 3/4" x 5 1/2" and added it to the right side of a piece of patterned paper that measured 4 1/4 x 5 1/2".  I then added that to an A2 cardbase of 110# Neenah Classic Solar White Cardstock.  I finished it off with 3 Pretty Pink Posh Sparkling Clear Confetti Sequins.

Thanks so much for stopping by and leaving such sweet comments all week!  Stay tuned as I'll be announcing the 2 winners of the Unity Prize Packs in a few days!  

Blessings, Tina

Thursday, August 1, 2019

Growing in Unity Day 4

Hello!  Can you believe it is already Thursday?  My Growing in Unity Week has flown by but has been so much fun!  I love having a reason to be creative every day!

Today's card is a combination of the Hit The Brick Background Stamp and two stamps from the May  May 2017 Kit of the Month (free your dreams).   I love background stamps and this is one of my favorites.   My vision was of a limb hanging in front of an old brick building with birds.  I actually have many Unity stamps with birds so I had a hard time deciding which to use.  I love birds... birds on a limb, birds on a wire, just any birds!  I finally decided on these beautiful large birds from the Kit of the Month  because they were the perfect size!
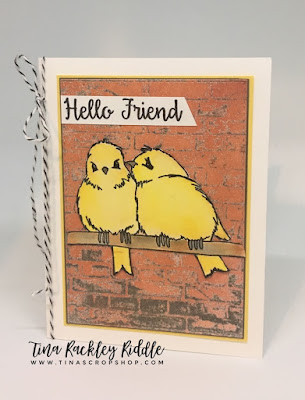


For my background I stamped the Hit the Brick Stamp Set in Versamark Ink on to Bristol Smooth Cardstock and then stamped it in SU Gray Granite Ink.  The Versamark helped the ink stay sticky so that I could Clear Emboss the image.  I ink blended Tim Holtz Fired Brick Distress Ink over the embossed the image and cut it out with a Stitched Rectangle Die.  I double mounted the panel on skinny layers of Soft Suede and Daffodil Delight Cardstock.   The birds on a limb image was stamped with Versafine Black Onyx Ink onto more of the Bristol Smooth Cardstock and was clear embossed.   I watercolored the image with an Aqua Painter and Tim Holtz Distress Inks in Scattered Straw, Mustard Seed, Rusty Hinge, Hickory Smoke, and Weathered Wood.  Once it was dry, I used my paper snips to fussy cut it and adhered it directly to the front of the panel with Gina K Connect Glue.    The Hello Friend sentiment was also from the same Kit of the Month and was stamped in more of the Versafine Onyx Black Ink onto a scrap of White Cardstock.  I cut it at an angle and adhered it to the front panel on the upper left side.  The matted panel was attached to an A2 cardbase of 110# Neenah Classic Solar White Cardstock.  I ran some black and white twine along the fold and tied it into a bow in the upper left corner to finish it off.  I really love the way it turned out!

Thansk so much for stopping by!  Don't forget to comment for a chance to win one of two Unity Prize Packs!    Blessings, Tina

Tuesday, July 30, 2019

Growing In Unity 2019 - Day 2

Hello and Happy Tuesday!  It's Day 2 of my Growing in Unity Week.   The stamp set I used is "Sweet Elle".  This is the 2nd baby shower card I've made with this cute stamp set.  One of the things I LOVE about it is that you can use it for a baby boy or girl and that you can coordinate it with the colors of the nursery.  This card was made for my daughter's baby shower for a baby girl using Blush and Navy...   When my daughter opened the gift, she commented immediately on the colors being the colors of the nursery.  Isn't that the coolest??


I did some basic Copic Coloring... I'm certainly not a Copic Expert!  I love that the stamp set already has the Elephant grounded... so no need to create shadows!  I stamped it on Neenah Classic Solar White 80# Cardstock and then matted it on Navy Blue Cardstock.  I used a piece of Patterned Paper in Blush and gold in the background and matted it on more Navy Cardstock.  I ran a piece of Blush ribon around the back patterned paper layer first and then added the top stamped panel with Dimensionals at the top and the bottom of the rectangle.  This two layer card front was mounted on an A2 cardbase of 110# Neenah Classic Solar White Cardstock.  

Thanks so much for stopping by!  Please don't forget to comment for a chance to win one of two prize packs from Unity!  Blessings, Tina

Sunday, January 14, 2018

GIU Blog Hop - Welcome To The Hood!


Hello and Happy Sunday!  I hope today is a wonderful day and full of blessings!  Today I am blessed and honored as a former GIU Gal to be in a Unity Stamp Company blog hop!  How cool is that?  As you'll see you have a chance to win a Unity Prize package just by commenting on this hop!  Even cooler, right?  I'm sure you'll also have some awesome inspiration along the way!

Have you seen Unity's new release?  They have some awesome stamp sets available now.  As soon as I saw their Facebook Live Release Presentation I headed over to purchase a few sets!  One of my favorite new sets has birds.. called Lift Me Up Birdies!  Seeing it reminded me that I hadn't used my Welcome To The Hood stamp set that I purchased a while back so it was time to pull it out!


So if you are a regular follower, you know I have a love of all things shaker.... so I decided to go shaker with this adorable set.  My first instinct was to stamp on white cardstock but I decided to try it on Pool Party since I wanted a blue sky to see if I could manage a light color wash of the birds on colored cardstock.  All of my stamping.. including the sentiment was stamped in Versafine Black Onyx Ink and heat embossed in clear.  The embossing helps to keep the colors inside the images.  Well.. it worked on the colored cardstock and I was super happy!  I used some distress markers scribbled on an acrylic block and an aqua painter to color in the birds.  Since I was coloring on regular cardstock instead of watercolor paper, I was light with the water and that also helped it to dry super quick.  I filled my shaker window with some Lucy's Little Things Sea Spray Sequin mix.  I thought it turned out super sweet and I hope you loved it too!  


  Thanks so much for stopping by today!  Blessings, Tina

Tuesday, January 2, 2018

Growing in Unity Week Winners!

Hello and Happy New Year!  I am finally able to announce the winners from my Growing in Unity Week!  I want to thank each and every one of you that stopped by and took the time to comment on my posts!  It is so appreciated!  

So for the winners, I numbered every commenter and then used Random.org to pick the random numbers.  The winners are:

Shannon Edwards
Lydia Hallum

Congratulations ladies!  You have two weeks to contact me with your mailing address so I can forward it to Unity for your prize!  1

Thursday, December 28, 2017

GIU Post #4 - Love You This Much!

Hello!  Hope you've been having a fabulous week!  This has been such a wonderful week for me being a Growing in Unity Gal!  I have had so much fun creating with these fabulous stamp sets!  Some of them I had purchased for one reason or another but hadn't used yet.  This has given me such a great opportunity to get them out and just have a blast making cards!  

Right now I'm thinking ahead to Valentine's Day with the fun owl in Unity's  "love you this much" stamp set!  I absolutely LOVE owls and this little guy is just adorable!


I started with an 11" x 4 1/4" piece of Basic Black Cardstock, scored at 5 1/2" for a top folding note card.  I added a piece of 5 1/2" x 3 3/4" piece of a wooden plank patterned paper.  My owl was heat embossed in black onto Bristol Smooth Cardstock.  I used Tim Holtz Distress Inks and an aqua painter to color my owl and then fussy cut him out.  Since I'm not an expert at the whole fussy cutting thing.. I ran the brush tip of a black marker around the edges so there was no white showing.  I then stamped the exact same owl and heart image with Real Red Ink onto a piece of blue watercolor look patterned paper.  I loved how it almost looked like clouds in the background!  A Real Red Marker was used to color in the hearts (of course they look a little darker since they were stamped onto blue paper).  I used a Circle Framelit Die to cut out around the owl that was stamped on the blue paper and cut out a black scallop to layer behind the circle.  Tombow Multipurpose Glue was used to adhere the colored owl over the owl that was stamped on the circle so that only the surrounding hearts were showing.   Some Glossy Accents was added over the hearts as well as the owl's eyes.  I decided that my owl looked like he was floating so I used the same circle framelits to cut a small piece of kraft cardstock for him to stand on by first cutting out a portion of a circle and  using the same framelit to cut in the other direction making a small hill.   The sentiment " I love you this much" was heat embossed with black on the lower right side.  I added a piece of Natural twine on the top fold and tied it in a bow on the left side of the card and allowed the ends to hang down ... my scissors helped to curl the ends a bit.  Last but not least I added a few Lucy's Little Things Rainbow Jewels in blue to finish this one off!  

Thanks so much for stopping by!  Remember I'll be drawing two winners to win some Unity Stamps so be sure to leave me a comment!  Blessings, Tina


Wednesday, December 27, 2017

GIU Post #3 - Everyone You Meet!

Hello and Happy Hump Day!  I am really enjoying my Growing In Unity week!  My next card uses one of my all time favorite Unity Stamp Co. stamps... Everyone You Meet!  Actually it's my favorite quote/saying and something that I really try my best to remember.  


For my stamped panel, I used the watercolor smooshing method to apply my color.  I started with a piece of Bristol Smooth Cardstock.  To apply  Peacock Feather and Picked Raspberry Distress ink, I  smooshed the mini cubes directly onto the wax paper and then misted it with my Distress Sprayer.  I then misted my Bristol Smooth Cardstock and pressed the wax paper ink side down onto it.  I used a heat tool to dry it and then reapplied the inks until I was happy with my background.  Once I had the panel completely dry, I stamped the sentiment with Versafine Black Onyx Ink and then clear heat embossed it. I used a bit more of the Picked Raspberry as well as Peeled Paint Distress Ink and an Aqua Painter to paint in the flowers.  My Stampin' Up! Lots of Labels Dies were used to cut out the sentiment and then cut another larger label out of Tempting Turquoise Cardstock.  I tied a piece of Black and White Gingham Ribbon around the Turquoise Label and then attached the sentiment label over it with foam tape.  My card base is 110# Neenah Classic Crest Solar White Cardstock that measured 11" x 4 1/4" and was scored at 5 1/2" for a top folding note card.  I used a We R Memory Keepers Corner Chomper to cut the rounded corner on the upper right and lower left corner.  My patterned paper measured 4" x 5 1/4" and was rounded the same as the card base and adhered with Fast Fuse.    I also used Fast Fuse to adhere the label layers since it is a strong adhesive and holds well.  I finished this one off by adding some Lucy's Little Things Rainbow Jewels onto the cardfront with Multi Medium Matt adhesive.   I think it turned out super cute and I hope you liked it!  

Remember at the end of the week, I will be drawing 2 winners that have commented on my posts.  I hope you are feeling lucky!  Blessings, Tina

Tuesday, August 16, 2016

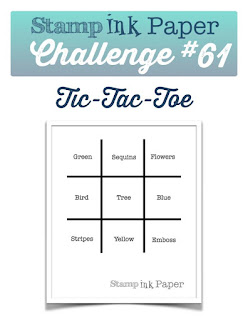
SIP Challenge #61 Tic-Tac-Toe from Lisa!


Hello and Happy Tuesday!  Are you ready for another SIP Challenge?  This week we have another fun Tic-Tac-Toe from Lisa!  
http://stampinkpaper.com/2016/08/sip-challenge-61-tic-tac-toe-from-lisa/

I went straight across the middle with Bird, Tree, and Blue.  Here's my card..


I have to tell you that I absolutely Love this sentiment from Unity Stamp Company but it is so large, it can be a bit tricky to use.  I had to get the elements in so for my tree with this sentiment I decided to use this awesome Stampin' Up! Woodland Embossing Folder.  I brayered soft suede ink over the embossed 3 3/4" x 5" Soft Sky Layer.  Now I have another confession.. and I'm pretty sure if you take a good look at this card, it is no secret... I am not good at brayering on embossed images.  There.. I've said it!  I have one of the old type brayer and I really believe that the new Stampin' Up! Sponge Brayers would probably be much easier to do this technique.  I'm going to order some on my next order so stay tuned.. I'll let you know!   I heat embossed my sentiment in the new Copper Embossing Powder onto Whisper White and then used Banner Framelit Dies to cut it out.  The birds are Little Bird Dies from Gina Marie and were adhered with glue dots.  I layered my card front on a 4" x 5 1/4" piece of Early Espresso Cardstock and then layered that on an 11" x 4 1/4" cardbase that was scored at 5 1/2".  For some reason I've been loving top folding cards lately!  

 Thanks so much for stopping by! Below are links to all of the products!
 Blessings,  Tina

Non- Stampin' Up Products:

Here are the Stampin' Up Products used:


Product List