Showing posts with label Ornate Floral 3D Embossing Folder. Show all posts

Tuesday, April 7, 2020

The Spot Challenge #105 Sketch Challenge with The Ornate Garden Suite

Good morning and Happy Tuesday!  It's another working from home day for me.  Sometimes I wonder if things will eveer go back to normal or if this is becoming our new normal.  I just try to remember that we can learn and grow from these challenges.  I hope that you and your family are able to stay safe and virus free!  

Since it is Tuesday, it's time for another Challenge over at The Spot!  This week we have a new sketch and this one has been really fun to work with.  


I used some of the awesome new products from The Ornate Garden Suite on this one!  


I started off with a Terracotta Tile 8 1/2" x 5 1/2" half sheet of card stock that was scored at 4 1/4".  I added a 5 1/4" x 4" Old Olive Cardstock layer that was run through my Big Shot with the awesome Ornate Floral 3D Embossing Folder.  I ran a piece of Terra Cotta Tile ribbon, from the Ornate Garden Ribbon Combo pack, across the middle of the Old Olive layer and tied it in a knot on the right side before attaching it to the card base with multipurpose glue.  Using the smallest square in the Stitched Shapes Dies, I cut 3 squares of the Ornate Garden Specialty DSP, I then cut a scallop border using Layering Squares dies.  I attached the three squares each in a diamond pattern using Stampin' Dimensionals avoiding the ribbon by placing them over or under that section.  The sentiment "you're amazing" from the Ornate Thanks Stamp Set was stamped onto a scrap of Terra Cotta Tile cardstock with Versamark Ink and then heat embossed in white.  I used one of  stitched rectangle dies to cut out the sentiment.  Since the rectangle was too wide and long, I cut it once to line it up under the sentiment to the right place on the left side and then ran it through a second time lining it up at the top of the sentiment and on the right side.  This allowed the sentiment strip to be just the right size.  I added three gold enamel glitter dots that had been colored with my Stampin' Blend Dark Old Olive marker.  The alcohol markers dry really fast when coloring in jewels or dots.. such a nice way to coordinate your embellishments to the color of your project!

Thanks so much for stopping by!  Blessings, Tina


Product List

Tuesday, March 24, 2020

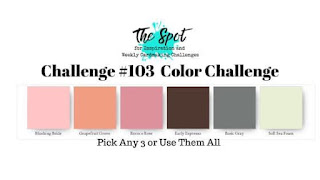
The Spot Challenge #103 Color Challenge with the Ornate Garden Suite of Products

Hi There!  Hope you are doing well and are hunkered down at home!  This Corona Virus mess is just too crazy for words.  I began working from home this week and will probably do so for at least 4 weeks.  Since I work as an Import Manager for a Retail Chain, I can tell you that unless you are a gas station, grocery store, or pharmacy, if you are in retail, things are super tough right now.  We had to furlough many of our employees and take it down to the bare bones just to give us a chance to survive this thing.  It's so, so sad.... 

At least crafters have their crafts to keep them sane!  So to help jumpstart your creativity, we've got another Spot Challenge for you to check out.

For my design team card, I used Rococo Rose, Blushing Bride and Basic Gray with a little help from the new Ornate Garden Suite of Products.  The suite has two stamp and die bundles, an embossing folder, a ribbon duo and some beautiful gold embellishments. This suite is available to demonstrators to pre-order now and will be available to customers on April 1st!


Here's my card...


I started with an 11 x 4 1/4" piece of Basic Gray Cardstock that was scored at 5 1/2".  I typically use this as a top folding card but today I'm using it as a side folding card.  I added a 4 x 5 1/4" panel of Rococo Rose Cardstock that was embossed with the beautiful Ornate Floral 3D Embossing Folder.  With a scrap of Blushing Bride I cut a beautiful layer with the ornate Layers Dies.  I backed it with Basic Gray Cardstock to show off that gorgeous detail in the die cut.  I cut a front layer of Basic Gray and heat embossed the sentiment from the Timeless Tropical Stamp Set.  I stamped the single flower from the Ornate Style Stamp Set in basic gray onto Whisper White cardstock.  I used Stampin' Blends to color the image in and then fussy cut it.  the stem was cut from the blossom (by accident.. lol) so I adhered the stem with Multipurpose glue and popped up the blossom with Mini Dimensionals.  

Here's the inside of my card, which I kept super simple by just stamping the small single flower...


Thanks so much for stopping by!  Stay safe and craft!  Blessings, Tina


Product List