Thursday, March 11, 2021

OSAT Blog Hop Three Cheers Birthday Themed Card


Hi There!   I'm over at the One Stamp At A Time Blog Hop with Demonstrators from around the World  today!  This month's theme is all about Birthdays!   If you have already been hopping, thank you for continuing on!  If you are starting at my Blog, please make sure you hop all of the way through for some fabulous and unique inspiration! 

I am still all about the Birthday Chick Bundle but surprisingly I paired it with the Sand and Sea DSP and absolutely loved it!


My color combination for this fun set is primarily Rococo Rose and So Saffron.


I loved this color combination!  So fun!  I thought the Sand and Sea DSP was so fun with this bundle!  I started with an 11" x 4-1/4" So Saffron Cardstock that was scored at 5-1/2" for a Top Folding Card.  I added the pretty fun dotted stripe Sand and Sea DSP pattern cut to a 4-1/4" x 5-1/2" panel completely over the front of the card base with Multipurpose Adhesive.  I cut a panel of the beautiful Yellow and Pink Watercolored Pattern from the DSP with one of the Stitched Rectangle Dies.  I used one of the Blending Brushes to add just a little more Rococo Rose Ink behind the area where the chicken would sit.  I stamped the sentiment on the panel in Memento Tuxedo Black Ink and then restamped it using Versamark and Heat Embossed it.  I cut the fun Birthday Banner out of more of the DSP and the fence was cut in Basic White.  The area ground was also more of the Sand and Sea DSP.. It's crazy how well it worked out for me!  I stamped the Chicken with the Balloon on a scrap of Basic White with Memento Tuxedo Black Ink and used Stampin' Blends to color it in.  I used the coordinating dies to cut it out and Popped it up with Dimensionals.  Of course I had to finish the front off by adding some black splatters with my Basic Black Stampin' Write Marker.  Oh and I also added Wink of Stella to the Balloon and added a few Wink of Stella splatters too because... well, why not?  I also added a little of the White Twine from the Snail Mail Twine Combo Pack.  

Here's how I finished the inside...


I stamped the sentiment, confetti, and chicken all with Memento Tuxedo Black Ink on 3-3/4" x 5" Basic panel of White Cardstock.  I used Stampin' Blends to color in the confetti as well as the Chicken.  The panel was matted with 3-7/8" x 5-1/8" Basic Black Cardstock and adhered to the inside of the So Saffron Card Base.  I added just a little Light Smoky Slate Blends at the bottom of the Chicken to ground it and then used the color lifter to lighten it a little more.  

One of my favorite 3D projects is always the Mini Curvy Keepsake Box.  


I finished this one off really simply by adding one of the tag dies in the Mini Curvy Keepsake Box Die Set cut in Basic Black.  I popped up one of the little hatching chicks and then tied it to the box with Whisper White Polka Dot Tulle Ribbon.  Super simple but really cute!

Thanks so much for stopping by!  You are at Tina Riddle's Blog, so just click the name directly below mine on the Blog Roll below to continue on...


Product List

Tuesday, March 9, 2021

The Spot Challenge 153 Sketch Challenge with Stampin' Up! Flowering Cactus Product Medley

 Hey there! I hope your week is off to a fabulous start!  I'm back over at The Spot this week with antoher Design Team Card for an adorable sketch!


I absolutely loved this sketch!  There are soooo many possibilities!  Here's what I came up with...


I am still having such fun playing with the awesome Flowering Cactus Product Medley that I had to grab it one more time for this sketch!  I started off with an 11" x 4-1/4" half sheet of Mint Macaron Cardstock that was scored at 5-1/2" for a top folding card.  I added a 3-3/4" x 5" sheet of Mossy Meadow Cardstock that had been embossed with the Tasteful Textiles 3D Embossing Folder.  I die cut the adorable heart shaped cactus and the purple flower from the beautiful coordinating DSP... it is sooo pretty! I popped it up on the card front on the right side with dimensionals.   I did some partial inking of the sentiment stamp in Highland Heather Ink so that just the top line was stamped onto Basic White Cardstock.  I cut it into a thrin strip and then cut the left side at an angle.  I added the sentiment strip with Multipurpose liquid adhesive and added another thin strip of the DSP also cut into on angle on the left side and tucked it under the cactus and adhered with more of the liquid adhesive.  I finished it off by adding three Elegant Faceted Gems and a small bow of the Mossy Meadow Braided Linen Trim with a mini glue dot on the bottom right of the cactus.  

Thanks so much for stopping by!  Blessings... Tina


Product List

Tuesday, March 2, 2021

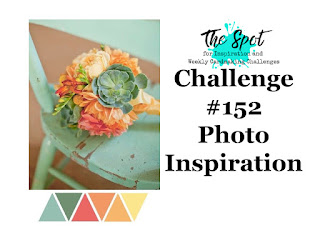
The Spot Challenge #152 - Inspiration Photo Challenge Bright Succulents with Stampin' Up! Flowering Cactus Product Medley

 Hi There!  I hope you're week is off to a fantastic start!  Since it is Tuesday, I'm back over with The Spot Challenge Design Team with my take on a fun Inspiration Photo Challenge!


My original thought was to use the beautiful Simply Succulent bundle, but after googling succulents, I decided to go in another direction.   I found out that all Cacti are Succulents but not all Succulents are Cacti.  After looking at the gorgeous colorful DSP in the Flowering Cactus Product Medley I thought how much colorful can you get?!? 

Here's what I came up with..


Isn't this DSP just dreamy??  I started out with an 8-1/2" x 5-1/2" half sheet of Calypso Coral Cardstock, scored at 4-1/4".  My beautiful, colorful, Flowering Cactus DSP was cut at 3-3/4" x 5" and was matted on a 3-7/8" x 5-1/8" panel of Mint Macaron Cardstock.  I ran some white baker's twine from the Snail Mail Twine Combo Pack around the panel three times and tied it in a bow on the left side.  I then adhered the matted panel onto the Calypso Coral Cardbase with Dimensionals.  I cut one of the larger labels from the Tasteful Labels Dies in Basic White Cardstock and stamped the sentiment in the upper right of the label in Calypso Coral.  The Cactus stamp was first inked with Mint Macaron and then sponged in Mossy Meadow on the edges prior to stamping onto a scrap of Basic White.  I used the coordinating dies to cut out the cactus.  The flowers were cut with the coordinating dies from some of the DSP and adhered with multipurpose adhesive.  I added just a small line to ground the cactus with my light Smoky Slate blends.  Dimensionals were added to the label and adhered over the white twine.  If you are interested in any of the products used, they will be linked below.

Thanks so much for stopping by!  Blessings, Tina  


Product List