Thursday, February 11, 2021

OSAT Blog Hop Where The Wild Things Grow February 2021


Hello and Welcome to The One Stamp At A Time Facebook Group's February 2021 Blog Hop!  We are certainly excited to have you today.  If you have already been hopping, thank you so much for continuing on.  If you have started with my blog, please make sure you hop all the way through for some amazing inspiration!  This month's theme is Where The Wild Things Grow and is perfect for the current Stampin' Up! products that showcase flowers, blooms, cacti, or greenery.  There are certainly a lot of fun stamp sets to chose from but I went straight to the Flowering Cactus Product Medley.  I just received mine last week and can't seem to get enough of it!


I made a fun fold card that folds up to fit perfectly in an A2 envelope but spreads out beautifully for display.  I also created a Note Pad Holder with a piece of Magnetic Vent Cover on the back that will stick to my refrigerator.  I have a lot of black and white in my kitchen so why not throw a little color into the mix, right?


For this cute fun fold card, I started with a Highland Heather 11" x 4 1/4" half sheet of card stock and scored the 11" side at 2-1/4", 3-5/8", 7-3/8", and 8 3/4".  Burnish all of the score lines so that from each side you have a valley fold and mountain fold so the front panel stands out.  The outer most panels are matted with 2-1/8" x 4-1/8" Mossy Meadow Cardstock and then DSP over that measuring 2" x 4".  The middle panels are matted with 1-1/4" x 4-1/8" Mossy Meadow Cardstock and 1-1/8" x 4" DSP.  The Middle Panel for both the front and back are matted with 3-5/8" x 4-1/8" Mossy Meadow and the focal panel of Basic White measuring 3-1/2" x 4".  Prior to adhering the focal panel, I stamped the heart shaped cactus in Mint Macaron with some Mossy Meadow sponged on the upper and left side of the image prior to stamping.  I stamped the cactus flowers in Highland Heather onto a scrap of Basic White and used the coordinating dies to cut it out and then popped it up with Dimensionals.  The sentiment was stamped in the upper right with Mossy Meadow Ink.  I ran some Linen Thread around the matted layer three times and tied it in a bow on the lower left side prior to adhering it with Multipurpose Adhesive onto the Highland Heather Panel.  I finished it off with three Mint Macaron adhesive-backed sequins.. honestly those may have been left over from a Paper Pumpkin kit! 


I finished up in the back of the focal panel, leaving room to write on it.


My note pad holder, I kept pretty simple but couldn't help but add some of the die cut elements from the DSP.  I started with an full sheet of  8-1/2" x 11" Highland Heather Cardstock and scored it on the long end at 2-3/4", 3, 7-1/2, and 8".  On the short side, I scored it at 1/2".


I used the Paper Trimmer to cut in diagonally to leave an exposed area at the upper part of the note pad holder.  I cut at the score lines and the bottom and clipped in on one side.  I adhered the bottom portion together with Multipurpose Adhesive.  I cut two 1" strips of DSP and attached them with Multipurpose Adhesive at the back and at the front. 


 The back was covered up by a square of Magnetic Vent Cover (purchased from any home improvement store).  The adhesive in the front was covered up by a Embellished Stitched Nested Label... so the adhesive won't show on either side.


I cut the Stitched Nested Label out of Calypso Coral Cardstock.  The cactus and bloom were both cut with the coordinating dies from the DSP.  I added a double layer of  Purple Posey letters to spell LIST from the Playful Alphabet Dies to the front of the label. The embellished label was adhered with Dimensionals.  So this one is ready to stick on the refrigerator so I can finally find my grocery list!

Thanks so much for stopping by!  Please click the name directly under mine on the below Blog Roll to continue on....


Product List

Tuesday, February 2, 2021

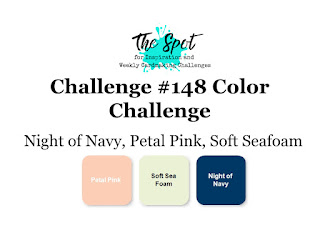
The Spot Challenge #148 - Color Challenge with Night of Navy, Soft Sea Foam and Petal Pink

 Hello and Happy Tuesday!  I hope you are having a fabulous week!!  It's time for yet another new card challenge over at The Spot and this week we have a fun color combination for you!


I love these colors together!  I tried out a new bundle, Brushed Blooms as well as a often used stamp set, Buffalo Check!  Check out what I came up with..


I love anything with Buffalo Check so I decided to use it for my background!  

I started with an 11" x 4 -1/4" Night of Navy cardstock, scored at 5-1/2".  I used my Stamparatus to stamp the Buffalo Check image onto a panel of Basic White Cardstock.  The Stamparatus enables me to stamp over the image multiple times until I get a good image and that sure comes in handy with a large background stamp.  The Buffalo Check layer was cut to 4-7/8" x 3-5/8" and adhered onto a piece of Basic White Cardstock measuring 5" x 3-3/4".  I ran some of the White Polka Dot Tulle Ribbon along the right side vertically and tied it into a bow at the top.  The Buffalo Check layer was adhered with Multipurpose Adhesive onto the Night of Navy Top Folding Card Base.  I stamped the two rose images from the Brushed Blooms Stamp Set in Petal Pink and he leaves in Soft Sea Foam onto scraps of Basic White Cardstock and used the coordinating dies to cut them out.  The sentiment was stamped in Night of Navy onto Basic White and cut out with the Tasteful Labels Dies.  I used the same dies to cut out a larger label in Night of Navy.  The layered labels were added to the card front with Dimensionals. I arranged the roses and leaves around the label with multipurpose adhesive on the label section and with Dimensionals on the portions that hung off of the labels.  Finally I used my Dark Night of Navy Stampin' Blends to color three Basic Rhinestone Jewels and adhered them on the card front.

I love how it turned out!  This sentiment is sooooo me!  lol

Thanks for stopping by!  Blessings, Tina


Product List

Tuesday, January 26, 2021

The Spot Challenge #147 - Get Your Heart On Theme Challenge with Stampin' Up! Whale Done Bundle

 Hi There!  Hope your week is off to a great start!  I'm back over with the Design Team at The Spot with a "love" themed card this week that is just a little different!


Since I don't have a lot of Heart or Valentine's Themed Stamps, I decided to use one of my very favorite sets from the Annual Catalog for an Anniversary Card for my hubby, Jeff!


My anniversary is February 18th, just 4 days after Valentine's Day.  Jeff and I had wanted to get married on Valentine's Day but couldn't work out the logistics of it!  We are huge lovers of Cruises and all things Nautical so I thought that this adorable Whale Done Bundle would work perfectly for an anniversary card!  I love this sentiment!  I can tell you that from going on so many cruises that when you are in the middle of the Ocean on a huge Cruise Ship, you really understand just how BIG the Ocean is!  

I started out with an 8 1/2 x 5 1/2" card base of Pacific Point Cardstock, scored at 4 1/4" I used the Whale of a Time DSP for my background cut 3 3/4" x 5" and matted it on layer of Night of Navy Cardstock that measured 3 7/8 x 5 1/8" for a nice thin border that left a lot of the beautiful Pacific Point Cardstock showing!  I heat embossed the sentiment in White Stampin' Emboss Powder.  The focal Circle was more of the Whale of a Time DSP cut using the largest circle in the Stitched Shape Dies and I backed it with the largest Scalloped Circle from the Layering Circles Dies cut in Night of Navy Cardstock.  I ran a piece of Pool Party 3/8" sheer ribbon around the panel and tied it in a bow on the right side prior to adhering the Circle with Dimensionals.  The Whale was punched out of the DSP as well.. I feel like I totally cheated on this card using so much DSP! lol  I finished this one off by adding three of the Blue Adhesive-Backed Gems... so pretty!

Here's how I finished the inside


The bottom portion of course is from the Whale Done Stamp Set stamped in Calypso Coral and Pretty Peacock with another punched "Whale" from the DSP.  The top sentiment is from the Floral Essence Stamp Set and the bottom sentiment is from the Itty Bitty Greetings Stamp Set.  

Thanks so much for stopping by today!  I hope you have a fabulous week and make some time to get your craftiness on!  Blessings, Tina


Product List