Tuesday, March 3, 2020

Stampin' Up! Postive Thoughts and New Coordinating Natures' Thoughts Dies

Hi There.  I finally had the opportunity to play with the gorgeous Stampin' Up! Positive Thoughts Stamp Set and the coordinating Nature's Thoughts Dies that just came out.  I thought I'd share the cards I made.  The first one used a sentiment from another stamp set since I wanted something that I could use with the classic label punch.


So my first card is a base of Pool Party Cardstock.  The background is some of the Golden Honey DSP (the black and white side) that I had sponged pool party into the top portion and Granny Apple Green onto the lower portion.  I used one of the Stitched Rectangle dies to cut it out and matted it in Pretty Peacock Cardstock.  I stamped the butterfly in Pretty Peacock Ink directly onto the background.  I also did some 1st and 2nd generation statmping of the greenery in Granny Apple Green directly onto the background.  I also stamped the greenery in Granny Apple Green onto Whisper White Cardstock and used the coordinating dies to cut it out.  I stamped the flower in Flirty Flamingo onto Whisper White and cut it out the dies as well.  I cut the feather out in Whisper White Cardstock and some of the small greenery were cut with scraps of Garden Green.  The sentiment from the Special Someone stamp set was stamped onto Whisper White in Pretty Peacock Ink.  I used the Classic Label Punch to punch it out and add it to the right side.  


This was such a simple card.  I used a Whisper White Thick Cardstock base.   The background is from the Pleased as Punch DSP and the sentiment from Positive Thoughts was stamped directly onto the DSP in Blackberry Bliss Ink.  I used the beautiful decorative rectangle from the Nature's Thoughts Dies to cut out my panel and matted it with Blackberry Bliss Cardstock.  The greenery was stamped onto Whisper White Cardstock in Granny Apple Green and the flower and butterfly were stamped in Blackberry Bliss and all cut out with the coordinating dies.  The die cut greenery was added with Multipurpose Adhesive directly onto the rectangle and the flower and butterfly were popped up with Dimensionals.  So simple and yet so pretty!

Thanks so much for stopping by!  I hope if you already have this stamps and dies that you have taken the time to play with them.  They really are so pretty!  Blessings, Tina


/strong>

The Spot Challenge #100 Getting To Know You Designer's Choice Challenge

Hi There.  I hope you are having a great day so far!  I have some super exciting news for you!  I had the honor of joining an awesome Design Team for a fabulous new weekly card challenge blog called The Spot.  I hope you'll stop by check and it out and be sure to play along with us each week.  The new Challenges go live on Tuesday mornings at 7am Eastern time.


 This week's Challenge at The Spot is a Getting To Know You, Designer's Choice Challenge!   If you click on the Challenge Graphic below it will take you straight to the Challenge Post where you can check out inspiration from the super talented Design Team.  I really believe this will be "The Spot" for inspiration and card making challenges to check out each week!  I hope you agree!


Since this week is all our choice of products, I decided to pull out one of my favorites from the Mini Catalog... Poppy Moments Dies!  I also used the awesome Peaceful Poppies DSP, Painted Label Dies, Stitched So Sweetly Dies,  Label Me Bold Stamp Set, and Sending You Thoughts Stamp Set on this fun Gate Fold Card.  I know.. I know.. I was all over the place with stamps and dies on this one!  There are so many great current products out now... I just couldn't help myself! 


To make this beautiful Gate Fold Card Base, I started with an 11' x 4 1/4" piece of Basic Black Card Stock and scored it at 2 1/4" and 6 3/4".  For the DSP layers, the Peaceful Poppies DSP was cut into 4 panels of 1 7/8" x 5 1/4" and 1 panel cut at 4" x 5 1/4" (I used the reverse side of the DSP for this one.. such a pretty Red ).  


You'll notice I also used one of the Stitched Scallop Rectangles from the Stitched So Sweetly Dies  on the inside.  The sentiment on the Inside is from the Sending You Thoughts Stamp Set.

So let's get back to the outside of this beautiful card....


After I added the DSP panels to the outside of my Gate Fold Card, I added one of the large Label Dies from the Painted Label Dies, cut in Basic Black, by centering it but adding Dimensionals only onto the left side of the card front.  I used Basic Black Cardstock to cut out the outlines and the centers of the poppies and used more of the DSP reverse side (that looks like Watercolored Red Wash) for the large flowers.  I backed those with some Real Red Cardstock scraps to add a little more strength to them.  The leaves were cut from scraps of Old Olive and Mossy Meadow Cardstock.  I arranged everything and adhered it to the Black Label Die.  I stamped the Label Me Bold "Happy Birthday" sentiment in Old Olive and Fussy Cut it and then adhered it only to the right side of the card front.  I finished it off by added some Clear Wink of Stella to the Basic Black flower centers and adding 3 sequins from the Peaceful Poppies Sequins.  All products used are linked at the end of the post in case you are interested in adding any of these to your inventory.

If you haven't made a Gate Fold Card, I hope you'll try one.  They are an easy fun fold but really beautiful.  Thanks so much for stopping by!  Blessings, Tina 


Product List

Wednesday, February 26, 2020

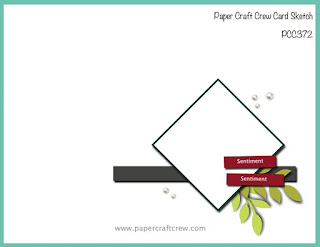
PCC372 Sketch Challenge with Stampin' Up! Timeless Tropical again!

Hello and Happy Wednesday!  I'm half way through the work week so that's a super big Woo Hoo!

Paper Craft Crew has another fun sketch up for you to try out this week!


Are you tired of my obsession with Stampin' Up! Timeless Tropical yet?  I can't seem to get enough of it!  This time I used the Palm Trees along with the coordinating dies for them as well as the additional leaves and flowers.


The background was cut using one of the Stitched Rectangle Dies with one of the Follow Your Art DSP sheets.  I thought the pattern and the beautiful coastal cabana had the "beachy" feel I was going for.  I matted that layer with a thin layer of Early Espresso Cardstock.  I used the second from the largest of the Stitched Shapes Squares for my Whisper White to back the trees.  I also used a thin matt of Early Espresso on the stitched square.  To stamp the Palm Trees on a scrap piece of Whisper White Cardstock, I used my Stamparatus Stamping Platform along with Stampin' Write Markers in Garden Green, Mossy Meadow, and Soft Suede.  I used the same markers on the sentiment from Label Me Bold Stamp Set.  To split the Happy Birthday into two seperate sentiments, I used the side of my marker just past the word and used a scrap of paper to make sure the edge was fairly straight.   I fussy cut the seperate sentiments out ... luckily it is just straight lines so really easy! So did you happen to nice that little bit of grass at the bottom of my diamond??  Well I couldn't let my palm trees just hang out there without ground or grass so I used the new Special Days Dies to cut a little sliver of grass in Garden Green Cardstock.  Once I had the grass cut I used the same stitched square to stitch the sides so it would fit right into the corner.  

Here's the inside of my card...


I kept the inside super simple by adding the rest and relax sentiment from Timeless Tropical along with three of the flowers from the coordinating dies.  


Thanks so much for stopping by!  If you need any of the products mentioned, below is the link to my Stampin' Up! Website!  Blessings, Tina


Product List