Thursday, March 12, 2015

OSAT Spring Flowers Blog Hop


Hello and Welcome to One Stamp At a Time's Spring Flowers Blog Hop!  After the winter we've had, I can tell you here in Middle Tennesse we are READY for some Spring weather along with Spring Flowers!    I hope you enjoy my Spring Flower inspired card!


My Wild Wasabi Card Base was topped with a layer of Whisper White CS that was
embossed with the Lovely Lace embossing folder.  Another layer of the beautiful new
Painted Blooms DSP  was mounted on more Wild Wasabi with a linen thread bow that
was topped with a white resin  flower from the Artisan Embellishment Kit.  The
sentiment is from  the Painted Petals stamp set  and was stamped in garden green on
whisper white that was again mounted on the Wild Wasabi.  Ok, so back to the bow..
I'm pretty proud of how this  turned out since bow making is NOT my gift! 


 I recently watched a tutorial from fellow OSAT blog hopper, Billie Moan entitled 
Beautiful  Bows.  I can assure you her bows are always stunning!  Although I
realize that my bow is not nearly amazing as her bows are, I really found her
tutorial helpful.  If you'd like to watch her Beautiful Bow tutorial, you can find it
 Here

After adding a few SU Rhinestone Basic Jewels and some Doodlebug Limeade
Sequins, I  called this one done!  I hope you've enjoyed my card and make sure you
 stop by the next Blog on the Hop by either clicking the Next button or following the
 links on the OSAT Blogger List.


Next up Megan


OSAT Blog Hoppers:

Eva - http://evascardsandthings.evabussom.com/…/osat-blog-hoppers…
Elizabeth - http://craftsbyhappystamper.com/…/…/spring-flowers-blog-hop/
Debbie - http://www.davdesigns.com/…/osat-blog-hoppers-spring-flower…...
Tina - http://tinascropshop.blogspot.com/…/osat-spring-flowers-blo…  you are here
Megan - http://meganttstamps.blogspot.com/…/osat-blog-hoppers-sprin…
James - http://stampinstud.blogspot.com/…/osat-showers-bring-spring…
Holly - http://hollyshobbs.blogspot.com/…/osat-blog-hoppers-spring-…
Darla and Nancy - http://stampinwithdarlaandsisters.blogspot.com/…/osat-blog-…
Andrea - http://onestampinmothertucker.blogspot.com/…/osat-blog-hopp…
Diane - http://stampandembellish.com/…/osat-blog-hoppers-spring-flo…
Martie - http://martie-pollard.squarespace.com/…/spring-flowers-osat…
Justin - http://jkcardsonline.com/20…/…/osat-spring-flowers-blog-hop/


The Stampin' Up! Products used are:
Built for Free Using: My Stampin Blog


Non-Stampin' Up! Product used:  Doodlebug Limeade Sequins


Blessings,

Tina

Saturday, March 7, 2015

Traveler Card Set Day

Today I've been working on a few masculine card sets to sell using one of my favorite sets by Stampin' Up! "Traveler".  I love the vintage feel of the images and what man doesn't LOVE trains and ships, right??  My set consists of  a Z-Fold Birthday Card, a Gift Card Holder, a Reflection Technique Card, and a Watercolored Background World Map Card.  I really love them all and I hope you will too!


If you are interested in any of the Stampin' Up! Products used, below is a list.  

Thanks for stopping by!  Blessings!  Tina


Built for Free Using: My Stampin Blog

Tuesday, February 17, 2015

Shine like the Stars in the Universe in Bokeh

Well here I am with yet another Banner Blessings card.  I absolutely LOVE this stamp set!  I used a brand new to me technique today.  I know the Bokeh technique has been around but today was the first time I had tried it and I really had fun creating with it.  I started with a base of whisper white cardstock and sponged in tempting turquoise, soft sky, and so saffron in various areas.  I made a template out of a window sheet that I had cut out the 3 smallest sizes of circle framelits.  I sponged whisper white craft ink into the circles in various sections, going with a lighter touch on the larger circles and heavier on the smaller ones.  I then used a sponge dauber with an even heavier coat of the white craft ink in a few areas.  After allowing the craft ink to dry, I heat embossed the Shine sentiment using Gold Stampin' Emboss Powder.   I added some punched as well as die cut stars from the brushed gold cardstock.   I also added a few gold flat sequins cut from the gold sequin trim.   Easy Peasey and lots of fun!

Here's my card..

If you haven't already tried this technique, I hope you'll try it.!  It really is a lot of fun to make!

Blessings,

Tina

Stampin' Up! Materials Used:

Built for Free Using: My Stampin Blog


Non Stampin' Up Materials Used:

Little B's Stitched Star Dies

Monday, February 16, 2015

Fun with Watercoloring Backgrounds and Banner Blessings

One of my very favorite of the newer Stampin' Up! Stamp Sets is Banner Blessings.  I am thrilled for my sweet friend Holly Stene because she designed that set.  Any time you can add some of the God's Word to a card, it is a good thing in my thinking and this set is all about that!

The background panel was a watercolor technique that was achieved by putting 3 colors of Stampin' Ink on an acrylic block and then spritzing with water and pushing or smooshing the block down onto watercolor paper.  I also spritzed a little water directly onto the paper after the ink was smooshed onto it.  I then ground up a little sea salt over the background and allowed the dry.  The salt absorbs some of the water and makes a speckled effect on the background. One the background is dry, just brush off the salt.   It is a super fun technique.  I hope you'll try it!

I've also used the Butterfly Basics stamp set, as well as a Vintage Stampin' Up! Set called Of the Earth.


The card base was Coastal Cabama with a layer of Mossy Meadow.  The watercolor background was created using water color paper.   Ink colors used in the smooshing were Mossy Meadow, Tempting Turquoise, and Hello Honey. The flower image was stamped with Stazon Black onto the watercolor paper after the background technique was achieved. The butterflies were stamped with Stazon onto Gold Cardstock The greeting was stamped onto Naturals White Cardstock with Memento Tuxedo Black Ink.  Both the greeting and the watercolored panel were mounted on a layer of Basic Black Cardstock for contrast.

Hope you love the way this card turned out as well as I did.

Blessings,

Tina


Sunday, February 1, 2015

CanYouCaseIt on Super Bowl Sunday? Well I'll sure try!

Everyone loves a Challenge Right?  Well today is Super Bowl Sunday and since the game doesn't start until later tonight it seems like this afternoon is a good time to take on CanYouCaseIt's Sunday Challenge.  You can find it here

This week's challenge is a great sketch and I love all of the cards posted by the Design Team so please make sure you check them all out!  Here is the sketch that I am casing:


One of my new favorite Stampin' Up! Stamp Sets is the Butterfly Basics Set and it currently offered as a bundle with the Butterfly Thinlit Dies.  It is an amazing set with great images as well as sentiments.  It really is a must have!  

Here's my card for today using the Butterfly Basics Set as well as the medium butterfly thinlit die:


Now I have a confession to make.  I absolutely love the look of a cut apart sentiment like I used on my card and I've done it many times but for some reason it never occured to me to do it with this sentiment.  A sweet facebook friend Holly Stene had done it on a fabulous card that she made a few days ago and I told her I would definitely need to case it.  Well since she gave me the inspiration, please check out her blog here

I hope you have a wonderful day and can celebrate your pick's win in tonight's game!

Blessings!

Tina


Materials Used today:

Stamp Set: Stampin' Up! Butterfly Basics Stamp Set

Dies: Butterfly Thinlits

Cardstock: Stampin' Up! Whisper White, Mossy Meadow, and Gold Cardstock

Ink: Stampin' Up! Mossy Meadow, Hello Honey, and Soft Sky

Sunday, January 18, 2015

"FROM THE HERD" STAMPIN' FUN!

I absolutely fell in love with the new Stampin' Up! set "From the Herd" in the Occasions 2015 Catalog.  There are so many stamps and so many possibilities!  I decided to run with the "just looking in on you.." sentiment from this set and have the herd looking in from the outside.  I cut a window out with a Taylored Expressions "Arch Window" die.  I stamped my herd image and colored the entire image in with my blendabilities but then had to cut off the portion of the image that wouldn't show through the window.  Being frugal and not wanting to waste the rest of the colored in image, I decided to fussy cut the left edge of the image and glue it to the inside of the card.  I really like the way that touch added a little something extra to this card. The little bird was actually in another part of the image but I cut him out and put him on the edge of the window sill.   The "You're How Old?" and "woo-hoo!" sentiments were from the "Just Sayin'" Stampin' Up Set.  I think they were a perfect addition on the card. I used the word bubble framelits to cut out those as well as the "Just looking in on you..." sentiment from this new "From the Herd" set.

This card was special to me as it was for my youngest son's 28th birthday.  Wayne is quite the jokester so I knew that I wanted a humorous card.  He really loved the card I created for him and I hope that you do too!


Used on this card were:

Stampin' Up! From the Herd Stamp Set
Stampin' Up! Just Sayin' Stamp Set
Stampin' Up! Word Bubble Framelits
Stampin' Up! Blendabilities
Stampin' Up! Adventure Bound Designer Series Paper Stack
Stampin' Up! Smokey Slate and Whisper White Cardstock
Stampin' Up! Early Espresso Ink
Memento Black Ink
Stampin' Up! Dimensionals
Taylored Expressions Arched Window Die

Sunday, November 2, 2014

Happy Fall Y'all

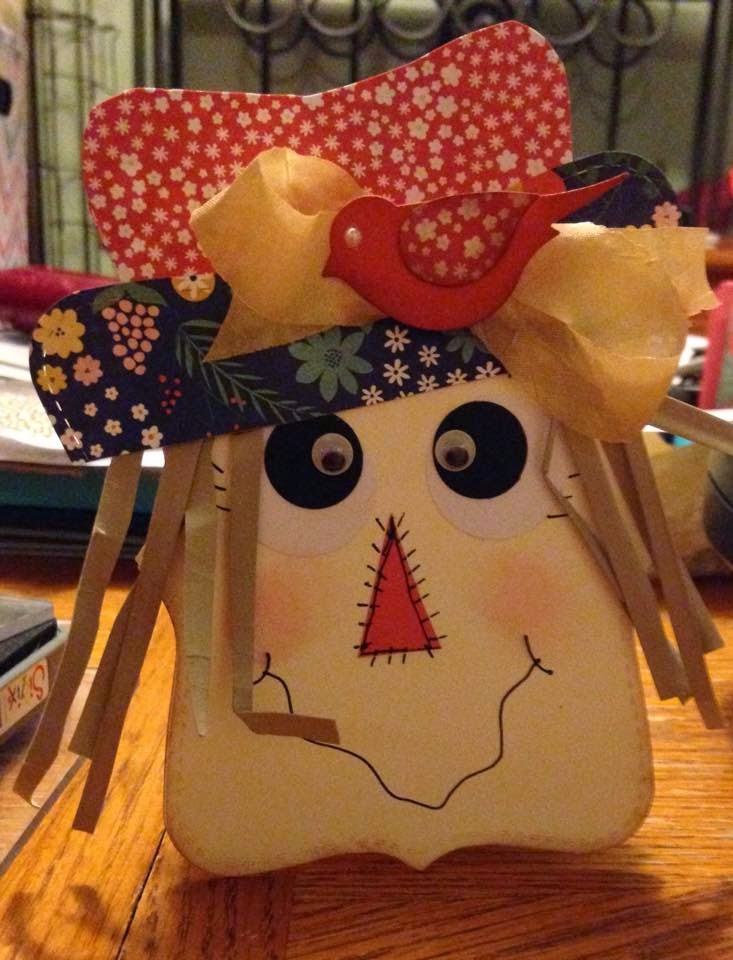
I love the colors of Fall!  Unfortunately the changing seasons put me a bit under the weather this year.  I finally went to the doctor Friday and have enough medication that I'm beginning to feel like crafting again.  Since I had been sick I had not been able to get Halloween Cards made and mailed out to our Granddaughters.  One of our sweet granddaughters, Taylor, had chosen a scarecrow theme for her Halloween card this year so instead of a Halloween Card, she, along with the others, will get the scarecrow as a Welcome Fall Card.  Made perfect sense to me!  lol


I had seen a Scarecrow Punch Art card on Pinterest and tried to recreate it using the Top Note Bigz Die from Sizzix/Stampin' Up!.

Here's my card...

I cut the card base from the top note die with a folded piece of vanilla cardstock with the fold just below the top so that the folded portion doesn't cut. I then cut a second flat vanilla cardstock piece with the top note to make my face and glue to the top of the card base. For the scarecrow's face I began by drawing in the mouth with a Basic Black Stampin' Write Marker. Then I cut a little triangle for the nose and drew in the stitching. The eyes were punched out of 1" whisper white cardstock and 5/8" black cardstock and a basic little googly eye was glued onto the black. I also drew in the eye lashes. The hat is cut from the top note die as well. The top part is long side up with the point cut off and with it indented downwards. The bottom of the hat is a piece of coordinating DSP that has been cut with the top note die in a horizontal position. Since I didn't have raffia, I just cut thin strips of crumb cake cardstock that I used for the hair.  I glued that on the under side of the hat before attaching and then bent the strips with a bone folder. I glue dotted a bow on the hat. Punched a bird out of coordinating cardstock and punched the wing out of the same DSP that I used for the top of the hat. Sponged the edges with brown ink and sponged the scarecrow's cheeks with a little pink ink. I really like the way he turned out and I'm sure our granddaughter's will too!

Hope you have a blessed day!

Stampin' Up! Items Used were:

Top Note Die
Flower Pot Designer Series Paper
Very Vanilla Cardstock
Basic Black Cardstock
Whisper White Cardstock
Tangelo Twist Cardstock
Crumb Cake Cardstock